Depth of field is one of the most versatile tools we have as photographers, yet it’s often misunderstood or used without much intention. In this article, I break down three simple composition rules to help you decide when to shoot wide open, when to close down, and when to land somewhere in between. These guidelines aren’t about rigid formulas—they’re about building a practical framework so you can approach any scene with clarity and use depth of field to strengthen your storytelling.
Video: 3 Simple Compositional Rules on How to Use Depth of Field
In this video, Pye shares three photography composition rules for controlling depth of field, specifically in relation to when we should shoot wide open vs. closed down apertures (or anywhere in between).
We’ve teamed up with Adorama to bring you a new series of photography tutorials called “Master Your Craft” to be featured on their YouTube Channel. Subscribe to see more of our videos on their channel throughout the next couple of months that will cover photography, lighting, posing, and editing education to help you hone your skills and master your craft.
I’m a huge fan of creating guides and simple frameworks to help photographers understand the thoughts and techniques that go into capturing great images. That said, I’d like to breakdown three photography composition rules regarding depth of field to help you use it to control your focus and make the most of the scene.
Rule 1: Shoot Wide Open with Busy Backgrounds
Whenever your background is busy or otherwise undesirable, you’ll generally shoot with a wide-open aperture. The shallow depth of field you get when shooting wide open on a prime lens at anywhere from f/1.2-f/2.8 will help create separation and depth between your subjects and the background.

The image above features what I would argue is a busy background. It’s not a terrible background, by any means, but with a closed-down aperture, the detail in the background would quickly become distracting. I tend to shoot scenes like this at a wider aperture. For this image, I could’ve gone all the way to f/1.4 using Sigma’s 105mm prime lens, but I felt f/2.8 gave me enough separation and depth of field while maintaining a good amount of detail, especially in the subject’s face.

The scene in the image above falls under the undesirable category. We were shooting in a parking lot in full view of a curb, bushes, chainlink fence, and closed-down railroad tracks. For this shot, I took advantage of the wide f/1.4 aperture on the Sigma 50mm prime lens and created as much separation and depth of field as possible. You’ll notice I’ve also underexposed the shot and added flash to the subject to further conceal the less-than-ideal background.

Although the scene above is set in a beautiful location, it’s still a bit busy. Plus, if I were to capture this image with a closed-down depth of field, you’d see the tops of a lot of warehouses. This is an example of a generally nice looking scene that still benefits from the use of a shallow depth of field.
[Related Reading: One Simple Trick to Better Compositions in Your Photography]
Rule 2: Shoot Closed Down with Better Backgrounds
If the background looks great, there’s really no reason to blur it into oblivion with a wide open aperture and an insanely shallow depth of field (unless it’s a stylistic choice on your part). The better the scene looks, the less we have to do to manipulate the scene to get our shot.

When I shoot on-location with beautiful scenery like that featured in the image above, I tend to shoot with a wider focal length and close down the aperture. I want depth in the scene to showcase the elements that make the location unique and beautiful.

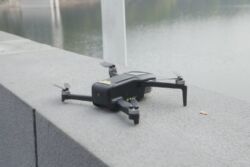
For the shot above, I wanted to use the hills in the background as leading lines to guide the viewer to my subject, and I also wanted to capture both the drone and the subject in focus. At a wide open aperture, I would’ve lost the depth I was trying to preserve in this type of photo with the goals I mentioned.

Whenever you have a scene with a lot of depth and a beautiful background, don’t hesitate to close down the aperture a bit. If there were cars or other distracting elements in the image above, I would’ve either chosen another angle or opened up the aperture and focused on the elements in the frame that I was trying to feature. My general rule when shooting a scene, in which I want most of the objects in focus, is to shoot somewhere between f/7 through f/11.
As for where to place the focus point, try to find a feature worthy object somewhere deeper in the shot. For the photo above, I focused on the mandap. When you focus on objects closer the the camera, the background falls out of focus more quickly. Again, it all depends on which object you want to highlight in the scene.

When I saw this scene unfold in Banff (featured in the image above), I knew I wanted to create a starburst effect for the sun flare peeking over the horizon. I also wanted to keep the details in the image tack sharp overall. To do this, I closed down the aperture to f/7.1.
Rule 3: Shoot Mid-Range Aperture when Using Foreground Elements
When we’re trying to work with foregrounds and preserve a bit of depth in our shot, set your aperture somewhere in the mid-range between wide open and closed down. We tend to get locked in to shooting wide open, whether it’s best for the shot or not.

To illustrate the case for shooting with a mid-range aperture, see the image above. In this shot, you can see the aperture is set to f/4. Had I shot it wide open (the Sigma lens opens up to f/1.4), the subject in the foreground would’ve become an unrecognizable, blurry blob. On the other hand, at f/7 or f/11, the subject’s presence in the foreground would start to compete with our intended area of focus.

In another shot from a location shared earlier in the article, I used a mid-range aperture (f/2) as opposed to wide open (f/1.4) in order to preserve more detail in the grass (but not enough to make it distracting).

In the photo above, I added a foreground element to the landscape image in Banff I shared earlier. In the shot, I used the branches in the foreground to frame the scene. The branches were very close to my camera position, so I chose to use a mid-range aperture to keep the branches somewhat in focus. If I’d shot at a wider aperture, the branches would’ve become unrecognizable and been less effective for framing the shot. If possible, use Live Preview to dial in your aperture in real time.
[Related Reading: Use This Trick for Better Photography Composition in Any Portrait]
Bonus Tip: Several Factors Influence Depth of Field

Keep in mind, all of the following factors will influence the depth of field in your photos:
- The distance between your camera and your subject
- The distance between your subject and the background
- The aperture setting on the lens
- The focal length of the lens

To Illustrate this point, see the image above. Even at f/2.8, which is a wide to mid-range aperture, everything is in focus because of the other factors at play regarding distance.

This same lens, however, produces drastically different results in terms of depth of field when we move in closer to our subject (see the image above). Bringing the camera closer to the subject exaggerates the characteristics of the depth of field.
Conclusion
In addition to using the rule of thirds, leading lines, and other tools for composition, you can add depth of field to your bag. Now, it’s time now to go put these concepts into practice. If you’re looking for more education from start to finish on lighting, posing, editing, or even running a photography business, check out our library of workshops at slrloungeworkshops.com.