
When photographers think about composition, we often think about concepts like rule of thirds, leading lines, negative space and other “rules” that guide the balance of a photograph. We sometimes overlook lighting as a compositional tool that can play a key role in directing your viewer’s focus in a photograph. In this video, we’re going to show you how to use lighting for composition in portraits.
Video for Using Lighting for Better Composition in Any Portrait
Today’s compositional trick is as simple as this: Place your subjects in the brightest area of the frame. Here are the steps we took to use this trick to full effect and create a solid portrait.
Step 1. Look at the Lighting when Scouting a Scene
When you’re walking through a location and scouting for the perfect scene, consider how light will affect your composition. As we scouted our location for this tutorial, I noticed in one particular spot how the sunlight reflected off the building in the background and created a nice graduation of brightness in the area, perfect for a portrait. The location also created a natural backlight for the couple after I placed them into the scene. Even though we were shooting at noon, the buildings served as natural reflective objects to aid creating directional light for our portrait.
[Related Reading: 6 Techniques to Create Great Images Anywhere]
Step 2. Use Objects in the Scene to Add Foreground and Help Frame The Image

In this particular location, I was able to use the tree in the foreground to frame the couple and help separate the light and dark areas of the frame, keeping the couple positioned in the brightest area. Not every location will offer such objects, but I recommend looking for them and using them if possible when scouting for spots.
Step 3. Dial In Your Exposure

Only after I’ve chosen a location and placed my couple do I pick up my camera to dial in the settings and capture the portrait. When I’m ready to get the shot, the first thing I do is dial in my exposure. Using the histogram in live view mode also helps retain an adequate amount of shadows and highlights (depending on your preference) when dialing in your exposure. Also, for this portrait, I chose to shoot at an aperture of f/2.8 (as opposed to a wide open aperture) to retain more detail in the scene and add extra sharpness to the surrounding objects.
Step 4. Pose Your Subjects
For more information on posing, be sure to check out our Official Posing Guide with tips, cues, and more. For this image, I directed the couple into a closed pose (one of our five foundation poses) to keep them close together and take advantage of their profiles. This pose works especially well for couples in engagement and wedding portraits.
[Related Reading: Complete Guide to Engagement Photography – 10 Tips & Tricks for Better Photos]
Step 5. Edit to Taste
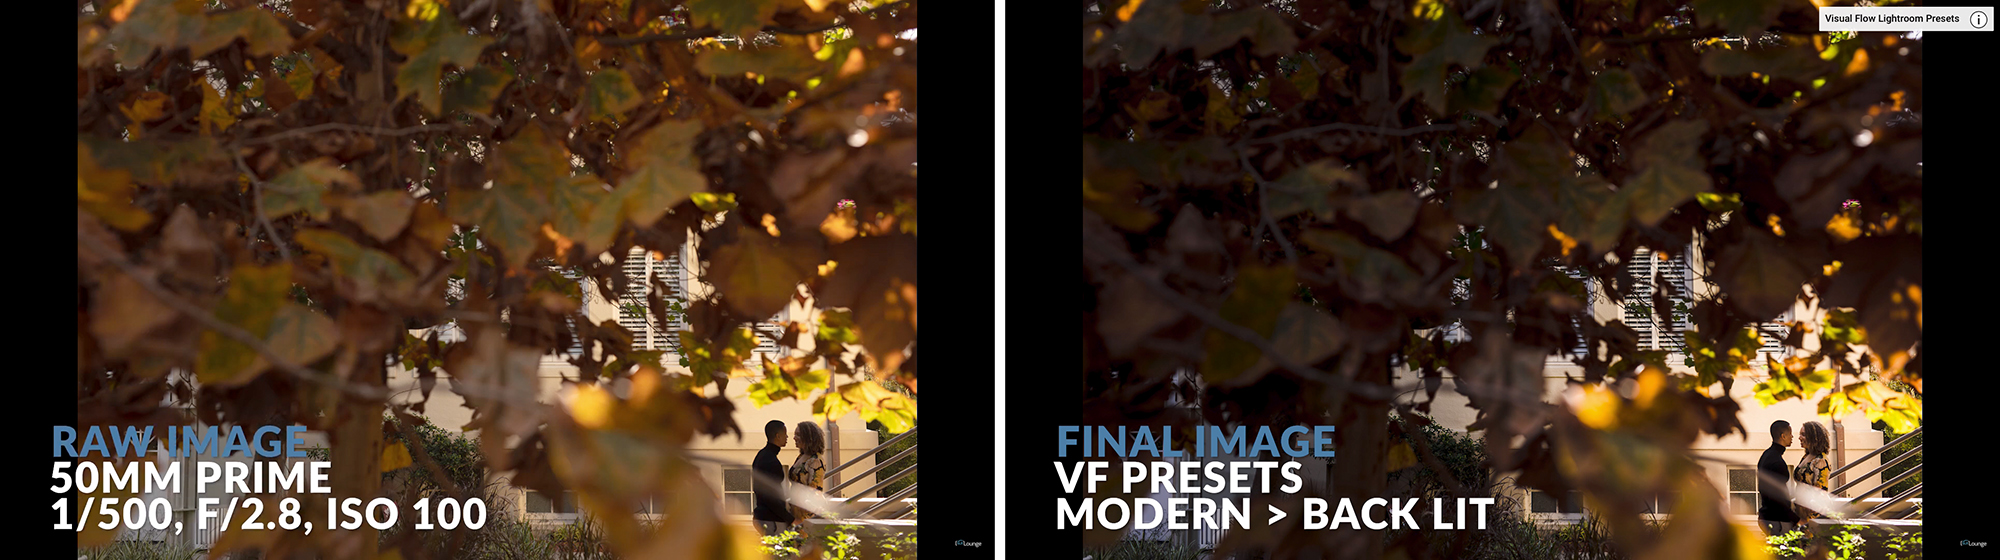
To complete the look, we chose the “Back lit” preset from our new Visual Flow Preset system. You can see in the before and after image above how we accentuated the couple by placing them in the brightest area in the frame. The preset further highlighted the contrast between the light and dark areas.
We hope you enjoyed this video and lesson, which is part of our new Natural Light Photography Workshop (release date coming soon). In this forthcoming workshop, we’ll visit several locations and cover posing, positioning, angles and more to show you how to you can use whatever camera gear you have with you to capture incredible portraits.
Thank you to our models Maury and Courtney. For more tutorials and lessons on composition and other photography fundamentals, check out our Photography Fundamentals Training System!


Get Connected!