Every camera body ships with at least four shooting modes, and most photographers settle into one or two of them within their first month of shooting — then never revisit the question. That’s a mistake. Each mode exists because it solves a specific problem, and reaching for the wrong one costs you shots.
This guide covers Auto, Aperture Priority, Shutter Priority, and Manual — what each one actually does, when each one is the right tool, and where the common misconceptions are. We’ll also cover HDR bracketing, exposure compensation, and the cases where “just shoot Manual” is genuinely bad advice.
We’ve shot professionally across weddings, portraits, and landscape work using all four modes depending on the situation. The recommendations here reflect that, not a preference for any single mode as a philosophy.
This article is part of our Learn Photography guide.
→ See the complete Learn Photography guide
What camera modes actually control
Camera modes determine which parts of the exposure triangle you set manually and which parts the camera sets automatically. The exposure triangle has three components: shutter speed, aperture, and ISO. Every camera mode is a different arrangement of control over those three settings.
Manual gives you all three. Auto takes all three away from you. Aperture Priority and Shutter Priority split the difference in opposite directions. Understanding that framework makes the whole system intuitive — there’s no mystery to any of these modes once you see them as dial positions on a control spectrum rather than distinct, unrelated features.

Auto mode
Auto mode hands the entire exposure decision to the camera. Shutter speed, aperture, ISO, white balance, flash — the camera evaluates the scene through its metering system and selects all of it. You frame the shot and press the shutter. That’s the full extent of your involvement.

Modern cameras are genuinely good at this. In straightforward lighting — outdoor daylight, well-lit interiors — Auto mode produces correctly exposed, sharp images. For someone handing a camera to a stranger for a group photo, or for a family member who picked up your camera for one frame at dinner, Auto mode does exactly what it should.
The limitation is creative control. Auto mode can’t know that you want the background blurred, or that you need a fast enough shutter to freeze a child running. It guesses at what a “good” exposure looks like and applies it. For most casual snapshots, that guess is fine. For any situation where the look of the image matters as a deliberate choice, Auto gives you no leverage.
That said, there’s no shame in using it when the moment matters more than the settings. The best photo of a birthday cake is the one that exists, not the one you were still dialing in Manual for when the candles were blown out.
Aperture Priority mode
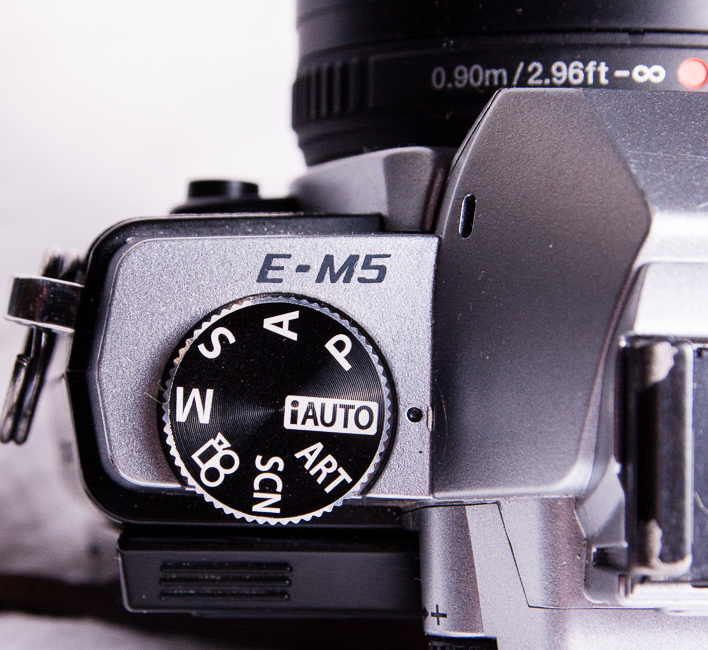
Aperture Priority (labeled “A” on Nikon, Sony, and Fuji; “Av” on Canon) lets you set the aperture while the camera automatically selects a shutter speed to produce a correct exposure. You also control ISO manually — or let Auto ISO handle it if you prefer.

This is the most widely used semi-automatic mode among working photographers, and for good reason. Aperture is the setting with the most direct creative impact on the look of an image — it controls depth of field, which determines how much of the scene is in focus and how the background renders. By controlling aperture yourself, you’re controlling the most visually important variable. The camera handles the shutter speed math.
In practice: set f/1.8 for a portrait with a blurred background and the camera picks whatever shutter speed produces correct exposure at your current ISO. Set f/11 for a landscape where you want edge-to-edge sharpness and the camera adjusts accordingly. You stay focused on framing and depth of field while the exposure adapts to the light.
The one thing to watch in Aperture Priority
The camera sets shutter speed based on its metering reading, which means in low light the shutter can drop to speeds that introduce motion blur or camera shake without you noticing. Keep an eye on the shutter speed readout — if it drops below a safe handholding threshold for your focal length, raise your ISO rather than accepting a slow shutter. Most cameras now support Auto ISO with a minimum shutter speed floor, which automates this tradeoff cleanly.
The other tool you need in Aperture Priority is exposure compensation — the +/- dial that tells the camera to expose brighter or darker than its metered suggestion. Backlit portraits, snow scenes, subjects against very bright or very dark backgrounds all tend to fool the meter. A quick +1 or -1 stop of compensation corrects the result without switching modes. Learn to use it fluently and Aperture Priority becomes a highly capable tool even in difficult light.
Tips for shooting in Aperture Priority
- Start at your camera’s base ISO (usually ISO 100 or 200) for the cleanest files, and raise it when the camera-selected shutter speed drops too low.
- In dim light, watch the shutter speed the camera selects. Below roughly 1/focal length is where camera shake becomes a risk — raise ISO before that happens.
- Use exposure compensation actively. Bright backgrounds, backlit subjects, and scenes with lots of white or black all require a manual correction to the metered exposure.
- Aperture Priority is the mode most wedding and portrait photographers default to during candid, fast-moving coverage. It keeps depth of field intentional while freeing attention for composition and timing.
Shutter Priority mode
Shutter Priority (labeled “S” on Nikon, Sony, and Fuji; “Tv” for Time Value on Canon) is the inverse of Aperture Priority: you set the shutter speed and the camera selects the aperture. You control ISO independently, or set Auto ISO.

Shutter Priority is the mode built for motion. You choose how motion is rendered — frozen or blurred — and the camera handles exposure. For a sports photographer who needs 1/1000 sec to guarantee a frozen frame regardless of light, Shutter Priority lets them lock that in without recalculating aperture every time clouds shift.
It’s also useful when camera shake is the problem rather than subject motion. If shots are coming out slightly soft and you suspect handholding at too slow a shutter speed, switching to Shutter Priority and setting a faster speed is often faster than diagnosing the issue in Manual.
Shutter speed starting points for common situations
- Walking subjects: 1/250 sec
- Running, active children, dancing: 1/500 sec
- Sports, athletes at speed: 1/1000 sec or faster
- Birds in flight, motorsport: 1/2000 sec or faster
- Intentional water blur: 1/15 sec or slower, camera on tripod
- Light trails: 5–30 seconds, tripod required
The reciprocal rule applies in Shutter Priority just as in any other mode: your minimum safe handheld shutter speed denominator should equal or exceed your focal length. A 200mm lens needs at least 1/200 sec. On a crop sensor body, apply the equivalent focal length — a 135mm lens on a 1.5x crop body behaves like 200mm, so 1/200 sec is the floor, not 1/135 sec. For more on shutter speed and motion, see our full shutter speed guide.
The limitation of Shutter Priority
When the camera selects aperture, it may open up to f/1.8 or stop down to f/16 in ways you didn’t intend — changing your depth of field as a side effect of chasing correct exposure. In bright outdoor light with a fast shutter speed, the camera may hit its minimum aperture and still overexpose. Pay attention to the aperture the camera selects and switch to Manual if depth of field matters as much as shutter speed.
Manual mode
In Manual mode, you set shutter speed, aperture, and ISO. The camera’s meter provides a reference reading, but it doesn’t act on it — every setting is your decision.

Manual mode is essential when using flash — the camera’s meter can’t account for strobe output.
Manual mode is not a sign of skill, and it isn’t the right mode for every situation. What it is, is the right mode for specific situations where the camera’s metering can’t be trusted or where you need complete consistency across frames.
When Manual mode is genuinely the best choice
Flash photography. The camera’s meter reads ambient light only — it can’t predict or account for the output of an off-camera strobe. In any controlled flash setup, Manual is standard. You set the ambient exposure, then dial in flash power separately to add light where you want it. Trying to use Aperture Priority with flash leads to inconsistent results because the camera keeps adjusting shutter speed based on ambient readings that no longer reflect the final lit image.
Studio work. Same principle as flash — controlled light, consistent settings, no reason to let the camera second-guess the exposure.
Panoramic stitching. When shooting multiple frames to stitch into a panorama, exposure consistency across frames is critical. Any variation in aperture or shutter speed between frames creates tonal seams in the final stitch. Manual locks every variable in place.
Consistent lighting situations. A well-lit event venue where the light doesn’t change, a studio setup, a scene under constant artificial light — anywhere the conditions are stable, Manual lets you lock in your settings and stop thinking about exposure entirely. This frees mental bandwidth for composition and timing.
Video. Exposure fluctuation is far more disruptive in video than in stills. Most videographers shoot Manual or Manual with Auto ISO as a nearly universal standard.
When Manual mode is not the best choice
In fast-changing light — moving between indoor and outdoor locations, a ceremony transitioning from shade to full sun, clouds rolling across the sky during a landscape session — Aperture Priority adapts automatically while Manual requires constant adjustment. An Aperture Priority shooter with good exposure compensation habits will often get more keepers in rapidly changing conditions than a Manual shooter who’s one step behind the light.
Manual mode requires more attention to the exposure triangle at all times. That’s a feature in controlled situations and a liability when you need to be fully focused on the moment unfolding in front of you.

Camera modes for HDR photography
HDR photography involves capturing multiple frames at different exposures and merging them in post to recover detail in both highlights and shadows. The mode you shoot in affects how the camera varies those exposures — and which mode you choose matters for consistency.

For HDR, Aperture Priority is the recommended semi-automatic mode — it keeps depth of field consistent across bracketed frames.
For HDR, use Aperture Priority or Manual. Avoid Shutter Priority. Here’s why: in Shutter Priority, the camera varies the aperture between bracketed frames to achieve different exposures. A changing aperture means changing depth of field across frames, which creates alignment and blending problems when you merge the images. Aperture Priority varies the shutter speed instead, keeping depth of field constant — exactly what you want for a clean merge.
If you’re comfortable in Manual, it gives you the most control: set your median exposure, then manually adjust shutter speed between frames to bracket above and below it. The aperture never changes, and your bracket increments are precisely what you set rather than what the camera calculates. Most cameras also support Auto Exposure Bracketing (AEB) in both Aperture Priority and Manual, which automates the sequence of exposures — use it with continuous drive mode and a remote shutter release or self-timer to minimize vibration between frames.
Which camera mode should you use?
The honest answer: it depends on the situation, and the photographers who produce the most consistent work are usually the ones who move fluidly between modes rather than committing to one.
Most working photographers default to Aperture Priority for candid, documentary, and available-light portrait work — it keeps depth of field intentional while the camera handles exposure adaptation. They switch to Manual for flash work, studio setups, and any situation requiring frame-to-frame consistency. They use Shutter Priority for sports and action when shutter speed is the non-negotiable priority. Auto mode surfaces when the camera is being handed to someone else.
The goal isn’t to prove you can shoot Manual. The goal is to get the image. Use whatever mode gives you the most control over the variables that matter in the moment you’re in.
If you want to build fluency with all four modes through structured practice exercises rather than trial and error, our Photography 101 Workshop covers the full exposure triangle in the context of real shooting situations — with assignments designed to build that mode-switching instinct fast. And for deeper dives into the individual settings these modes control, see our guides on aperture, shutter speed, and ISO.
Frequently asked questions about camera modes
What camera mode do most professional photographers use?
Most professionals split between Aperture Priority and Manual depending on the situation. Aperture Priority is the default for event, wedding, and photojournalism work where light changes quickly and the photographer needs to stay focused on composition and timing. Manual is the standard for studio work, flash photography, and any scenario with consistent, controlled light. The idea that professionals always shoot Manual is a myth — Aperture Priority with confident exposure compensation use is a fully professional approach.
What is the difference between Aperture Priority and Shutter Priority?
In Aperture Priority, you set the f-stop and the camera adjusts shutter speed. You control depth of field; the camera controls exposure timing. In Shutter Priority, you set the shutter speed and the camera adjusts aperture. You control how motion is rendered; the camera controls depth of field. Choose Aperture Priority when background blur or depth of field is your primary creative concern. Choose Shutter Priority when freezing or blurring motion is the priority and depth of field is less critical.
Is it bad to shoot in Auto mode?
No. Auto mode produces correctly exposed images in most normal lighting situations, and there are real scenarios where it’s the right choice — handing the camera to someone unfamiliar with it, capturing a spontaneous moment when there’s no time to adjust settings. The limitation is creative control: Auto can’t blur a background on purpose, freeze fast action deliberately, or expose a backlit subject the way you intend. It’s a useful tool with a specific job, not a shortcut to be ashamed of.
Should I always shoot in Manual mode to get the best photos?
No. Manual mode gives you the most control over all three exposure variables, but more control isn’t always better — it also means more adjustment required as conditions change. In rapidly shifting light, an Aperture Priority shooter with good exposure compensation instincts will often outperform a Manual shooter who’s one dial turn behind the scene. Use Manual when it provides a genuine advantage: flash work, studio setups, panoramic stitching, video, or any situation with stable, controlled light. In everything else, the “best” mode is whichever one lets you focus on the shot rather than the settings.
What is exposure compensation and when should I use it?
Exposure compensation is a feature in Aperture Priority and Shutter Priority that lets you override the camera’s metered exposure. The +/- dial tells the camera to expose brighter or darker than it calculated. Use it whenever the camera’s meter is being fooled: bright snow scenes the camera underexposes, backlit subjects that become silhouettes, very dark subjects the camera overexposes in an attempt to bring up the scene. In Aperture Priority especially, fluent use of exposure compensation is what separates photographers who get consistent results from those who get lucky ones.
What mode should I use for flash photography?
Manual mode. The camera’s metering system reads ambient light only — it has no way to account for the output of an external flash or strobe. In any mode other than Manual, the camera will adjust shutter speed or aperture based on ambient readings, producing inconsistent results as it tries to compensate for light that hasn’t fired yet. In Manual, you set the ambient exposure independently, then adjust flash power to add light on top of it. This gives you full, predictable control over both the ambient and flash components of the final image.


