
With HDR photography, the specifics of how we capture the shot(s) make all the difference. For example, we often capture three or more different exposures of the same shot to create a final HDR image. If we manually release the shutter, we increase the chances of losing detail in our images due to camera shake. We may also notice ghosting when shooting with a longer duration between shots. So, how can we minimize movement if we need to take consecutive images? Is there a way to take all the HDR shots we need without having to press the camera shutter every time? The answer is yes! We can enable our camera’s “continuous shooting” mode to take multiple shots with just a single click of the shutter.
Video: Continuous Shooting Mode
Before we explain the continuous shooting mode in more detail, we need to talk about Auto Exposure Bracketing (AEB).
What Is Auto Exposure Bracketing (AEB)?

Auto Exposure Bracketing (AEB) is a feature that is automatically built into most modern (within the last ten years or so) DSLR cameras. Some advanced point-and-shoot cameras may also have this feature built-in.
Now, all cameras are different so consult your manual to set up AEB in your specific camera. However, the general principles will apply to AEB, regardless of the camera model and brand. First, you need to choose the number of images you want in your bracketing sequence (if your camera offers this option). The number of images you can choose will depend on your camera. As we will discuss later, the optimal number of images in a AEB sequence is going to generally be 3 images.

Next, you need to define how far you want the exposure value spacing to be between each image in the sequence. So for example, you can set your images to vary between either one, two or even three stops. Once again, consult your camera’s manual to set up AEB. Again, the optimal exposure value spacing between images is generally two stops.

[Related Reading: Understanding Your Camera’s Drive Modes]
Activate “Continuous Shooting” Mode
Again, every camera is different, so the way you capture HDR images will depend on your camera’s features. If you have properly set up and dialed in your AEB, your camera should automatically fire three consecutive shots (or however many images you specified in your AEB) with just a single press of the shutter. If you find yourself having to manually press the shutter to take all of the exposure shots that are in the sequence, then your camera’s continuous shooting mode is probably turned off. Again, consult your camera’s manual to learn how to turn on the continuous shooting mode for your specific make/model.
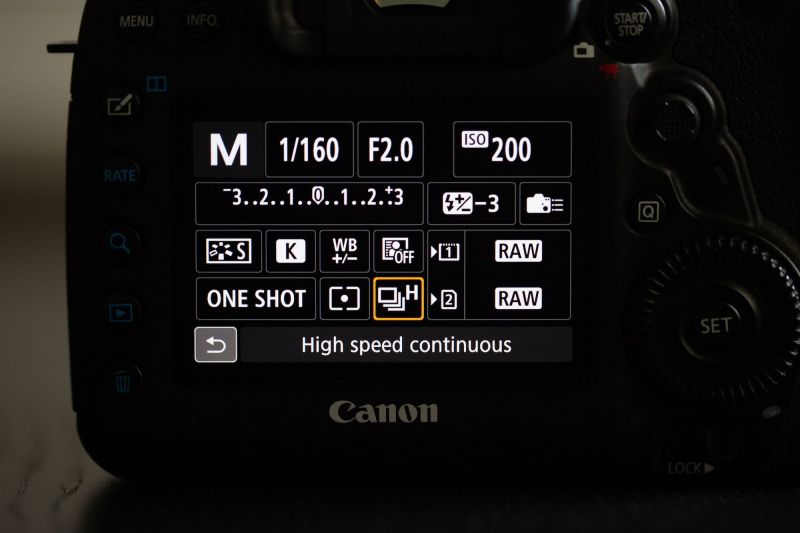
Here is the continuous shooting mode function on a Canon 5D Mark IV.
Step 1. Push the AF-Drive option

Step 2. Flip the dial until you see the three-photo icon with the “H,” which stands for “High Speed.”

On a Nikon D800, simply turn the dial to the continuous shooting mode as shown below.

Conclusion
Once you’ve turned on your camera’s continuous shooting mode, your camera should fire all three (or more) consecutive shots without any further assistance. The continuous shooting mode is a useful feature that allows us to maximize image detail with more quickly fired shots. In addition, using this mode decreases camera shake, thus eliminating potential camera shake in our images.
If you’d like to dive deeper into HDR photography techniques, check out our HDR Photography Workshop. This workshop includes over ten hours of video instruction, 25 RAW exercise files, and three presets specifically designed for HDR photography. While the content focuses mainly on landscape photography, you can use these techniques for other types of portraiture.


Get Connected!