
I love wildlife photography. Sadly, it’s not something that I get to do all that often but whenever I do, I find it rejuvenating and invigorating. It’s one of the reasons I got into photography in the first place so it will always hold a special place in my heart.
I took this photo some time ago but thought it would be a great basis for this article. My style of wildlife/nature photography is not what you would call typical, partially due to gear limitations (not having a very long lens) but mainly as I prefer the look. I don’t tend to fill the frame with my subjects. Instead, I prefer to have them as an element within a larger scene. Ideally, the weather is one element, landscape another, and subject the third. All of this will sound familiar if any of you read some of my Deer Hunter articles.
[REWIND: WILDLIFE PHOTOGRAPHY: WHAT GEAR DO YOU REALLY NEED? {DEER HUNTER SERIES PART 1}]

Photographing Wildlife In Challenging Conditions
Personally, I adore fog. I think it adds so much to my wildlife photography and as such, whenever possible, I plan all of my trips around it. However, photographing in dense fog has its challenges; both during shooting and in post-production. While shooting, the biggest challenge is focusing. I’ve recently changed camera brands (we can get into that another time) from Canon to Nikon. With my old Canon 5D Mark II, the focusing system was utter rubbish. I haven’t been able to test the new camera yet, but I imagine even that (the Nikon D750) will struggle in dense fog. I do hope to be proven wrong.
So how do you focus in dense fog? Two words. Manual focus. That may have sent a shudder down your spine, but it is really the only option. Modern DSLR’s are not built for manual focus in the same way that older SLR’s were. For that reason, I use Live View to focus. It’s very accurate but can take a little while to get used to.
Universal Wildlife Photography Tips
These tips are not just specific to this photo but rather something I like to consider with every image.
1) Capturing Interaction
I’m not just referring to the obvious (in your face) interaction, although that can be great too, but the more subtle ones: body language, subtle glances. Anything which can imply emotion. Leading me nicely into:
2) Anthropomorphization
Put simply, this is when we assign human behavior, actions, characteristics, etc. to animals. Understanding this concept can add a completely different element to your photography. Take the image that is the subject for this article. In my mind, the body language of the two deer implies desire, a longing. Yes, it is more likely to be an instinctual, animalistic desire rather than a romantic one, which I am implying. Nonetheless, the suggestion is there and for me, it adds a lot to this photo.
3) Weather
My final universal wildlife photography tip is weather. This is something which is always out of our control but wherever possible (e.g. waiting for the right weather report), try to use this to your advantage. As I’ve said, I love fog. Hence, I search for days when I know that’s what I’ll get. You may love vibrant sunrises, sunsets, midday sun or even rain. Whatever it is, use the weather as another element to your wildlife photography.

The Editing Of My Stag In The Mist Photo
As you will no doubt notice, the SOOC above is quite different to the final image. There weren’t any crazy things done, but there are a few elements I’d like to bring to your attention.
When I’m photographing wildlife, I always leave white balance on Auto. I know this can be easily changed in post (when shooting in RAW), so I prefer to have one less thing to think about. I like my attention to be firmly on the animals.

Raw Conversion And Dealing With Fog
The photo above shows the image having gone through some fairly simple changes in Lightroom. I’ve altered the white balance and made some adjustments to the overall contrast of the image. To do so, I adjusted the tonal controls (highlights, shadows, whites, blacks), the curve, and the clarity slider.

If you’ve never edited a photo in heavy fog, some of this may seem strange to you. Fog has the effect of severely lowering the contrast of an image. As such, we need to increase our contrast to carve out some of those hidden details. You could use the Dehaze slider in Lightroom, but personally, I prefer the control I have from using all of the adjustments mentioned above. I find it gives me a little more control, and I prefer the results. Test it out for yourself and see which you prefer.

This photo was shot at ISO 200, so noise is not going to be much of an issue. That being said, when we push and pull a photo, we will introduce more noise. By adding contrast and sharpening, the noise levels will increase. With almost any other image shot at ISO 200, you will not notice this. With fog, I find you do. I’m not exactly sure why but you have to be very careful when editing a foggy image not to introduce too much noise. That’s why I chose to leave sharpening at a minimum in Lightroom and instead add it more precisely in Photoshop.
Enhancing In Photoshop
Having made some fairly light adjustments in Lightroom to correct color and to bring the fog down to a level I liked, it was time to head over to Photoshop to make some final enhancements. Here’s a photo that shows all the layers I used in this image:
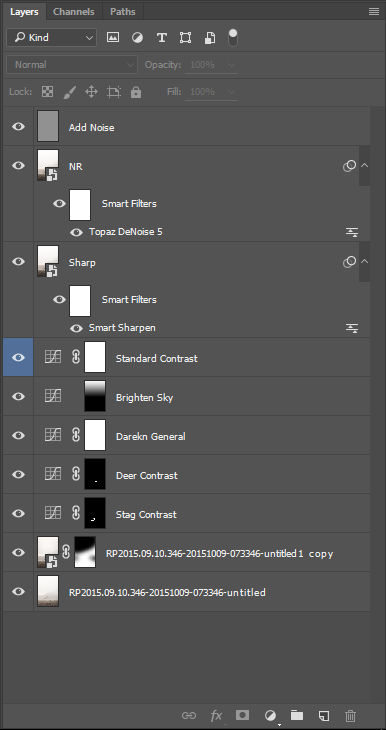
Opening the layer as a Smart Object in Photoshop (in Lightroom: right click > Edit In > Open As Smart Object) allows you to retain all of those adjustments you made in Lightroom. If you double click on that layer, your photo opens in Adobe Camera Raw with all the Lightroom adjustments available to be adjusted. I like to use this method in case I decide to edit the original RAW file a little more.
The first layer here is the image, minus some of those contrast adjustments I made in Lightroom. I decided it wasn’t necessary to add contrast in some areas (the sky) as it increased noise. It’s a very minor change and not totally necessary, but I’m a perfectionist. All I did was make a copy of that “smart layer” mentioned above and removed those settings. I then added a mask and painted it back selectively.

One of the big reasons for heading into Photoshop with this image was to bring out the deer. I felt they were a little too hidden by the fog and so wanted to add some very precise contrast to bring them out. To do so I needed some good masks.
To create the mask here, I headed over to the channels tab and selected the channel that gave me the most contrast between the Deer and the background. By control-clicking on that channel, a selection is created. That selection can then be applied to any layer as a mask and edited further by applying adjustment layers to it. For the final version of mask here, I had to go in and edit the mask manually, but the channels technique got me close (the photo above).
This is a little tricky to explain so if you’re not familiar with this technique, please watch the videos in these articles:
LUMINOSITY MASKS: THE LONG AND SHORT OF IT
5 LAYER MASK TIPS YOU MAY NOT KNOW
The final step I’d like to mention, which is a little out of the ordinary, was to add noise. Once the whole image had been edited, I decided to reduce the noise using a plugin called Topaz DeNoise (which I was reviewing at the time) and then add some noise back. As I mentioned above, by pushing and pulling this image, some noise was added; hence, the reduction using Topaz. I then decided to add a very small amount of noise back into this image to smooth out some of the tonal transitions.
Why reduce noise then add it back? I find that the noise created while editing or from shooting at high ISO’s (on modern digital cameras), doesn’t look very nice. Whereas, adding noise in Photoshop has a more uniform structure and looks more comparable to the quite pleasing noise you would see from film. Give it a try and see for yourself.
For those that would like to know the camera settings for this photo are as follow:
Canon 70 – 200 f2.8 IS II at 165mm
ISO 200, f2.8, 1/200 sec


Get Connected!