We’ve teamed up with Adorama to bring you a series of photography tutorials called “Master Your Craft” to be featured on their YouTube Channel. Subscribe to see more of our videos on their channel that cover photography, lighting, posing, and editing education to help you hone your skills and master your craft. To watch the entire series, check out our playlist!
Video: Transform Your Photos with Simple Compositing, Pt. 1
In this tutorial, you’re going to learn from shoot to post how to create this final image, all while keeping your subject safe, using a technique I like to call “Simple Compositing.”
Be sure to download the exercise files so that you can work alongside me through this tutorial.
I’m going to divide this article into different parts to make it easier to follow along. This article/video is part one. Let’s go ahead and dive straight in.
Why Use the Simple Compositing Technique?

To start, we need to ask ourselves why we would want to use a technique like this. If you look at the two images above, we have a couple standing on the rocks with water rushing in. You might wonder, “Why not just shoot those in one photograph?” Easy enough, right? Well, we are going to use this simple compositing technique for a couple reasons.
First, in scenes and situations like this, it can be difficult or even impossible to get the shot that you want without wasting tons of your (and your clients’) time. When the waves come, the couple has to hold still in that spot with the right pose and expression, and that can be difficult. You don’t want to waste an hour of your clients’ time, trying to get one single photograph that may not be doable.
The biggest and most important reason, however, is safety. I shoot in this location often and I know that every 10 minutes or so, when a giant wave comes along, a significant amount of water actually splashes on to the rocks. Here, they’re not in a spot where they can get washed away, but it is enough water to give them a bad day.
Generally, it’s not safe to place our subjects in the middle of the street or have them stand where a wave is going to crash. Instead, quickly capture a shot and move your subjects out within a few seconds. Then, you can stay back and photograph the background that you want.
How to Shoot for the Simple Compositing Technique
Now, let’s talk about how to shoot the image and cover what you’re going to need. Knowing that we’re going to layer the images, we will want to have the camera up on a tripod. Any camera any tripod is going to work. For this shot, gear wise, I used a Canon 5D Mark IV with a 24-70mm lens.

Looking at the image above, you may wonder how we were able to dial in such a low shutter speed at f/4 and ISO 200 on such a bright day. This is usually not possible because if we try to slow down the shutter that much in bright daylight, the shot goes completely white. You may have also noticed a nasty green tint in the shot, which we’ll have to fix in post. If you’re thinking ND filter, you are correct. When I shot this a little more than five years ago, the ND filter I used was decent, but it had a pretty significant color graduation, which is no bueno. High-quality modern ND’s are not going to do that. If you’re interested, I recommend hopping onto Adorama and checking out the Tiffen Square Water White ND filter. A four or a five stop filter should serve you well.
What you may have noticed from previous tutorials is that I usually use a square ND filter and hold it over my lens. I do this because I’m lazy. I mean, that’s really the short of it. I’m simply trying to get in and out of locations as quick as possible and I don’t want to use a drop-in filter system. If I were shooting landscape images, then I would recommend getting a drop-in filter system. If you don’t get a square ND or a drop-in filter system, then you’ll have to get step-up and step-down rings to screw the filter onto lenses of different sizes, and they’re really annoying and obnoxious to use. I’d rather just get a square ND. If you’re shooting portraiture, holding a square filter over the lens is fine.
Rewind: [Day vs Night: Full Length Behind the Scenes Photography Tutorial]
Once my camera is set up and ready on the tripod, I ask my subjects to step in for a quick shot and then they step out again. From there, I just have to wait for a good wave (in this case, I waited about two minutes). So, we get our shot of the couple and the wave separately. You’ll notice in the shot above that I also managed to capture some lovely bystanders; luckily, that’s an easy fix in post. That’s really it for the shooting portion.
How to Edit Using the Simple Compositing Technique
The first thing I want to do in post is color grading. We’re going to use Lightroom to do this, although you can use whatever software you would like. Once in Lightroom, jump into the Develop module. Go ahead and add your favorite preset. I’ve chosen Visual Flow‘s Modern Pack.
White Balance & Exposure

In order to see proper colors, I like to start by taking a white balance reading (press “W” and click on her dress). Once we do this, we get to a much better white balance with a +65 tint adjustment. That’s how crazy that ND filter was. Next, I’ll just lower the exposure a bit. For this image, I’ve selected the HDR Natural preset (again, from Visual Flow’s Modern Pack). In case you don’t already know, Visual Flow presets are designed by lighting condition. As such, I’ve chosen HDR because this image has a lot of dynamic range and I want to bring as much of it out as possible. If you don’t have Visual Flow presets, just use your favorite preset to get it to a particular look that you like.
Radial Burn
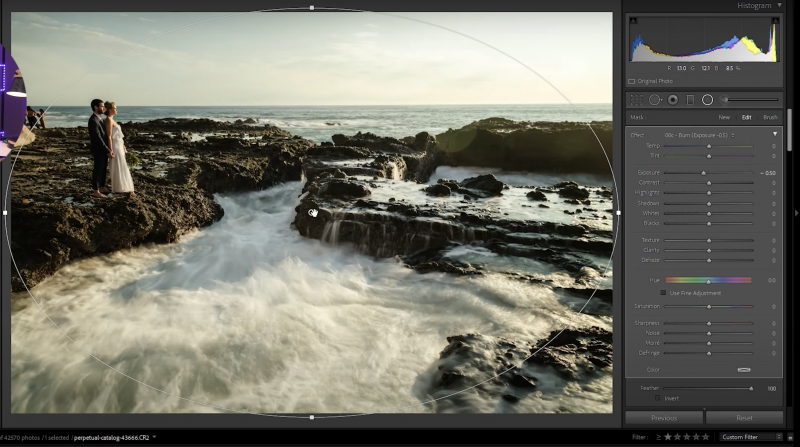 I’ll start with a radial burn. I happen to have a brush for this, which you will have seen if you’ve watched my other tutorials. If you need to create your own brush, it is simply a pinned brush and it drops exposure by negative 0.5. I’m going to bring that over my couple. You can click and hold the cursor over your couple and then drag the pin to the left to increase the strength of the effect (or, in other words, to darken the radial burn).
Isolated White Balance Adjustment
Here’s another little handy dandy secret regarding color temperature. I want to pronounce the blue hues in the image (not over the couple), so I’m going to adjust the temperature by about negative 10 using the same radial burn brush. Another thing I can do here is to adjust the feathering effect so that as the color temperature shift feathers in towards the subjects. Otherwise, a little bit of blue can spill onto the subject’s feet. To avoid this, hold down “Alt/Option” and use the brush to remove the mask from the feet. If we wanted to only control the temperature, we would need to separate these two brushes. We’re good as is with this image. For more in-depth Lightroom tutorials and to become a pro at color grading check out our Mastering Lightroom course!
Synchronized Colors Between Images
Now, this next piece is important. You’re going to need to synchronize the colors between the images you plan to use for the composite. We refer to this second shot (without the couple) as our plate image. Copy the settings from the last shot and synchronize it over to the plate shot. If you capture the image in manual mode and used a tripod, then both these images should be virtually identical, with the exception of the waves and the couple being in either one or the other image. The colors and other compositional elements should be the same.
Layered Images in Photoshop
Select both images, right-click, and select “Edit in Photoshop.” You’re going to choose “Open as Layers in Photoshop.” We’ll finish out the edit in Photoshop. I refer to this as a simple composite because compositing can be absolutely crazy, meaning you can spend hours or even days with hundreds of layers inside a single Photoshop file. At that point, the edit becomes more graphic art than photography. We can save that conversation for later, but composites come in different levels of complexity, and this one is simple. For this edit, all I need to do is select the layer that has most everything that I want in the photograph (which in this case is the plate shot) and then click and drag it to the top layer position.
Next, select both layers (or all the layers that you’re going to edit as a composite) and auto align the layers. The auto alignment feature in Photoshop should automatically align the images. You might have a tiny bit of shift between the images, even when using a tripod. Auto align will fix any unwanted shifting.
 Once the layers are aligned, add a layer mask. This mask is going to reveal the image below. Use a white brush to reveal and black to conceal the layer underneath. Set the black brush to 100 opacity & 100 flow. You can use a mouse or tablet or whatever you have. Another reason why this is called simple compositing. All I need to do is paint black where the couple is and I’m done.
When you’ve practiced this technique and you follow the steps presented here (using a tripod), it’s literally that easy. You can always take more time to refine smaller details if necessary, such as removing distracting elements like bystanders in the background and so on. Finally, save it, and our image is finished.
Final Image

Conclusion
And that’s it! You’ve gone from a basic shot with people in the background and unimpressive waves to the much improved final image. Remember, this composite technique helps in two ways. It simplifies the shoot itself and keeps the workflow moving in a timely fashion; you might spend a lot more time trying to pull this off in one shot when you could just use this technique and spend no more than five minutes editing it in post. More importantly, however, this technique helps keep you and your clients safe throughout the entire process of shooting. There’s nothing worse than waking up to a headline that says somebody was hurt or even killed during a photoshoot when it could’ve been easily avoided. Using simple compositing techniques, you never have to put your clients in danger.
If you enjoyed this content, be sure to check back as I’m going to build on this technique in part two, where we’re going to get a little bit more advanced and combine lighting techniques with compositing to blow your mind a little more.
Be sure to catch our next episode of Mastering Your Craft on Adorama’s YouTube channel next week! If you want to catch up on all the episodes, make sure you check out our playlist!


Get Connected!