
Unlike many of the writers here at SLR Lounge, I don’t live in sunny, gorgeous Southern California (or Florida) where one can shoot outdoors year round. Not having a dedicated studio space makes it especially difficult to shoot during the winter up here in the gloomy, grey, pitch-black-by-four-PM, freeze-your-buns-off, Inland Northwest. Which is why I learned to use off camera flash a couple years ago and have built up a nice little mobile kit I can use in a client’s home or office, even if it’s dark and cold outdoors. In this No Studio? No Problem! series, I’ll show you some creative set ups for taking portraits without a dedicated studio space, using natural and artificial light.
Camera & Lenses
I’m using the Canon 5D Mark III, which performs really well in low light. This is ideal when working in-doors. A typical lens for portraits is the Canon 85mm f/1.8 prime lens. This lens is incredibly affordable and works great, but sometimes I’m stuck in a small space and need a wider angle out of sheer necessity, which is why I splurged on the Canon 24-70 f/2.8 Mark II zoom lens and it’s on my camera 75% of the time. This lens is versatile and tack sharp. I also have in my bag a Canon 50mm f/1.4 prime, which I only use if I need the extra depth of field or speed in low-light.
Laptop & Software
I’ve always been a Mac user and having a laptop is a great asset when you’re constantly on the go. The small screen isn’t the best for editing, but I make it work. Plus it fits right in my LowPro Camera Bag. I’ve been happy with the MacBook Pro, especially when paired with an Intuos Wacom Tablet and pen. Don’t forget a calibrater (I use the Spyder 4 by Datacolor) and development software. I use Adobe Photoshop and Adobe Photoshop Lightroom 4, plus the SLR Lounge Lightroom Preset System. This set of gear is basically my mobile digital darkroom and I can process photos wherever I happen to be. I also use my laptop for sales sessions on-location.
Lights & Modifiers
I’m always tempted to buy large studio lights, but I exercise a little restraint and stick to lightweight and durable Canon Speedlite 430EX flashes. Someday I’ll upgrade to something a little newer, like the Canon 580EX, or maybe even the amazingly affordable Yongnuo Professional Flash Speedlights. I have Pocketwizard Flex TT5 triggers for my flashes but actually prefer the much more affordable 4 Channel Wireless Trigger for External Speedlights by Cowboy Studio for a simple lighting setup.
I also carry a Wescott 5-in-1 Reflector, and a few different portable light modifiers. My favorite is CowboyStudio’s Pro 30 Inch Octagon Umbrella Speedlite Softbox. For the price, this is an excellent modifier that folds up like an umbrella for easy transport. It has a few flaws, and if I had a little more money to spend, I would choose something like the Westcott Rapid Box. In fact, if I were just starting out, I’d grab the Westcott Rapid Box Portable Portrait Speedlite Kit, which comes with two light stands, two modifiers and a nice carrying case. Score!
Backdrop
If you’ll be getting creative with backdrops, which are especially useful for Newborn Photography, you’ll need a backdrop stand. While you can get a portable backdrop system for as little as $40, I knew I’d be hauling this thing around from place to place, and I wanted to invest in something durable and light weight. The Manfrotto Background Support System I’ve been using since 2011 has held up very well and it also comes with a handy carrying case. I keep things pretty simple, as far as backdrops go. A roll of white paper or neutral textured blankets work for me. For more info on all the right gear to use for Newborn Portraits, check out the SLR Lounge Newborn Portrait Workshop.
Traveling on location for a shoot, some people love it, some people hate it. No matter which group you are in, you have to realize that on location jobs require their own set of preparation steps and they definitely operate a little differently from in studio photo shoots. There are also certain pieces of gear every photographer should at least have experience using on location so they can make the best purchasing decisions for themselves. Here is my list of 3 pieces of gear every on-location photographer should own.
Transporting It All
Since I work without an assistant most of the time, I need to be able to carry all this gear by myself. While I’m sure there are camera bags made specifically for hauling all your gear, I just happened to have a giant Ogio rolling suitcase, which fits all my gear (except the backdrop supports and light stands, which have their own carrying case). I can literally carry all my gear from the car in one trip with my backpack camera bag, light stands and backdrop support bags slung over my shoulder and wheeling the rest in the Ogio bag. Now I just have to keep telling myself not to buy any more gear, because I don’t want to have to make two trips out to the car to unload everything!
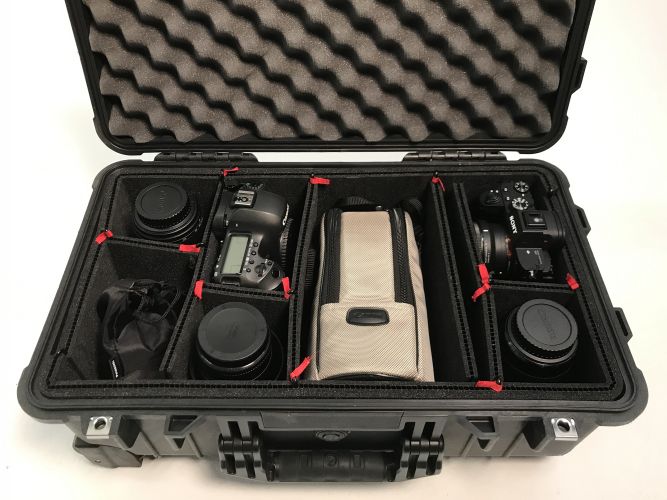
Pelican Cases:
These products are the tried and true method of transporting expensive gear. They have been around for years and years now and are quite possibly the best cases available for transportation. Just look up the pelican cases tests that are online to see what I mean when I say they can keep your gear safe in some pretty drastic scenarios. They come in various sizes and interiors that can work for the different uses you may have. Sometimes you just need a small case to transport a hard drive. That is where the Pelican 1120 case would work well. For me, the perfect size to transport most camera equipment is the Pelican 1510 which is also one of their more popular cases. These cases are just under the overhead luggage limit on most commercial airplanes so it is also the perfect size for flying with your gear. I can easily fit a few lenses and camera bodies in one of these cases and have the peace of mind that everything is safe.
Pelican Case Inserts
Let’s talk about the different interiors you can get for these cases. Most of the bigger Pelican cases come with the option of pick and pluck foam, foam dividers, or Trekpak dividers.
The standard pick and pluck foam is relatively self explanatory. You make an outline of the gear you are trying to place in the case, and then pluck the insides of that outline. If everything was done correctly, it should line up perfectly with your gear and you are good to go.
The foam dividers are a nice and easy way to add some cushioning to the inside of your cases without the need for any plucking. These dividers can obviously be moved and adjusted over the lifespan of the case so it offers a wide range of variety in the layout of your gear.
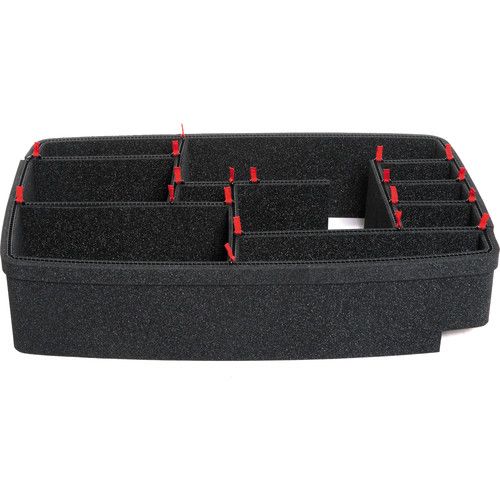
The third option for interiors are the Trekpak dividers. This is a newer way to organize your gear in Pelican cases. It offers even more customization for the layout of your gear. Where foam dividers can lack the Trekpak system makes up for them. Say you have a smaller piece of gear that needs to fit in a section of the case that would normally be too big for it and it would leave the item moving around too much for safe transportation. This is the perfect scenario to use a Trekpak interior! You can cut the sides included in the Trekpak kit to the exact size you need. In my opinion the Trekpak system offers the best of both worlds. It is fully customizable and provides enough padding that you don’t have to worry about your gear being safe during the most vigorous scenarios.
My current camera transportation system involves Pelican 1510’s with the Trekpak cutouts. I can also easily fit two Profoto D1’s with their power cables into one of these cases for an easy travel setup.
Check Pricing & Availability From Our Preferred Vendors Here;
Tether Tools Tether kit:
Hey, if it works so well in the studio, why not bring in on location with you? This is a kit of gear I hate shooting without. Whether it is just for me to check focus on a bigger monitor or to help coach my portrait subjects throughout the shoot, being able to see the photos on your computer in real time is something I can’t live without and frankly, has spoiled me quite a bit.

Below is a list of the gear that I bring with me to make tethering a breeze on location:
- 15 foot Tether Tools Tether cable
- Tether Table Aero Master
- Tether Tools Jerk Stopper
- MacBook Pro 15 Inch
- Phase One’s Capture One Software

[Related Reading: Top 5 Must Have Fujifilm X Lenses]
This setup allows for quite literally a plug-and-play scenario which keeps me from needing to get to the location super early. I am a firm believer in tethering whenever you can, (even during an outdoor shoot). It truly adds a level of professionalism to every session that can’t be matched and makes our work better than it would be otherwise. Clients often are surprised they can look through their photos on a big monitor as we shoot, which I think is a huge bonus for client relations. I really wish I didn’t have to bring extra gear with me on location but this kit is something I certainly can’t leave in the studio.
CHECK PRICING & AVAILABILITY FROM OUR PREFERRED VENDORS HERE;
So we got all this gear, how do we move it from point A to point B?
Rock n Roller Multi Cart:
I first learned about these carts from their popularity in the music industry. Load your instruments onto the cart and wheel it wherever you need to go. The first on location job I ever did, I didn’t have a cart for and thought to myself “I don’t need one of those stupid carts, I can just carry everything.” Boy was I wrong… From that point on, I haven’t left the studio without at least one of these carts. They make traveling super easy on your muscles. Why carry when you can wheel? The bottom column system of the cart can easily be extended to make it longer, hence the ability to store more gear on it. The whole cart can also be broken down for easy storage within seconds. Feel free to add a GripnGaff bag to your cart for even more storage options. Turn your multi trip load in, into a one tripper with a Rock n Roller Cart! You can even add a top level shelf and a laptop stand so you can tether and shoot right off of the home base of your cart.

CHECK PRICING & AVAILABILITY FROM OUR PREFERRED VENDORS HERE;
Well there you have it! The 3 pieces of gear every on location photographer should own. These items are on this list because they make your life easier on location and help to provide you with the same quality of product as in the studio. Please feel free to reach out to me if you need any further info on my experience using these products as I would love to help!


Get Connected!