Skin is very complex. Therefore, it’s no surprise that editing skin can also become very complex. As with all editing, especially within Photoshop, there are a number of ways to arrive at the same destination. These methods can vary from the super quick to the long and laborious. For the most part, as you would expect, you get what you pay for (so to speak). The longer techniques tend to yield the best results.
Plastic skin was once a scourge upon our industry. Why this is, I have no idea. Whoever thought that removing all detail from a person’s skin and making them appear more like a Barbie doll was ever a good idea, I do not know. Mercifully, as an industry, we have nearly arrived at a far more healthy place. Yes, we still see the odd, plastic fantastic portrait. But, for the most part, that look is no longer desired.
With this article, I want to educate the remaining plastic lovers out there and show you a few quick techniques to get more natural looking skin.

Skin Retouching | Why All The Plastic Hating?
I have nothing against plastic itself. It’s a revolutionary material. But it does not belong on a person’s face. Now, I don’t want to plaster any fellow photographers work in this article so let me briefly explain what I mean by “plastic fantastic skin.” Skin has detail. It has pores, colour shifts, imperfections. No matter how good your skin care routine is (if you have one), your skin will have imperfections.
If we take skin editing too far, we remove all detail, the transition between skin tones become far too smooth, and we end up with something which no longer resembles skin. It’s not pretty. Worst of all, it takes a while to accomplish this undesirable look. In my opinion, although this will depend upon the job and client, I approach skin retouching with a philosophy to enhance, not perfect. I want to enhance what is there rather than change it altogether; make a person look their absolute best but still look like themselves.

Skin Retouching | First Things First
Retouching skin can be a laborious process. Whether you’re using a quick technique or delving into the realms of Frequency Separation, preparation is key. Prior to any shoot, advise your client to, at the very least, wash and moisturize their face. Models should have a stringent routine for skin care but this doesn’t just apply to them. I ask all my clients to do the same, although I do recognize it’s not always possible.
This is where a good make-up artist is invaluable. However, this is not something that is always available to us. No matter how it is done, prepping the skin is an important step that, if possible, should not be overlooked. Trust me, it’s a big help!
Skin Retouching | Blemish Be Gone
The first step when retouching skin is removing blemishes. What degree you do this to will depend entirely upon the amount of time you want to dedicate to each photo. You could spend 20 minutes removing every little imperfection or 2 minutes removing the obvious problems (spots, etc.).
[REWIND: 90 SECOND ADVANCED EDIT ON SOFT SKIN]
For anything high end, I do 100% of my blemish removal in Photoshop. More often than not that will be while using a technique known as Frequency Separation. I won’t be covering that method here as it really requires an article of its own. For blemish removal in Photoshop, I’ll normally be using either the Clone Stamp or Healing Brush tool. This great video by Aaron Nace over at Phlearn does a fantastic job of explaining these two tools.
If you don’t have Photoshop, or only want to do a quick retouch, then something similar can be achieved in Lightroom. Hit the Q key and you’ll be in the Spot Healing panel. There are two options here which work in much the same way as the Clone Stamp and Healing brush tools. However, they also have three other parameters which are fairly self-explanatory: Size (brush size), Feather (how soft the edge of your brush is) and Opacity (how strong the effect is).

Skin Retouching | Match Skin Colour
This is one of those things that a make-up artist will help with. Those of us that don’t take great care of our skin (and those that do) will have natural shifts in colour across our faces. It takes practice and skill to be able to determine what is OK to leave and what needs adjusting, however, it can make a huge difference to the overall look if we can even out the transitions.

Unfortunately, this technique is reserved for Photoshop. You could try and adjust skin color using an adjustment brush in Lightroom, but it would be near impossible to achieve the sorts of results we want. In Photoshop, I use a highly targeted Hue and Saturation layer to refine the colour across a face. Click here to be taken to a recent article which describes this technique in detail.
[REWIND: RETOUCHING IN PHOTOSHOP | CORRECTING SKIN WITH HUE & SATURATION]
When using this method, it’s important to use a light touch. Keep that philosophy in mind from the beginning. We want to enhance the skin, not make it “perfect.” If we go too far, it looks fake.
Skin Retouching | The Dreaded Skin Softening
Why “The Dreaded?” Because it is this step which is usually the main culprit for that horrible, fake-looking, plastic skin. I have two main methods for softening skin. The first is a quick and easy method and the second is a far longer and more in-depth technique. Which I use depends upon how much time I want to take, or am being paid to take.
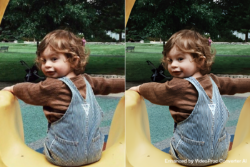
If you’ve done a good job of removing blemishes and adjusting the colour transitions, lots of skin softening should not be required. In fact, I would go so far as to say it would not be desired. I see this all the time. Photographers seem to soften skin even when it doesn’t need it. The result being something which looks too perfect. For example, children normally have good skin (aside from food stains, drool, dirt and just about any other possible mark). As a result, I rarely soften it. It just doesn’t need it. Don’t just soften skin for the sake of it.

The quick and easy method utilizes a brush preset from the SLR Lounge Preset system. Refer to the photo for the exact settings used so you can create your own brush preset. Paint this over areas of the face that require softening. Bare in mind, this is not everywhere! Typically I would add it to areas of the face that are prone to wrinkles. Having brushed it in, I may even dial back the effect a little.
My second method for softening skin is actually more of an all in one, Frequency Separation. I use it for removing blemishes and evening out both colour and tonal transitions. When done correctly, it will lead to skin which perfectly fits my philosophy, enhanced not perfected. It will also result in skin which retains all its detail; a person actually has pores, but has a clean and healthy look.
[REWIND: A QUICK WAY TO CORRECT SKIN COLOUR FOR A HIGH END LOOK]
As it is such a long and complex technique, I plan to fully explain it in another article. For the moment, here’s a video created by Elena Jasic which is a fantastic demonstration of how to do this method. This video is a little old now and I have refined my personal workflow for this, so I’ll share it in a follow-up article soon.
Skin Retouching | Theory And Philosophy
Full disclosure, I struggled writing this article. I began writing with the intention of providing some clear steps to editing skin and hopefully I have accomplished that. What I hope you will also take away from this is a philosophy for editing skin. If it’s permanent, it stays. Enhanced is better than perfected. And a light touch is better than a heavy hand.
If you would like to know more about the SLR Lounge Preset system, or any other SLR Lounge product, have a look though the SLR Lounge Store. Click here.