
The circular polarizer is a tool commonly found in the camera bags of discerning landscape photographers. As a landscape photographer in my spare time, I’ve had multiple polarizers in my camera bag for as long as I can remember; I almost have one for every thread-size I own, and I have two in 77mm!
However, I often get blank stares and weird looks whenever I suggest that other types of photographers, from wedding photographers to high-speed action shooters, also try using a polarizer.
Based on what a polarizer’s effect can do for your photography, though, I’d say that almost every type of photographer out there should consider owning this extremely handy tool!
 Nikon D750, Nikon 70-200mm f/2.8 VR, Sigma EX Circular Polarizer
you can’t always fake it in photoshop
Many self-proclaimed photography experts will give advice on the internet to the effect of, “you don’t need filters anymore in the digital age, that’s what Lightroom and Photoshop are for!”
Well, I’m here to tell you that is just plain wrong. In fact, it’s downright terrible advice in the case of the circular polarizer. Any Lightroom effects or Photoshop tweaks you might be able to perform which could even remotely resemble what a polarizer does, will either be a poor substitute, or just plain ugly.

Nikon D300, Nikon 85mm f/1.4, Sigma EX Circular Polarizer
Besides, using a polarizer in the field just makes for that much less work in post-production, even if all you need to do is give a blue sky a little more oomph. And if you’re a full-time professional, turning out thousands of proof images every week/month, post-production time adds up quickly.
Landscape Photography With A Circular Polarizer
Of course, if you are indeed into landscape photography then you probably already know generally what a circular polarizer can do. Just to reiterate, though, here’s the full extent of it:
First and foremost, (the effect everybody knows about) it makes the sky a darker, more saturated blue, though in fairness, it’s not as simple as that, and we’ll get into this momentarily.
Indeed, you can easily use HSL adjustments to darken and saturate blues in Lightroom or Photoshop. But there’s a whole lot more to it than that!
Additionally, literally any surface that has a reflection or glare on it, including water, foliage, even damp rocks and dirt, or glass, and other shiny man-made surfaces and even pavement, can all be polarized.

By rotating the circular polarizer carefully I was able to keep some of the reflected clouds, while still revealing the tide pool where I wanted.
The effect is more prominent when your camera is at a right angle from your subject and the sun. If the angle is not 90 degrees, little to no polarization effect may be seen, especially with respect to blue skies. This is due to the nature of how a circular polarizing filter does what it does: it blocks wavelengths of light that hit the filter at certain angles, but not another, and the angle of maximum blockage is ~90 degrees.

Nikon D5200, Nikon 10-24mm DX, Sigma EX Circular Polarizer
The one thing you must be mindful of, any time that the sky is involved, is the focal length of your lens. At wide-angle focal lengths equivalent to 24mm or wider, you run the risk of making your sky’s blueness appear very, very uneven. Above, I tried to balance the blue sky on the right with the light sky on the left, since the left is where the sun was setting anyways. However, this image could still use some dodging and burning to make the blue blob in the top-center less obvious.
*As a side note, a polarizer will also darken your overall exposures by 1-2 stops, depending on the level of polarization being applied.
Wedding & Portrait Photography With A Polarizer
Wedding and portrait photographers are the ones who seem the most surprised by my recommendation of a circular polarizer filter. In many circles, the best practice is thought to be zero filters on your lenses at all times, because any filter whatsoever will potentially cause image quality issues with color or sharpness, and what’s maybe worse, filters might even harm your camera’s ability to autofocus reliably.
 (Without Polarizer)

(With Polarizer: When the angle is optimal, the difference is stunning!)
A circular polarizer can work wonders for anyone who has to shoot either portraits or general event coverage outdoors, and especially in “bad” sunlight. It eliminates the shine from sunlit hair, and even from skin itself!
Many photographers consider the harshness of mid-day sunlight to be utterly ruinous to their final product, but with the right shooting angle and a good polarizer, you can turn even noon day sun into a gorgeous (or at least manageable) final result!
 (Wedding details without polarizer)

(Wedding details using a polarizer; exact same editing in Lightroom)
Even when the sun’s angle isn’t a perfect 90 degrees, the effect is still going to make your images pop a little bit more, especially when greenery is present.
As an added bonus, cutting down ~1.5 stops of light might sometimes be the difference between blowing out your scene at f/1.4 or f/2.8 in broad daylight, and preserving its highlights nicely.

Nikon D700, Nikon 24mm, Sigma EX Circular Polarizer
Of course you may still need to stack a ~3 stop ND filter behind your CPL filter, if you’re shooting with a wireless flash system that does not have HSS (high speed sync), and thus it will force you down to 1/200 sec shutter speeds.
Again, many portrait or wedding photographers would probably become queasy if they saw another person doing this casually, but don’t panic. Stacking two decent quality filters won’t utterly ruin your images. In fact you probably won’t see any difference in image sharpness, and only a slight difference in color shift if you’ve bought some cheap filters. Just shade your lens from the sun so that flare doesn’t harm your shot and you’ll be fine!
The benefits of a polarizer, plus having full liberty of using any aperture you wish, will be far more impressive in the final result.

(Left: un-polarized. Right: polarized.)
Of course, some situations would still look better if you had an assistant with a “scrim on a stick” to actually bring shade to your subject’s faces. Unfortunately that just isn’t always possible, so a polarizer will still come in handy for more journalistic style wedding / event photographers in those “Hey can you take our picture?” type rapid-fire scenarios, whether at high-noon or early / late in the day.
Using A Circular POlarizer For Aerial Photography
It almost goes without saying that if your subject is repeatedly depicted against an empty blue sky, a circular polarizer is a great tool to have. Even if the subject is not at a perfect 90-degree angle from the sun in your photos, if there is water or anything else then you’ll often still get some beautiful deep blues, greens, etc.

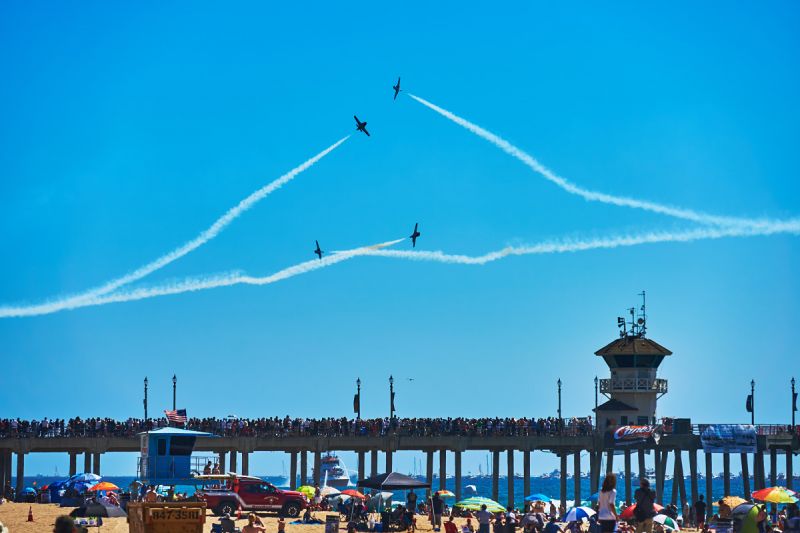
Huntington Beach Air Show, California, 2017
Nikon D750, Nikon 70-200mm f/2.8, Sigma EX Circular Polarizer
However, photographing airplanes or other flying objects does require great care, due to the nature of how a circular polarizing filter works – Best at 90-degree angles to the sun, almost not at all at other angles.
If you are taking pictures in all directions at an air show or a bird sanctuary, you’ll need to closely monitor your exposure and the level of polarization that gets applied. What I prefer to do is, position myself at an angle that will give me good polarization for the composition I want, depending on the scenery and where the action is going to be taking place.

Above is what near-100% polarization looks like, when the sun is at a 90 degree angle from my camera and subject.
On the right is what the scene looked like a few hours earlier when the sun was at a different angle, yielding less polarization.
Identical, minimal processing was applied to both images in Capture One Pro 10.
As an added bonus, cutting down ~1.5 stops of light can help you with getting your shutter speed a bit lower in order to blur propeller and rotor blades on certain aircraft, which is a very good thing.

Above is a demonstration of what it looks like if I capture photos as a plane flies towards that 90-degree angle of optimal polarization. The images were exposed at exactly the same settings, and the processing applies was also exactly the same. What a difference!

Architectural, Automotive, And More!
Even if your scene has zero blue sky or greenery in the photo, a polarizer can still be a critical part of your toolkit when photographing anything shiny, let alone anything with glass that you actually want to see through.
Beware, however, of polarized windows which are extremely common on cars these days. When used with a polarizing filter, they have the potential to create atrocious cross-hatch patterns that will utterly ruin your image. Spin your CPL filter very carefully and remove the CPL if necessary.
Buy a Polarizer
Now, for the conclusion and the good news! You don’t have to spend hundreds of dollars to get a good quality circular polarizer. While I would recommend avoiding the TRULY dirt-cheap ones because they probably will have a noticeable color cast, and could lack coatings that help combat flare and other things, any circular polarizer in the $75-100 range (for 77mm threads) is a great value. In this price range, my top recommendations are:
- B+W
- Breakthrough
- Hoya
- Sigma
- Or, when in doubt, if it’s a brand that nobody has ever heard of before, it’s probably not worth the risk.
Happy shooting! I’ll look forward to seeing gorgeously colorful images shared in the SLR Lounge community! Be sure to visit our Critique Section HERE.


Get Connected!