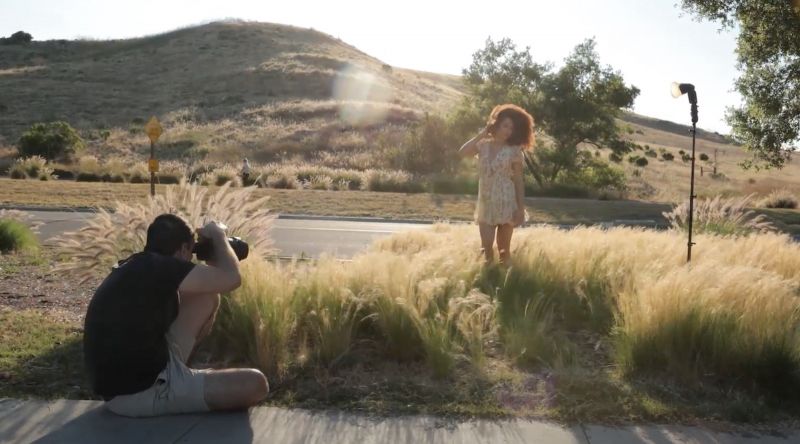
Almost everyone who starts out in photography does so relying upon ambient light. As you grow in the field and start to develop a body of work, you begin to look for ways to obtain more control over your images and the first step is artificial lighting. At first, this can be daunting because you are now in total control of this new element of your photographic process whereas before, you only had to adapt to what was already present. In this tutorial, we’ll boost your understanding of flash and teach you how to capture natural light portraits with flash.
Video: Natural Light Portraits with Flash
When it comes to flash photography, a lot of photographers mistakenly assume that flash can’t look natural. Of course, this simply isn’t true. In fact, we can show you, step-by-step, how to make your flash photography look as though you only used natural light. The “secret” lies in understanding the balancing act between flash power and ambient exposure.
Tips for Balancing Natural Light and Flash Photography
Prioritize the Light
When you’re looking for the right balance between the ambient light and your flash, a good way to start is to dial in your camera settings using only the natural light first. This will set the foundation for the lighting that you will build upon with your flash. When you do add your flash, it will serve a fill light.
Note: Regarding your camera settings, most cameras have a maximum sync speed of 1/250th.
Match the Light
In general, you want to match the artificial light with the natural light. So if the ambient light is soft, you’ll want the light coming from your flash to be soft as well. If the light is hard, you’ll want the same from your flash to keep the look of your image consistent.
This is where light modifiers come into play as they give your greater control of the light coming from your flash. When you do add your flash, start with your power settings low and increase it only if you need more.
Understand the Effect of Light Source Size
The larger a light source is the softer the light it will produce. Conversely, a small light source will produce a harder light. Generally, softer light, which is more flattering light, is used for women while a harder light is more suited to men. But, depending on your preference, feel free to break this rule once you’ve mastered this lighting balance and discovered the vision for your photo shoot.
Recommended Gear
Review our gear recommendations below to see what you’ll need to practice these techniques.
- Camera
- Lens
- Manfrotto Nano or Any Other Stand
- Off-Camera Flash
- MagSphere 2
- MagShoe 2
C.A.M.P. Framework
Anyone familiar with our site will recognize the C.A.M.P. Framework (Composition, Ambient Exposure, Modify/Add Light, Pose and Photograph). Put simply, we follow this sequence as we work through portrait sessions. You can learn about it in more detail in this article.
Basic Composition for Natural Light Portraits with Flash
Regardless of the technique we’re trying to showcase, such as capturing natural light portraits with flash, we always want to pay proper attention to composition. To illustrate our point, let’s start with a basic walk-up shot.

The model and the sun both look great, but the scene as captured leaves plenty to be desired. We can do a lot just by changing our perspective. If you find yourself in a similar situation, try lowering the camera to hide unwanted elements in the background (like the road or passing cars) and shift your angle to more clearly frame your subject against the background.

Using the grass in the foreground adds depth to the shot and helps conceal the unwanted elements mentioned above. Now, let’s focus on lighting.
Dialing in Ambient Exposure

To capture convincing natural light portraits with flash, you have to dial in an appropriate ambient exposure. For natural looking light, keep your ambient light brighter in-camera and your flash power low. Do the opposite to create a dramatically lit image.
Modify Added Light
We can use a reflector to add or modify the light in this scene, but they have downsides. They require an assistant, they often make subjects squint, and they don’t work particularly well in the shade. Instead, as the title of this article suggests, let’s use flash.
Lighting Setup for Natural Light Portraits with Flash

In order to capture the images featured in this article, we placed the flash on a stand and positioned it at roughly a 45-degree angle off-camera.
Balancing Ambient Exposure and Light Power
As we mentioned, high flash power or low ambient exposure will make the lighting in the scene look more dramatic and less natural. See the example we created using a bare flash at full power below.

If you’re trying to create dramatic portraits, this approach will work. However, our goal involves creating natural light portraits with flash. For that reason, we need to adjust our settings accordingly and go with a brighter ambient exposure while using less flash power.
It also helps to diffuse the flash with something like the MagSphere 2, which helps bounce light around and while minimizing reflection or specular light. Here’s an example (below) of a portrait we captured using the MagSphere.

Now, we can slow our shutter speed to 1/1000 and lower our flash power another stop.

Here’s the same shot without flash.

Check out the side-by-side shots below, which feature a standard exposure without flash, with flash, and with flash and a brighter exposure.
Pose/Photograph
Once you have everything set up and dialed in, direct your subject into a variety of poses and capture more natural light portraits with flash.
Final Images for Natural Light Portraits with Flash


