
What MagMod is best known for is creating products that cut down on set up time and maximize efficiency. I wanted to grab a couple of golden hour portraits of my daughter, Anabelle, to commemorate her upcoming Quinceañera and brought along the new MagBox and the trusty MagBeam to help me out. You can watch the full video here:
In this video you’ll see that I am moving around quite a bit because our light is quickly changing as the sun is setting. Let’s walk through the various lighting scenarios and setups that you see featured in the video:
Shooting Directly Into The Sun
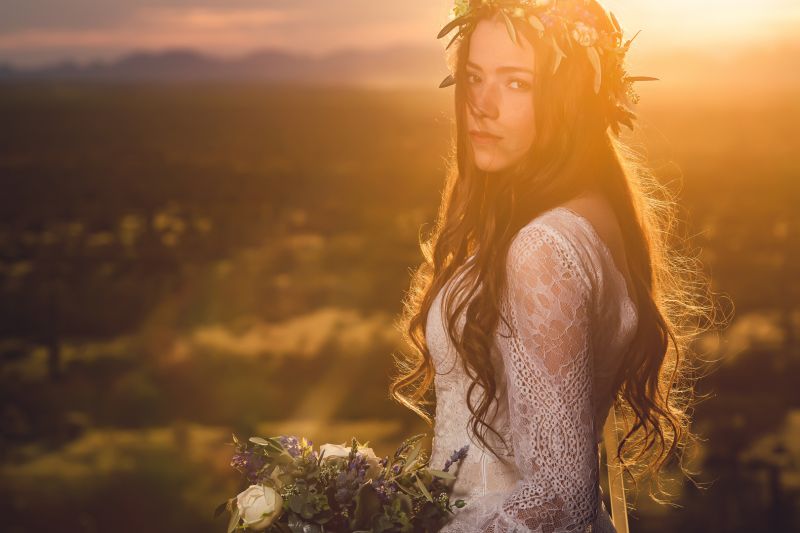
If you choose to shot a scene like this using only natural light, you’ll find that the background often gets washed out because you are exposing for the subject. In order to retain the detail and color of the sky, I chose to bring in the MagBox with one Godox AD200 and set up a paramount lighting setup to pump in enough light to chisel her out of the scene. An important attribute to note is the catch light you see in her eyes which makes her eyes pop in the frame.
Matching The Direction of Sunlight

Next, I had Anabelle face towards the sun and shifted the MagBox to match the direction of light. This can help fill the shadows created by natural sunlight just a bit and essentially create a more powerful sun. The key here is to balance the flash to ambient light so that it looks like more emphasized sunlight. A trick to getting the perfect ambient to flash balance is to start with a low flash power, anywhere from 1/64th to 1/32nd, and then slowly move it up depending on how far your flash is from the subject or how much available light there is.
Balancing Flash & Ambient Light
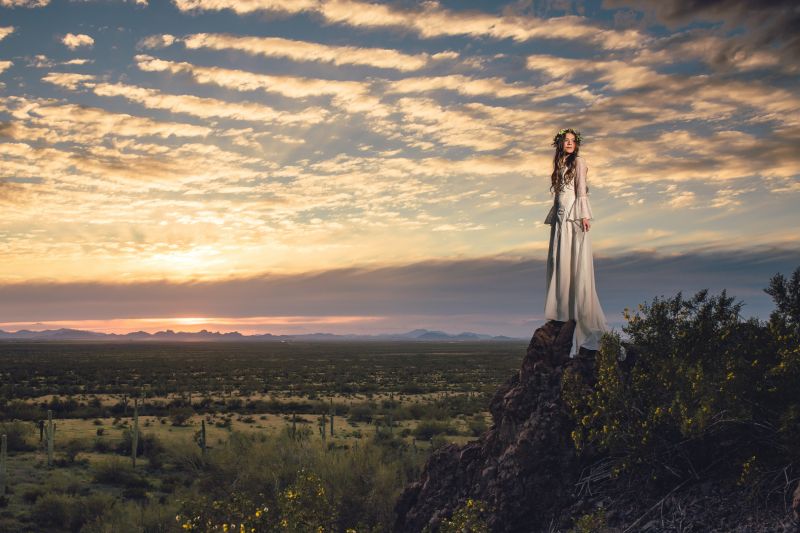
Here I reached for my MagBeam to light up Anabelle as she stood on the rock. You can see the vast landscape behind her is perfectly exposed while she is chiseled out of the scene with a pinned light source. For shots like these, if you don’t want to composite out a flash stand, the MagBeam comes in handy.
[REWIND: Dramatically Change The Color Of The Sky With 3 Colored Gels]
When The Sun Goes Down, What Do You Do?

After you lose your gorgeous sunlight, what’s next? This is your chance to bring out your creativity and reach for tools to help craft a entirely new look than what the scene offers. I used a 1/2 CTO (color temperature orange) gel on my MagBox to warm up her skintone while shifting my in-camera white balance to 4,000K, creating a contrast in color. If you are new to colored gels and want a primer, I suggest you watch this video to learn more!

Doing the exact opposite from the image above, I pulled out a CTB (color temperature blue) gel and shifted my in-camera white balance to 9,000K to make the sky appear as though the sun was still out. This is a great trick to capture the warm tones left over in the clouds and sky post-sunset.
Blue Hour & Beyond

You still have enough color in the sky up until 30 mins past sunset, which is known as blue hour. To take advantage of the rich cool tones that appear once the sun sets, I went back to the CTO gels and popped one flash behind Anabelle and then placed my Magbox to camera right. With the help of my wife and a little Atmosphere Aerosol, we created the very last image of the night.
Hope you enjoyed these tips to get quick and easy lighting setups during golden hour and just a little bit after. The sun sets so quickly during this time of day it’s important to have a solid understanding of flash and how you can easily manipulate light to create dynamic imagery with just a couple of tools. You can purchase the MagBox Pro Kit which comes with the correction gels that you see used in this video.
You can see follow me on my photography journey on my Website and Instagram.


Get Connected!