Let’s face it, we’re all a little bit lazy when it comes to editing…and by “lazy” what I really mean is efficient! In this article, we’ll show you exactly what settings you’ll need to create a preset that helps efficiently dodge & burn directly inside of Lightroom for dramatic natural light portraits.
Video: How To Efficiently Dodge & Burn In Lightroom for Dramatic Natural Light Portraits
You can download the exercise file and edit them alongside me as we walk you through this simple three step process to dodging and burning all within Lightroom.
Part 1 – Dive Right Into The Technique of Localized Dodge & Burn

We want the background of this image to be deeper and darker, and yes, we could have done that with a flash, but sometimes you just don’t have all your lights with you. Once we’ve lowered the exposure so the background is where we want it to be, you’ll notice the skin tones are dark. So what we’ll do is use our Adjustment Brush using the Exposure setting to raise it back to the original setting from the Raw file. And yes, the paint job may be a bit messy, but that’s okay because of the next step.
In Photoshop we have “Blend If” and inside of Lightroom, we have “Range Mask.” What that means is we can choose to blend a particular effect based on what’s underneath that effect. What this means with Luminance, as I pull up on my range, it’s not going to blend anything that’s in the shadow range.

Part 2 – Dark Mode Editing
Jumping back into the original file, we’re going to edit this file using the Dark Mode preset from the Visual Flow Toolkit. Once we’ve applied that default, you can see how everything is reversed from the original file. The background elements have a beautiful painterly vibe to it but now, we need to reveal the skin tones.
Using this as a final step, you can edit the image to look however you like with your own presets, and then apply the Dark Mode setting to get the “Darkened Version” of your favorite look. From here we’re going to jump into Part 3 for our final awesome time.

Part 3 – Final Edit of the Image (Awesome Time)
At this point we’re going to lift the shadows a little more, bring our highlights up a little, and then lower the white point down a bit to preserve the whites in the clothing. Now we’ll select our adjustment brushes for Quick Dodge & Lift (from the VFLOW presets), creating a statistical adjustment to change exposure values while retaining the underlying color of an area.
With this, we’re going to loosely paint over all of our subjects to make sure we’ve covered them entirely and haven’t missed anything. Not to worry if we’ve gotten messy as we’re going to fix that shortly.

What’s great about this is once you’re happy with your mask you can then hold alt or option and click the “magic button” and drag to the right or left to make adjustments to your preset quickly and easily without making any shifts in your colors. Once that’s done and you’re happy with the overall skin tones, now we’re going to use the same trick as in Part 1 by applying a Luminance Mask to pull it off of anything that’s extremely white and if you like, you can pull it off of the shadows as well. I kind of like the shadows so I’ll be leaving it for my image.
Then we are going to take the Erase brush and leave the Auto Mask on to clean up my earlier paint job. The Auto Mask feature will help you refine your edge efficiently helping you remove any halos and bright spots from your shot.

Finally, we’re going to use the Dodge Whites adjustment brush to bring out the little bit of depth on the faces that we don’t quite see yet. (Don’t worry, if you don’t have the presets you can pause the video to copy the settings or check the photo below to make your own!).

Now we can paint over all of their faces and only brighten the highlight values! This is what’s nuts and why I want you to share this video, since most people don’t realize you can make these types of adjustments inside of lightroom! And just like in the last section, we can adjust the intensity of the adjustment by holding alt or option and sliding left or right as desired. Then we’ll apply the luminance mask to take it off the shadows and give it a nice blend. You can add additional “layers” of this to add more to sections that may be darker than the rest in your image and on any other skin tone areas in your shot that need it.

From here you can refine any way you choose, but for me, I’m going to just add a radial burn to the image, bring the exposure down a little bit, and then brush it away from areas of skin to make sure the inside area is not as much affected as the outside area.
Now this is where we’ll make our final adjustments by pulling the contrast and highlights down a little bit, and then dial in my final white balance, for me I’ll be using a nice warm image, but you can do whatever you like for your personal preferences.

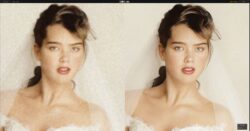
From start to finish we get a dark and beautiful burned portrait from just a natural light image right here inside of Lightroom. Let’s take one last look at the before and after, all edited in Lightroom using this dark mode technique.


Conclusion
We hope you enjoyed this video and lesson on how to efficiently dodge & burn in Adobe Lightroom Classic for dramatic natural light portraits. You should be walking away with three Visual Flow presets of your own as well; Dark Mode, Quick Dodge & Lift, and Dodge Whites, as well as the knowledge on how to use them efficiently with the added power of the Luminance Masks inside of Lightroom!
Learn More About Adobe Lightroom
To master more of Lightroom’s secrets and powerful tools, check out our complete Lightroom workshop series. If you are interested in using the presets used in this video, learn more about our Visual Flow Lighting Condition-Based Development Tools here.