
Developing with Lightroom is a different art to Photoshop in pretty much every respect. Whereas to work within Photoshop properly, it demands you understand how it thinks and does what it does; with LR you simply intuitively do. Except that’s not really the case, because the depths of Lightroom that you won’t really just learn through trial and error, the parts not so intuitive, is where some of the best stuff can be found. In the coming weeks, I’ll be going into more depth on how one can setup and use LR for a more tailored experience beginning now.

If you’ve read any of the thoughts I brain vomit onto the pages here at SLRL, you may have picked up that whilst I use, like, and think highly of Lightroom, I’m a Photoshop guy at heart. The type of work I tend to enjoy isn’t batch working on a wedding, but rather picking a few shots per shoot and making each of them tuned to my/client’s very liking. I’m used to Photoshop, and even with its changes and weird new startup current-file look, opening and setting it up is like greeting an old friend.
Lightroom’s organizational capacity with catalogs and so forth has always been its strongest point with me and for many, which is probably why Capture One has adopted that structure of late. However, Lightroom’s Developing ability has sort of hit maturity and come into its own in the past year or two. Enough, anyway, for me to spend a significant amount of time with and within it. There are two features I use within Lightroom that (and I’m not exaggerating here), revolutionized Lightroom for me: Snapshots and the SLR Lounge Lightroom Presets, which gets even better when using the tools below.
Snapshots
Absolutely one of the most underused and under appreciated features in Lightroom, and the only reason I can imagine for many to treat Snapshots like a leper is that there’s a lack of understanding of how they can be used. So here’s the breakdown that’ll show you how to use it, and illuminate why it’s so essential to LR developing.

Snapshots is a tab you’ll find within the Develop Module, and can be somewhat associated with the History tab, which is, no doubt, something you’re all aware of. Much like in Photoshop, the History in Lightroom is a trail of digital footprints of processes you’ve done to your image, and each of those steps can be retraced and reverted to.
Alone, it’s already a wonderful thing to have so you can, with but a click of the mouse, return to a preferred image some 10 processes ago. However, adjustments in Lightroom can be fast and frequent, and the history simply displays a change with rather banal notification that will say something like, “Update Highlights Adjustment,” or “Add Graduated Filter.” This doesn’t exactly tell you much when you’ve got a list of changes as long as The Orient Express. So what to do? Well, use Snapshots.
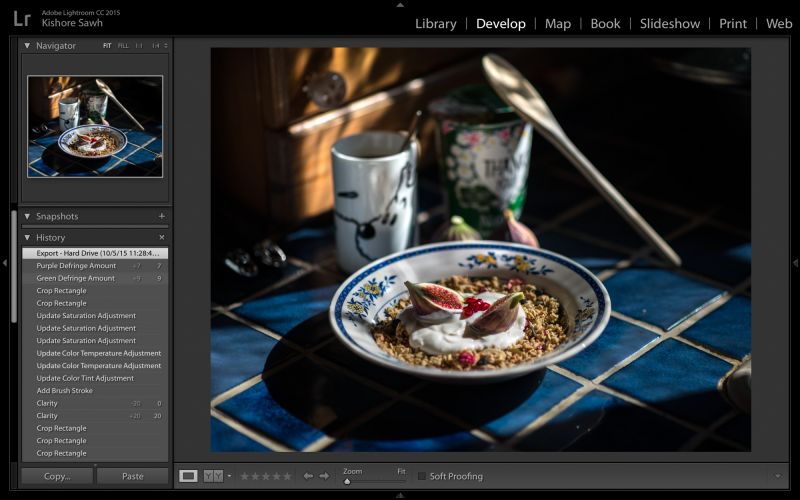
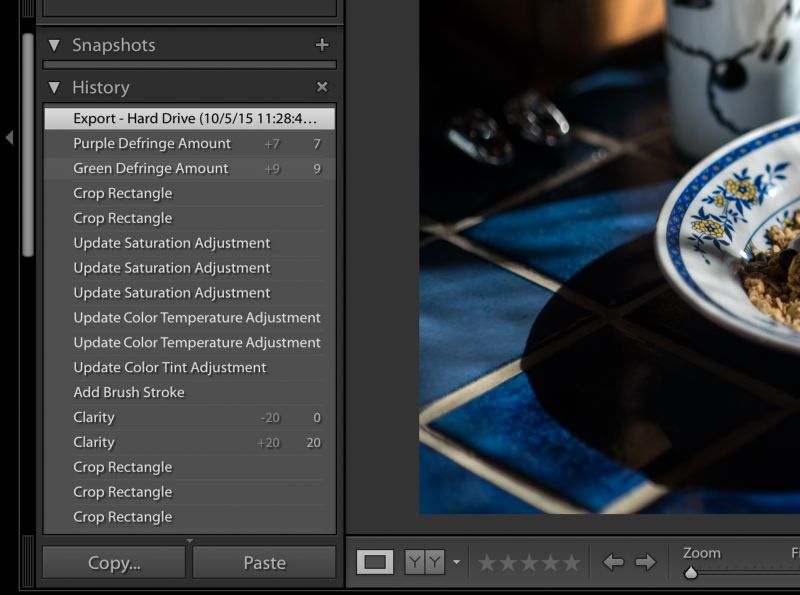
Think of a Snapshot as taking one of those digital footprints, digging it up and storing it in your closet for you to go back to easily. They allow you to quickly reference a version of your image with edits, that you store to go back to whenever. Simply, when you’ve come to a point in your developing where you feel you like the image, Snapshot it, then you can continue to work on it, and if 20 moves later you don’t like what you’ve done, you can revert to the point you liked and saved as a Snapshot.
Before I learned to use Snapshot, I would often make Virtual Copies of the same file and edit it, but this means I don’t always have to, and it doesn’t duplicate any images either so there’s no computer power penalty. And it’s dead easy to make one, as you simply make the edits you like, click the little add sign on the Snapshots bar, and a dialogue box will come up for you to rename your Snapshot. It works alphabetically so you may want to keep that in mind, but LR as a default gives you the date and time the edit, and I tend to just use that.
In this example, I used this image of my little cousin in the living room, edited it, applied a b&w preset and liked it, made a snapshot of it, then made some other changes. To go back to it, all it takes is a single click within the Snapshot bar.


Removing The Bottle Neck From Your Presets with Fader
Let me be clear here that I currently use and own our Lightroom Presets, and all those of Mastin Labs, and some VSCO. In order of preference, it used to be Mastin Labs, SLRL, VSCO, because Mastin had those great light-touch film looks, but now we’ve added those too. Though I still find the Mastin Labs Ilford B&W to be my favorite b&w presets, period. The true benefit of the presets is that it’s a system that allows for predictability, congruency, and personalization. It’s the thinking man’s Preset system.

But, and it’s a big one, I find using VSCO presets on my iPhone to be my favorite way to use presets simply because I can tone down the level of the preset in its entirety, essentially allowing me to apply the preset as I would opacity in Photoshop. It’s just not that easy in Lightroom because you have to go into individual sliders and adjust each, and sometimes I just want a preset but in a lighter variety. To the rescue came a friend, Mark Condon, founder of ShotKit, which I wrote about some two years ago now, when he suggested The Fader from Capture Monkey, and you can find more from Mark in his book Lightroom Power Use

What is it? It’s literally a preset opacity slider plug-in for Lightroom, and it has opened up the taps on the SLRL Preset System. With it, one is able to achieve the subtle, or emphasized look of all the presets without fiddling with numerous sliders, and using just one. It’s extremely simple to use, and it’s free. Download it, install it by going to Lightroom, File>Plug-In Manager then Add Plug-In. In use, click a preset you want, and then to go File>Plug-In Extras>The Fader and then use the presented slider until you have the desired effect. It’s brilliant.


Example In Use:


However, there is another newer app called Opal which we are currently evaluating, and it seems like it will be more fluid that Fader, and while there is a small price, the convenience and speed seem to make it an even better tool.
*This post has been updated form the original version which was published in Jan 2016.


Get Connected!