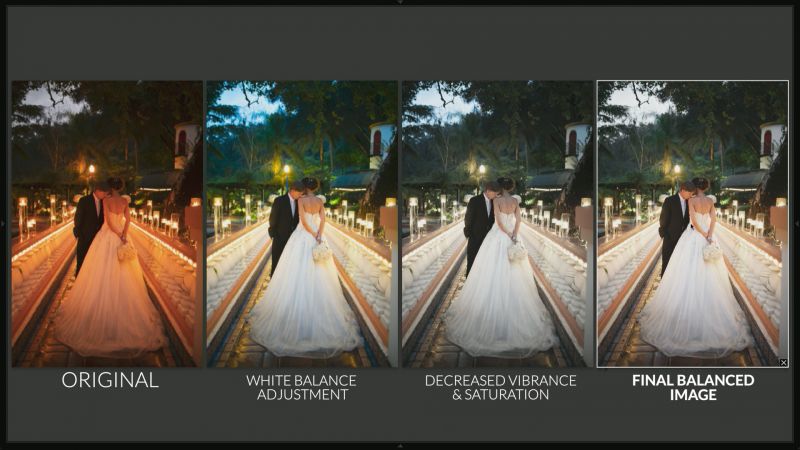
In this video, I’m going to show you how to correct the hypersaturated and mixed colors that occur during dusk, all within Lightroom.
The Lighting Situation
You’re loving that nice warm natural light as you see in the before image which is lit by the candlelight. But then you have a bit of blue peeking in from the sky or a window that is nearby. This image was shot on a Canon 5DM4 on a Sigma 35mm at 1/80th of a second, f/1.4, and ISO1600. It was shot at 6,700K, I know extremely warm, and there is no reasoning behind this other than pure laziness.

Here are the steps I took to take the image from what you see on the left to our final version on the right.
1. Dial in your Accurate White Balance

Using the White Balance Dropper I selected an area on her dress to dial in an appropriate white balance for the image. If you don’t have anything in your scene that is purely white find something as close as possible. From there I adjust my exposure up by +1.50 to arrive at the image you see above.
2. Hypersaturation Because Of Mixed Lighting
What ends up happening is that a portion of the image becomes highly saturated since our white balance was adjusted for the dominant light in the scene (candlelight) and not for the light in the background (the sky). This throws off the overall warmth and brightness that I would like to have in the image.

You would think the logical solution would be to reduce the overall Vibrance and Saturation in the image. The issue with doing so is that it affects everything universally and doesn’t give us fine-tuning control. This is why the HSL tool was made – to help pinpoint and adjust colors in a scene.
3. Fixed Mixed Lighting With HSL Tool

By taking the tool in the top left-hand corner of the HSL panel and dragging it over the image, you have the ability to pinpoint certain colors and fine-tune them. So, I placed my tool over the blue area in the sky and neutralized the color. Note, it’s important that you don’t completely annihilate the color you are choosing to desaturate, this is what makes images look too fake or overedited. This step will depend on a matter of preference.
[REWIND: How To Balance Mixed Light]
From there, I wanted to desaturate the green tones in the image as well and you can see that as you drag the tool on the image, certain colors are affected. Within the Green tones, there is some Yellow, and you can see that as I pull the green down, the Yellow simultaneously decreases in saturation. I then pulled down the oranges a bit to neutralize the skin tones.
4. Go Back And Adjust Temperature & Exposure
Now that we’ve gotten the image to a better point, add some warmth back in and make small adjustments in the Tone Panel to get to a more balanced exposure now that all your color tones have been adjusted.

If you take a look at the progression of the edit you can see the differences in color saturation through them all. While decreasing overall Saturation and Vibrance may seem like a quick fix, it does a terrible job at keeping the tones of the image true to color and doesn’t allow you to pinpoint where the issues are.
If you are interested in learning the A-Z’s of editing in Lightroom check out our Mastery Series that includes step-by-step editing examples and in-depth explanation.


Get Connected!