Introduction
In this video from our Lightroom 4 A to Z Workshop on DVD, we will discuss how to use the Spot Removal Tool in Lightroom 4. The Spot Removal Tool is great for removing blemishes on skin, dust from camera lenses, tiny insects around your subjects, and any other specks in your images. There are two types of Spot Removal Brushes: the Cloning Brush and the Healing Brush. This article will go over what these 2 Spot Removal Brushes are and how to use them.
Watch the Video
The Spot Removal Tool
The Spot Removal Tool is located next to the Crop Overlay Tool in the Adjustments Toolbar, as shown below.

You can also access the Spot Removal Tool by simply hitting “Q.” The downside of the Spot Removal Tool is that only the size of the brush can be changed, and the shape of the brush cannot be changed. This problem actually causes a few limitations as we cannot use the Spot Removal Tool for certain areas of the image that we want to remove. That means that oftentimes, we need to bring our images into Photoshop to finish removing any spots in our image.
The Cloning Brush
As mentioned before, there are two different types of Spot Removal Brushes. The first brush is the Cloning Brush, which can be found in the Adjustments Tools once you have selected the Spot Removal Tool.

The Cloning Brush replaces your Target Area with an area that you sample from. It is a good idea to zoom into the image when using the Spot Removal Tool so that you can clearly see the spots you want to remove. Generally, a 1:1 zoom is good enough. To select a zoom, go to the Navigator Panel on the left of Lightroom and select one from the options available. As you can see below, a 1:1 zoom has been selected. The box in the image shows the area of the image you are in.

The easiest way to zoom in on your image is to use the Space Bar on your keyboard. As shown below, the zoom icon will appear when you hold down the Space Bar.
![]()
While holding down the Space Bar, left-click with your mouse on an area of the image to zoom into the area. As shown below, you can also move to different areas of the image by dragging the image with your mouse. However, you still need to be holding the Space Bar down in order to move to different areas of the image.

When you release the Space Bar, your Cloning Brush will appear, as shown below.

Using the Cloning Brush
To adjust the size of the Cloning Brush, simply hit “ [ ”or “ ]. ” Another way to change the size is with your mouse wheel on your mouse. You can also change the size of the brush in the Adjustments Toolbar by dialing in a number or by dragging the slider for “Size.” “Opacity” refers to the opacity of the Target Area and can be changed the same way as changing the size of the Cloning Brush. For example, when you want to diminish a spot instead of completely removing it, you would bring the opacity down by dragging the slider or dialing in a number.

When removing spots with the Cloning Brush, you want to adjust your brush size down to be just a little bit bigger than the actual spot you want to remove. To get the best effect out of the Cloning Brush, your brush needs to be almost the same size as the spot you want to remove.
First, click on the spot you want to remove with your Cloning Brush. This is known as the Target Area.

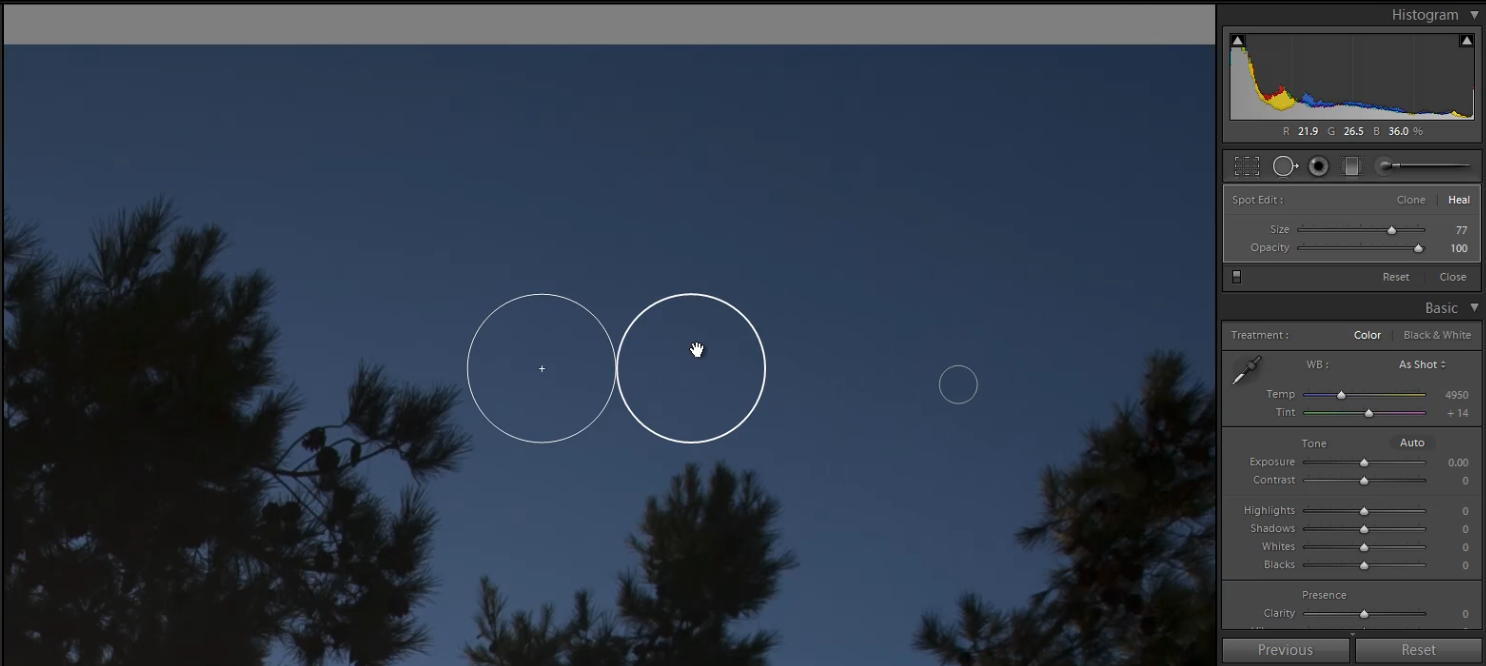
Lightroom will then automatically guess and sample from another area, known as the Sample Area, next to the Target Area. Below, the mouse is hovered over the Sample Area. As you can see, the Sample Area has been applied to the Target Area. The Sample Area has an arrow going towards the Target Area.

If the Cloning Brush has cloned from the correct Sample Area, move on to the next spot you want to remove. However, the Cloning Brush is not always correct. In our image below, the Cloning Brush has selected a portion of the tree as the Sample Area to replace the Target Area.

To change the Sample Area, simply click on the circle of the Sample Area and move it to the correct Sample Area you want to replace the Target Area with. Likewise, to move the Target Area, simply click on it and move it to wherever you like, as shown below.

If you want to adjust the size of the Target Area, select it and click on the edge of the circle. Next, drag the edge of the circle to make the Target Area larger or smaller. As you can see below, enlarging the size of the Target Area also enlarges the size of the Sample Area.

The Healing Brush
The second Spot Removal Brush is the Healing Brush, which can be found next to the Cloning Brush once you have selected the Spot Removal Tool (“Q”).

The Healing Brush replaces your Target Area with an interpreted guess from a Sample Area. That means, the brush takes your Sample Area, guesses what should be in that Target Area, and then heals that Target Area. Although the Cloning Brush and the Healing Brush work in slightly different ways, we can apply these brushes the same way. It is also a good idea to zoom into the image when using the Healing Brush, just like we did with the Cloning Brush.
Using the Healing Brush
As mentioned before, applying the Healing Brush to an image is the same as applying the Cloning Brush. Once again, we need to adjust the size of our Healing Brush to match the size of the spot we want to heal out in the image. As you can see below, there is a larger spot in our image that we want to heal out.

Once you have selected your Target Area, the Healing Brush will automatically guess and sample from an area it thinks is the correct area to replace. As you can see below, the Healing Brush has selected the correct Sample Area to apply to the Target Area.

If the Healing Brush sampled incorrectly and chose the wrong Sample Area to replace the Target Area with, just move the Sample Area to the correct area as we did with the Cloning Brush. To get the best effect with the Healing Brush, it is important to move the Sample Area to an area that has a very similar look and color as the Target Area. If you do not select the correct Sample Area, it will be very noticeable in your overall image.
Once you have finished making your adjustments, click “Q” to jump out of the Spot Removal Tool. Then hit Space Bar to zoom out of your image. Check your image to see if there are any noticeable areas that were cloned or healed incorrectly.
When to Use Photoshop
As mentioned earlier, the downside of the Spot Removal Tool is that we cannot adjust the size of the brushes. Therefore, when there are more complex areas or longer areas that need to be removed in our image, we cannot remove these spots in Lightroom. Instead, we would have to bring that image into Photoshop to remove the spots. As you can see in our image below, there is a long piece of dust on the right side of the image that cannot be easily removed with a circular brush.

If you try using the Healing Brush or Cloning Brush on a difficult area like the one above, it will be very obvious. As you can see in the image below, the Healing Brush did not do a good job of healing out that long piece of dust.

You could try removing a difficult spot by using very small brushes multiple times to go over the area. However, this is a rather ineffective way of removing spots in your images and it will usually be very noticeable.
Diminishing Instead of Removing
Earlier, we mentioned that we can diminish a spot by bringing down the opacity. For example, when working on areas of the skin, we may not want to completely remove a spot but rather diminish it. If there is a beauty mark that we want to keep but is just a little too noticeable, then we would turn the opacity down. As you can see below, we have selected a beauty mark as the Target Area and the brush has selected an area as the Sample Area. If you look over to the right, you can see that we have brought the opacity down from 100 to 25. That way, the beauty mark will still be there, but less noticeable.

Conclusion & Learn More!
Once you have finished removing all of the spots from your images, you can view the Before/After of your image in a couple ways. The easiest way is to simply hit “\.” When you hit “\,” Lightroom will display your image before you removed the spots. Hit “\” again to return back to your image with the spot removal adjustments. Another way is to turn off the Spot Removal Tool in the Adjustments Tools. Just click on that filter to turn the Spot Removal on or off.

We hope you enjoyed this article and video excerpt from the Lightroom 4 A to Z Workshop on DVD. Stay tuned for our next article and episode!
The Lightroom 4 A to Z Workshop on DVD is a 14 hour video workshop turning any Lightroom novice into a complete master of Lightroom 4 in no time! The Lightroom 4 A to Z Workshop can be purchased by itself, or within the Lightroom 4 Workshop Collection which also contains our award winning and industry standard Lightroom 4 Preset System, as well as the Lightroom 4 Workflow System.


