
No one venue is quite like the next. Some offer scenic landscapes and stunning architecture, while others boast panoramic ocean views; at such locations, the biggest challenge arises from narrowing down your choices. When the options are plenty, and all of them great, we can focus more on other aspects of the shoot and worry less about the scenery. Unfortunately, not all locations are designed to provide amazing backdrops for portraits.
Problem: LACKLUSTER LOCATION

Try as we might to control most aspects of a photo session, there are times when we must shoot at an undesirable location. On top of this, when the subjects you’re photographing are paying clients, you will be expected to deliver top-grade images, regardless of the venue. As a result, shooting at lackluster locations can prove quite stressful, especially without preparation.
[REWIND: One Off-Camera Flash Turns Ordinary Into Extraordinary]
Join PremiumSolution: CREATIVE LIGHTING & COMPOSITION
Luckily, we can use creative lighting and composition to make extraordinary images in ordinary places. By simply adjusting your exposure and adding a flash behind your subjects, you can turn day into night and create beautiful silhouettes in even the most mundane locations. Experiment with various angles for creative composition, and direct your subjects into a variety of poses. The posing options will pay off later when designing wall art clusters or album spreads.
The gear you will need (in addition to your camera and lens) to create day-for-night silhouettes. This is not an exhaustive list of options:
Flash
- Profoto B2 250 Air TTL To-Go Kit
- Canon Speedlite 600EX II-RT
- Yongnuo Speedlite YN600EX-RT II for Canon Cameras
WIRELESS TRANSMITTERS
CTO GELS
LIGHTSTAND
Click right in the box below to see a behind-the-scenes video:
Here is how to transform boring scenes with day for night silhouettes in 4 easy steps:
STEP 1: EXPOSE FOR AMBIENT

Because we’re turning day into night, we will need to underexpose the image and darken the scene. When using a flash without high-speed sync, the shutter speed will have to be set at 1/200th or slower. To further reduce the bright ambient light, keep your ISO low and bump your aperture accordingly.
STEP 2: PLACE FLASH W/ CTO

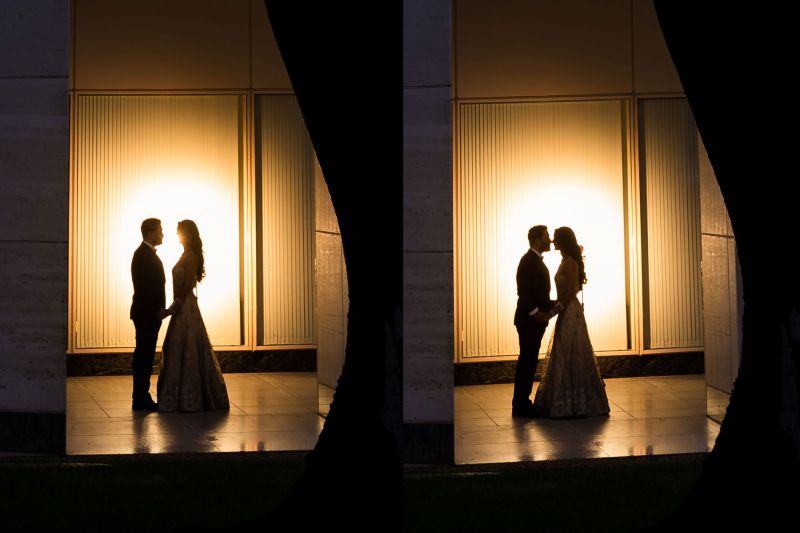
To create a backlit silhouette, we faced the flash away from the couple, close to the background. You can control the size of the light around your subjects by adjusting the zoom and power level on your flash. Be sure to cool/warm your white balance in camera, and add a CTO gel to your flash if necessary. For this image, we added two CTO gels to the flash to allow us to further cool the white balance and enhance the day-for-night effect. Confused on how to use CTO gels? Check out this tutorial for more information.
STEP 3: PLACE & POSE COUPLE

We then directed our couple into a closed pose, which is one of five foundation poses covered in our Complete Posing Workshop, and we placed them between two columns, using a wide angle to capture more of the building, as well as a tree that stood just outside the building to our right.
When shooting a silhouette, especially of a couple, it is important to make sure there is a clear separation between the subjects; otherwise, their form will lose definition and you won’t know where one subject ends and the other begins.
STEP 4: CUE VARIOUS POSES FOR A STORYTELLING SEQUENCE
While a shot like this could qualify for an epic, stand alone image, you could use cues to direct your subjects into different poses and build a storytelling sequence that would work great for a wall art cluster or album spread.
[REWIND: Use Posing Cues To Pose For Story]
Join PremiumSee more tips like this in Photographing the Couple, part of the most comprehensive Wedding Workshop series on the market. As a Premium Member, you can stream all of our workshops now, with new workshops added each week!


Get Connected!