Since we first wrote some Wacom Pen Tablet reviews there has been a massive interest in new versions of the hardware, how different they are, and particularly how to set them up for different applications. We are happy to oblige, and in the coming weeks we have a review of the new/current Wacom Intuos Pro and the Wacom Cintiq Pro 13, and additionally have some sample set-ups for applications like Photoshop, Capture One, Affinity Photo, and Lightroom.
It warrants stating that one of the reasons these units are so valuable is that aside from the obvious natural feeling of using a pen, they allow for a faster, less broken, and more efficient workflow. Much of that is achieved through personalization and set-up (takes experimentation), which is really one of the big differences between the standard and higher-end models in the range; the Pro line lets you personalize to a higher degree, and allows for much quicker access and alterations.
*If you’re looking to become adept at Photoshop and Lightroom at record pace, CreativeLive’s Photoshop Week is upon us, and as a partner SLR Lounge is offering high discounts on the week. Check it out here.
Now, that said, there is one relatively basic configuration you can make which can have a profound effect on your experience, and I’m surprised how often I see people using tablets who don’t know it, and how often I’m asked about it. Simply, it’s setting up your on-pen buttons to allow you to adjust brush size, hardness, and ‘undo’.
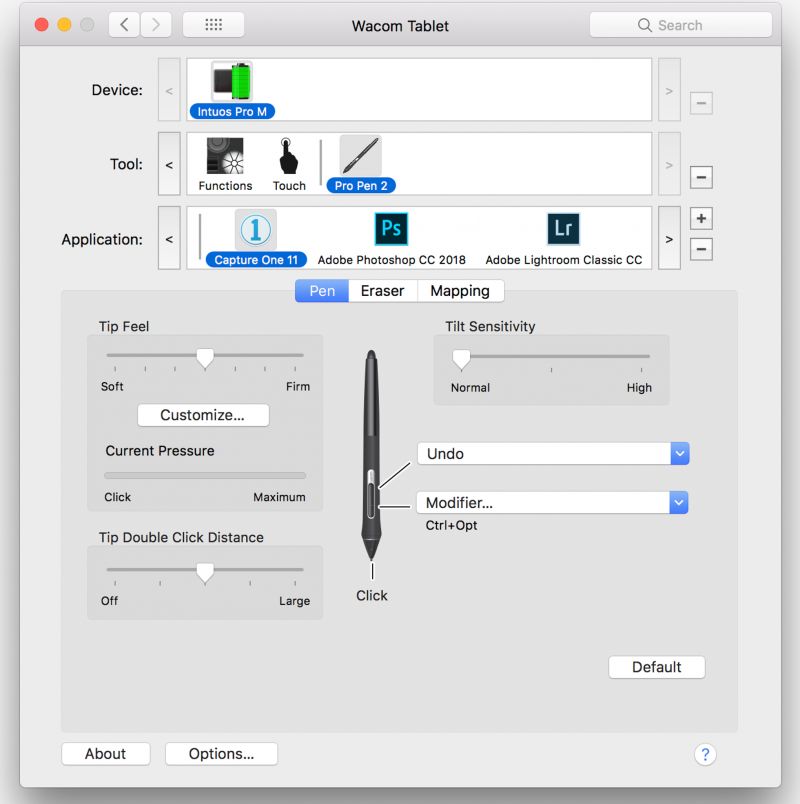
Setting up a Wacom tablet from the get-go can be a little tedious, but the rewards are reaped quickly when done. If you’ve ever tried then you’ll be familiar with the following screen:
And, incidentally, the above setting is the setting you can set yours to, to have the functionality described.
Most Wacom pens will have two buttons, and if you do a lot of brush work, as is typical when using a pen tablet, this button set-up is a good one. Perhaps ‘undo’ isn’t a priority for you, and that’s fine, but being able to change brush size and/or opacity without touching the keyboard, any hotkeys on the tablet or looking away from the screen, is a joy. The caveat here is that it doesn’t work the same on all. Here are some suggested settings:
Photoshop
Photoshop gives you the greatest flexibility when using this set-up compared to the other applications mentioned in this post. With the button set-up as shown below you can hold down the bottom button and hardness will change as you move the pen up/down across the tablet, and brush size will change as you move left to right.
Lightroom
Lightroom will allow you to change brush size by moving either up or down or side to side with setting shown, however, it doesn’t seem to work as smoothly as with photoshop, but it does work.
[RELATED: Why You need A Wacom Tablet & How To Set Up A Wacom Tablet For Lightroom]
Capture One
A Wacom pen, I’m sorry to report as a Capture One fan, cannot currently be programmed to function in the ways above. If mapped as done in Photoshop (see below) it’s a little bit more of a protracted process, but not much.
Holding down the pen button and tapping on the tablet will bring up the brush adjustment parameters dialogue, and you can either continue to hold the button or let go and be able to quickly adjust the brush sliders and as you move the pointer out of the dialogue window you’re back to work.
Again, this is sort of pen-tablet 101 here, but as with so many things, the most basic are often the most useful. Hopefully this is of some utility to you, and if there are things you’d like to know specifically drop a comment below.
Recommended Tablets:
Wacom Intuos Pro Medium (Small is gone but Med is now the same size)
Wacom Intuos Draw Pen Small Tablet
Reviews:


Get Connected!