The following is an excerpt from our HDR Tutorial by SLR Lounge. This workshop dubbed “the gold standard of HDR education” by FStoppers contains over 13 hours of tutorials, RAW files for you to follow along, and dozens of full prep to post examples. We cover bracketed HDR, in-camera HDR, single-shot faux HDR, single-shot bracketed HDR, panoramic HDR and more! Click here for more info.
Introduction
In our previous tutorial, “Horseshoe Bend: Adobe Photoshop Layer Blending,” we demonstrated how to use a Layer Mask and the Graduated Filter Tool to blend the two different processed images in Adobe Photoshop, one RAW single exposure and one HDR image created in Photomatix Pro.
[Tip: Click here for a 15% Photomatix Discount Code]
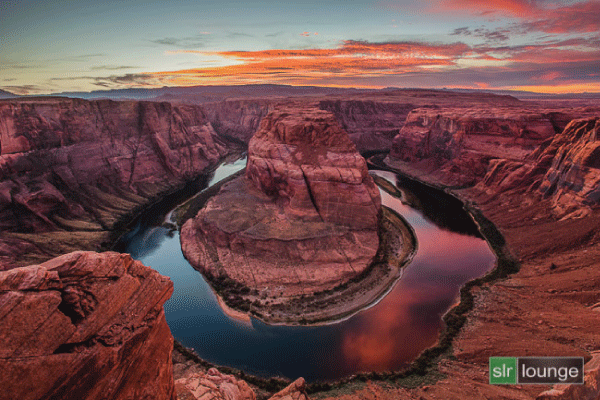
In this final tutorial, we are now going to apply the finishing touches to that merged PSD image file, to create the final HDR shot of Horseshoe Bend (Page, Arizona) pictured below. We will be doing the final image processing inside of Lightroom 4. In addition, we will also demonstrate how to create a black and white version of the shot below.

Watch the Video
CR2 File vs. PSD File
Below, we have the original RAW CR2 file and the merged PSD file. In the PSD file, we have used the HDR image from Photomatix to preserve the highlights in the sky, which we demonstrated in our “Horseshoe Bend: Adobe Photoshop Layer Blending” tutorial.
When shooting HDR photography, having a camera that can capture more stops of light is extremely useful because the camera can capture more dynamic range. For example, if we have a camera that can capture 14 stops of light, then a perfectly exposed image might actually be able to capture this entire tonal range within that scene! If we can capture all of the tonal range in one single shot, this makes processing much easier since we do not have to go through the whole HDR processing technique. Instead, we can just “tone map” it, using a single-shot HDR. Although cameras that can capture more tonal range are nice to have, they are not a necessity.

How to Edit the PSD File in Lightroom
We will be making our final editing touches to the PSD file, so make sure you have that file selected. After you have selected the PSD file, press “D” to jump into the Develop Module of Lightroom 4.
Applying Presets
First, we are going to apply the “HDR Light” preset from the Presets Panel (“Ctrl + Shift + 1”) to the PSD file. By doing so, we are actually re-processing the HDR with the HDR effect. However, even with the lightest HDR effect applied, it is still too powerful. This gives us our starting point but it will need more work to be perfect.
Below is our image with the HDR Light Preset applied.

The Detail Panel
After we have applied the HDR Light Preset, the first thing that we need to do is fix the detail in our image. Expand the Detail Panel (“Ctrl + 5”) and reduce both Sharpening and Noise Reduction back down to zero.

The Lens Corrections Panel
Then, expand the Lens Corrections Panel (“Ctrl + 6”) and reset Lens Vignetting back down to zero as well. Both of these settings were already applied to our image, so we don’t need them.

The Basic Panel
Next, we are going to make some adjustments in the Basic Panel (“Ctrl + 1”). To give our image a moody tone, darken the image by bringing Exposure down to -0.10. Then, reduce Contrast down to zero. Next, tweak the Highlights down to -80, the Shadows to +30, the Whites to -80 and the Blacks to +30. Finally, bring Clarity down to +20.
Below is what our image currently looks like with these adjustments in the Basic Panel.

The Graduated Filter Tool – Contrast Adjustments
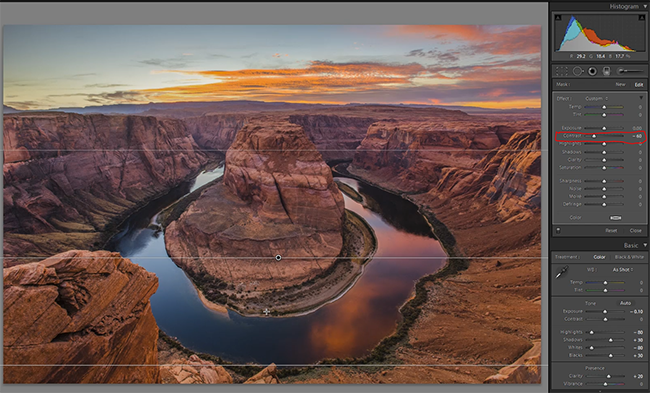
Since the rock at the bottom left corner of the image is so close to the camera, there is a lot of contrast whereas the rocks further back in the image do not have as much contrast. To fix this, we are going to use the Graduated Filter Tool (press “M”) to create a negative Contrast Brush.
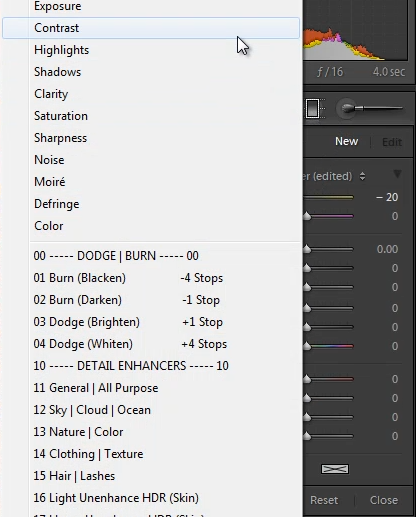
This will create a more natural transition between the high contrast and low contrast areas of the image when we drag the brush up from the bottom. After you have selected the Graduated Filter Tool, select “Contrast” from the dropdown menu.

Next, set the Contrast of the brush at -60 so that the effect blends in a bit better. Below is our image with the Graduated Filter Tool with Contrast at -60 applied. As mentioned earlier, we are going to drag the brush up from the bottom of the image.

Back to the Basic Panel
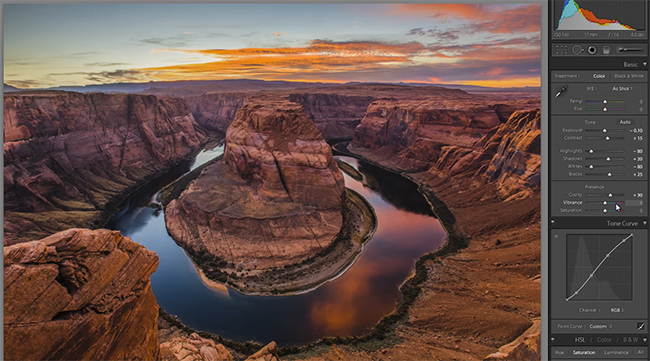
Now that we have adjusted the high and low contrast areas of the image, we are going to make overall Contrast adjustments in the Basic Panel again (“Ctrl + 1”). These adjustments will affect from the midpoint all the way up to the foreground objects in the image. Bring Contrast up to +15 and bring Shadows down to +20. Next, bring Blacks down to +25 and bring Clarity up to +30. Be careful not to bring Clarity up too high as your image will start to look very unnatural.
Below is our image with the new adjustments we made in the Basic Panel. [FAQ: What is HDR Photography?]

The Graduated Filter Tool – Sky Filter
Next, select the Graduated Filter Tool (“M”) again because we will be adding more detail to the sky in our image. Select “Sky | Cloud | Ocean” from the dropdown menu.

To make the effect a little more subtle, bring Exposure down to -0.33. Next, bring Contrast down to 10, Highlights to 10, Shadows to -10, Clarity to 15 and Saturation to zero. Finally, set Sharpness at 10 and leave the remaining settings at zero. We do not want too much of an effect since this shot already has a really nice sky to begin with.
Now, simply drag the brush down from the top of the image.

Back to the Lens Corrections Panel
Double check your image for fringing and make sure everything looks good. Next, we are going to go back into the Lens Corrections Panel (“Ctrl + 6”) to add in a subtle Vignette to slightly darken the edges of the image. Bring Amount up to -10 and Midpoint to 15.

Making Comparisons
Now that we have finished editing our final HDR image of Horseshoe Bend, let’s take a look at the blended and original images.
Blended Version vs. Edited Version
The before version of the image, straight from Adobe Photoshop, is on the left. As we can see, the before version is quite flat when compared to the edited version on the right.

Original Image vs. Edited Image
Next, we need to take a look at the original image and compare our final edited image to see if we like it.

Applying the Final Touches
We need to compare the final edited HDR image with the original image to see if we need to make some final adjustments to the HDR image.
Fixing Overall Saturation
When we compare the original image with the final edited image, there is actually a little bit too much saturation overall in the final HDR image. Therefore, we need to go back to the Basic Panel (“Ctrl + 1”) to make some adjustments. Pull Contrast down to +5 and bring Vibrance down to -5 as well.

Fixing Temperature
Next, we need to check the Temperature with the original RAW file. If you want to go with a certain tone for the image, you would make adjustments to the Temperature. For our image, we will set Temperature at +3 to give us a little more warmth and yellow in our image. Temperature adjustments come out quite strong in images so make sure you do not overdo them, but of course they are going to be slightly subjective

Fixing the Graduated Sky Filter
Finally, we are going to reduce the effect we applied to the sky with the Graduated Filter Tool (press “M”). We want to make a subtle effect with this enhancer, so bring Exposure down to -0.13. Set Contrast at 7, Highlights at 8, Shadows at -10, Clarity at 7, and Saturation at zero. Next, set Sharpness at zero and leave the remaining settings at zero.

This is our final HDR image of Horseshoe Bend, taken in Page, Arizona.

How to Create a Black and White Version
To create a black and white version of this same shot, first create a virtual copy by pressing (Ctrl + ’). Next, convert the image to black and white by pressing “V.” With black and white images, we always need to add a little more exposure and contrast to the image. Therefore, go into the Basic Panel (“Ctrl + 1”) and bring Exposure up to +0.43 and bring Contrast up to +25. Highlights are at -80, Shadows at -10, Whites at -80 and Blacks at -5. Finally, set Clarity to +30.

To create a more dramatic look to our black and white image, select the Sky Filter that we previously applied to our image. Increase the burns by bringing Exposure down to -0.69.

Below is our final black and white HDR image of Horseshoe Bend.

Conclusion & Learn More!
If you check the histogram (“Ctrl + zero”) of our final HDR image, we still have all of the tonal range, which is good. If you want to, you can pull down Temperature in the final color HDR image – this is more preference at this point. When you compare your final HDR image with the blended PSD file, you can see that we have retained a lot of detail in the final image, especially in the sky.
We hope you have enjoyed this final tutorial on creating our final HDR image of Horseshoe Bend in Page, Arizona!
For more HDR education, be sure to check out our HDR Tutorial by SLR Lounge. This comprehensive “gold standard” guide will give you a mastery of HDR photography, from the scene considerations to the actual shooting to the post production. Click here for more info.


