With the way cameras are developing, we thought we would give you the ultimate guide to HDR portraiture. Specifically, how you can push your sensors to their utmost potential to yield stunning, high dynamic range portrait photography in a single raw image! In this video, we will walk you through a step-by-step HDR photo edit in Lightroom and offer you 3 free presets to use for your very own HDR portraits.
For this tutorial, we are using the Visual Flow Preset System, a lighting condition-based (patent pending) processing that we’ve partnered with DVLOP on. We will also be covering how to edit HDR portraits in Lightroom (without presets) and walk you through creating 3 presets for you to use for your images:
You can download the RAW file to work on while you are watching this tutorial by filling out the form below!
What is HDR?


High Dynamic Range photography produces an image with a broader range of tonal detail than would normally be produced by a single image from your average camera. In this video tutorial and accompanying article, we are going to discuss exactly what is HDR and what types of scenes have a high dynamic range, to begin with.
How to Shoot HDR Portraits


From point of capture, we are shooting the image in such a way that it helps us minimize the amount of work we would have to do in post. When you expose in-camera for an HDR image, you typically want to expose to the left to maximize your histogram. Do not confuse this technique with underexposing. Simply push the shadows to the left edge of the histogram while making sure that you aren’t clipping any shadows. Allow your camera make/model to pick up as much of the highlights it can. If your camera boasts a broader dynamic range, it will naturally pick up more highlights. But, either way, we want to preserve shadow details since clipped shadows will give us muddy/green tones when pulled. Maxed out histograms in HDR scenes will look something like a U-shape shown below.

For more information on exposure, we just released Part One and Part Two of our Exposure Guide which you can watch for free.
How to Edit HDR Photos in Lightroom
In just four simple steps, and less than 30 seconds, I will show you how we achieved the final image now that the image is exposed properly for an HDR edit:
1. Apply HDR Natural Preset

We first apply the Visual Flow: Modern > 02c. HDR Natural Preset to balance the overall tone and exposure in the scene. While this tutorial shows you how to achieve the final edit using the Visual Flow Preset, we will walk you through what the HDR preset is actually accomplishing later in the article by discussing the changes made in each Lightroom panel. The Modern Pack has a modern pop of color with a splash of warmth to create soft and flattering portraits.
2. Apply Radial Burn

Next, we add a Radial filter with a -1.00 Exposure Burn to really draw the viewers’ focus into the subjects. A quick trick is to hold down Alt/Opt and click and drag to the left or right and you can control that filter however you see fit.
3. Adjust Temperature, Tint, & Contrast to Taste
 Since the preset doesn’t adjust the color of the image, go ahead and adjust the Color Temperature and Tint to taste.
4. Enhance Sky and Clouds
In addition to our Visual Flow Preset System, we’ve built an entire pack of Re-touching Brushes designed to help add finishing touches to images all within Lightroom. For our last step for this HDR image, I grabbed our ‘Sky & Cloud’ Re-touching Brush to bring back some of the detail we lost from the sky. And that’s it! As you can see in the video, the entire process should take well under 30-seconds!
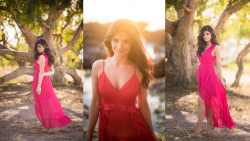
Final Before/After

Now that we’ve walked you through how to accomplish this by using our Visual Flow Development Tools, let’s breakdown what the Lightroom preset is doing to the image so we all fully comprehend how we are pushing the file to its max potential.
Lightroom HDR – How To Make an HDR Preset
While presets are amazing for efficient editing, it’s great to truly comprehend what they are doing to your image to better understand how to photograph your images. Let’s break down what exactly is happening in our Lightroom Develop Module when we are editing an HDR image.
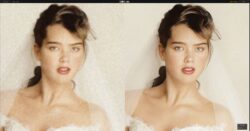
What I would recommend is starting with the right exposure for your system, whether you are using the Visual Flow system or your own Lightroom presets. This is the first and most important step because it will help minimize the amount of time you spend per image in post. To learn more about dialing in the perfect exposure, read Part One and Part Two of our Exposure Guide. When you expose in-camera you want to expose to the left to maximize your histogram. If I press J to turn on my Highlight and Clipping alert in Lightroom you’ll see that this image is actually not properly exposed.

As soon as I decrease the Exposure settings by -1.00 you’ll start to see the Shadow Alert (in blue) pop up, this is a great indication that you’re near-perfect exposure. We want to make sure that when we are dialing in our exposure in-camera that our shadows are not underexposed.
1. Tone Curve for HDR Photos
The Basic Adjustments shown below are designed to recover all of the highlight and shadow detail in the image. The problem in doing so is that it kills image contrast as shown below.

Because our image has been flattened out, we are using the Tone Curve shown below and to the right to add back in contrast and an adjustment to exposure. If we were to add contrast through the Contrast slider, we would end up with wonky colors throughout the image. The overall effect of this curve brightens but also add contrast back into the image. Here are the Basic and Tone Curve settings for the Visual Flow HDR preset (tweak for your own personal style):

2. HSL & Color For HDR Photography
Anytime we are making sweeping changes to an image we need to work on the color. Typically, HDR Presets pack a punch when it comes to color because they are being stripped of some of the original contrast and luminance. If you are following along in the video, pause, and dial in each of the HSL settings you see. We are adjusting the Hues of Oranges and Yellows by decreasing them a bit to keep skin tones from going nuclear while also adding in a little more Teal into the Greens.

Next, we’re pulling down the Saturation of every single color because this is predominantly where most colors in HDR images get blown out of proportion. Lastly, we adjust the Luminance (brightness) of each color to brighten the appearance of each color (especially for skin tones and all the details that would be in that range). In addition, we adjust the Split Toning to add a unifying bit of color to our Highlights (Yellows) and Shadows (Oranges) and balance them at +60.
3. Sharpening & Noise Reduction Designed for HDR Portraits

In the next section in the Develop Module, you’ll come across the Detail portion of the image where you’ll find the Sharpening and Noise Reduction settings. We have a standard amount of sharpening that is being added to all of our images and a noise reduction setting that is designed for HDR. We need to increase noise reduction and avoid our shadows from getting muddy.
4. Save Your Custom Lightroom Preset
Once you’ve dialed in all of these settings, save your preset by doing the following steps:
- Head to the top of your Preset module and in the right corner, you’ll find a + sign, click that to create and save a new Preset.
- Name your preset and select ‘Check All’ and then de-select any settings you don’t want to be applied to every photo such as White Balance, Graduated Filters, Radial Filters, Lens Corrections (with the exception of Lens Vignetting).
- Click Create and now you have your own HDR Preset!
Creating a Radial Filter in Lightroom

This is a quick and easy Lightroom trick that I like to apply to the majority of the images I edit in Lightroom because it draws in the viewer’s focus immediately. The Visual Flow Retouching Brush Pack comes with 47 retouching brushes and 26 tools to get most of your detailed editing done in Lightroom. This specific brush is a simple -.50 Exposure Burn in an oval shape that typically is applied from edge to edge of your image. Once you’ve dialed-in this exposure setting, go ahead and follow the instructions given in the prior section to create a preset and select the ‘Check None’ box and then select ‘Radial Filters’ and save it out.
Creating a Sky/Cloud Enhancement Brush

The last preset we are going to teach you how to create is the Sky + Clouds Local Adjustment Brush from our Visual Flow Retouching Kit. As you saw when we demonstrated this portion in the video, this brush is designed to enhance the appearance and deepen & darken our clouds without making it obvious. We are going to pull down the Highlights to -30 and raise the Shadows to +35, therefore balancing out the Exposure. An important aspect of this preset is in the Clarity and Dehaze settings which are set to +40 and +15 respectively. This shift is what really makes the clouds pop against the sky but a heavy hand of either one of these settings can make an image look over-edited.
High Dynamic Range Photography – Additional Resources
Looking for more information on HDR photography? Browse through some of our past tutorials to get more insight on how to capture and edit HDR images:
- HDR Real Estate Photography
- Single Shot HDR | Getting the Most Out Of Your Camera
- How We Shot It: Maximizing Dynamic Range On A Cloudy Day
- Maximizing Dynamic Range | Minute Photography
- Reading Exposure via the Histogram
Visual Flow Preset System

This is just a glimpse at how the Visual Flow Preset System works and how we arrived at our final lighting conditions. Click here to see more examples and view the 9 other presets in our Modern Preset Pack! All you have to do is select the preset based on the lighting condition and let our engine do the rest. It doesn’t get any easier to create a consistent, refined and professional image!