5 Types of Contrast in Photography

So there are basically 5 types of contrast you have to deal with in photography:
- Tonal Contrast: The photo that has both very dark and very bright tones is a high tonal contrast. The image that has many tones from pure white to pure black is considered a medium tonal contrast. If it has mid-tones, but no pure whites and blacks, the photo is a low tonal contrast image.
- High Contrast: Photos have a lot of bright whites and dark blacks without a lot of medium tones.
- Low Contrast: Photos have less tonal contrast, so you see a lot of grey tones instead of extreme darks and lights.
- Color Contrast: Colors either blend gently or clash strongly depending on how they’re paired. On the color wheel, colors next to each other (analogous) give low contrast, while opposite colors (complementary) create strong contrast.
- Contrast Through Textures: The photo has a combination of soft and rough elements to enhance the contrast in a scene. For example, the background may appear blurry and soft in contrast to the sharpness and texture of the subject.
What Is an Example of a Contrast Image in Photography?
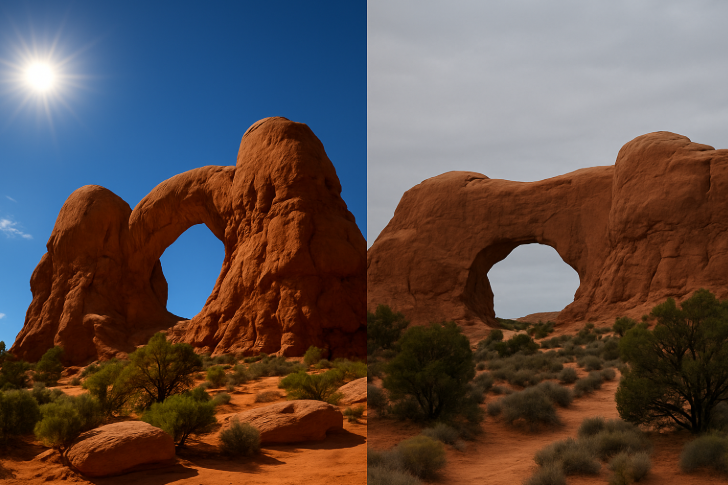
In contrast photography, contrast is the difference between how bright the highlights are and how dark the shadows are in your photograph. First of all, when you take your photograph, depending on where the light is coming from and how direct or diffused it is, it will have an effect on the contrast of your image.
For example, if you take a shot in the middle of the day with harsh sunlight, those shadows will be dark and the bright areas will be really bright, so there will be a big difference between the two. Whereas on an overcast day, the shadows will be subdued and the brighter areas will be a lot less harsh, so less difference between the two, which gives you a less contrasty image.
What is the Best Contrast for Photos?
Now, what’s considered “good” contrast in photography? That’s not really a fixed rule. It depends on the kind of picture you’re capturing and what vibe you want it to have.
If you’re taking portraits of people, softer or low contrast usually looks nicer. Have you seen those beauty YouTube videos where they use a ring light? The light is even there, and it doesn’t make the face look too harsh. That’s why people like low contrast for portraits.
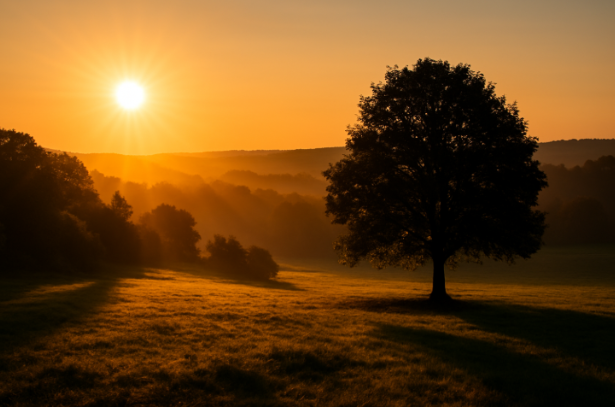
On the other hand, if you’re shooting something naturally dramatic, like a sunset, then high contrast is an obvious choice. The bright sky and the dark horizon give it that wow factor, and the high contrast in it helps you show off the drama in the scene.
Now, if you have no contrast at all, meaning the light is super flat and everything kind of blends together, the photo looks dull. Nothing stands out, so people won’t really pay attention to it.
And lastly, if you push the contrast too far when editing, like making the darks too dark and the lights too bright, it can look fake and unappealing. Instead of looking cool, it just hurts the eyes.
So the real answer is: good contrast depends on the subject and what you’re going for. In some cases, low contrast looks great, and in others, high contrast works like a charm, and sometimes you just need to find a balance in between.
How to Create Contrast In Photography? 10 Best Tips
1. Darkness First
You should always think of a photo like starting in a black wash. Nothing is there until light hits it. When you take a photo, you are basically exposing as much light as you need in certain spots to create the contrast. That’s what brings out shapes, faces, or anything else. So the idea is simple: light shows, dark hides.
2. Break a Scene into Steps
When you look at a scene outdoors, picture it in layers. You might have what’s near you, the subject, then the scenery farther away, and the sky. If one layer is dark against a lighter layer behind it, you notice the difference right away. If you can create the contrast between these levels, everything will be clear.
This means when you frame your shot, put something dark in front of a brighter area behind it. That difference creates one layer of contrast. Now, if that bright area is then set against something darker farther away, you add another layer of contrast.
By stacking these differences, dark against bright, bright against dark, the whole photo builds up with layers that separate from each other. That’s what overlapping contrast means: each level is different enough from the next, so your eyes move smoothly through the picture.
3. Colors That Pop Against Each Other
Contrast is not only about light. Colors matter too. On a color wheel, the colors that sit opposite each other stand out the most when placed together.
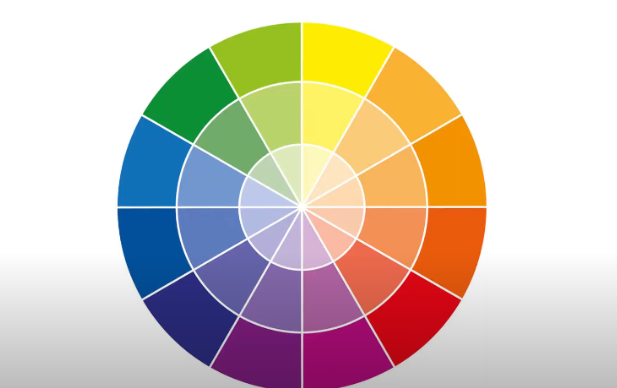
For example, if you notice red &green, or blue & orange, or yellow & purple, they push against each other and will instantly create a strong contrast in your photo. That is why spotting these color pairs outdoors can give your photo a punch that catches the eye.
4. Bright Sunlight
Direct sunlight creates a very strong contrast. This happens most when the sun is on its first or last legs, like in the morning or late afternoon, because the light cuts across the land and makes some parts very bright while others drop into shade.
When you use your camera here, you can choose how to expose the shot. If you expose for the bright areas, the shadows will turn almost black. If you expose for the shadows, the bright parts will glow and lose detail. Either way, you end up with a photo that has bold contrast.
5. Dark Clouds with Sunlight
One of the most striking kinds of contrast in contrast photography happens when the storm clouds hang heavy, but sunlight still shines on the land in front.
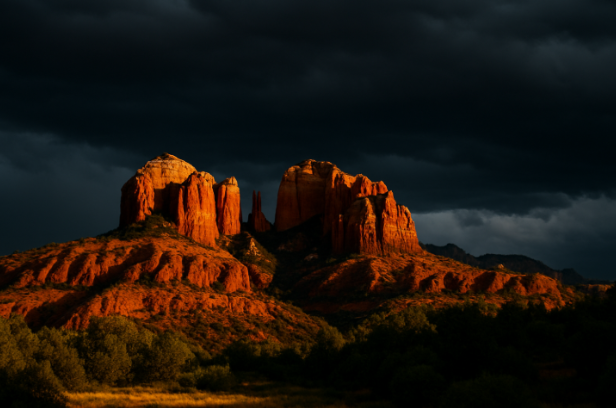
This looks dramatic because you normally expect the sky to be brighter than the land; the difference jumps out at you, and that unusual switch creates awe-inspiring contrasts in your captures.
6. Light Against Dark
Photographers often use contrast to separate the subject from the background. One way is to place the subject in shade while a bright area sits behind them. When you expose for the subject, the background looks brighter and pushes the subject forward.
Another way is to do the opposite. This gives the subject light while the background turns darker. Both approaches rely on the same idea, which is to place light against dark so the subject clearly stands apart in the photo.
7. Capture Three Versions
High contrast scenes can be tough to capture because the bright parts and the dark parts don’t fit into one perfect exposure. A simple way to handle this is bracketing.
Bracketing means you take three photos of the same scene: one underexposed, one at normal exposure, and one overexposed. This gives you options later. You can choose the one that looks best, or you can combine them for the detail in both the shadows and the highlights. By doing this, you capture different levels of contrast instead of risking one flat result.
8. Add Flash for Extra Effect
Sometimes, natural light does not give enough difference between bright and dark areas. In that case, you can use a flash to create contrast.
To do this, take a photo with no flash and set your camera so the background looks darker than usual. Then turn on an off-camera flash and point it at your main subject from the side to light it up with the dim background. It changes the mood completely and adds life to the shot.
9. Photos at Night
At night, the contrast between light and dark is extreme by itself. For example, street lamps, neon boards, or car lights against a black background. Your eyes go straight to the glow.
This is also a good time to try long exposures with a tripod. The combo of bright artificial light against the dark surroundings gives night photography its unique look.
10. Adjust Contrast In an Editing Tool
After you take the photo, you can still play with the contrast later in a photo editing software like Lightroom and GIMP. In these tools, you can drag the contrast slider to increase or reduce it. This is useful when the photo out of the camera does not have the level of contrast you want.
Related Articles to Contrast Photography Definition

Black and White Landscape Photos and Tips to Inspire Your Adventures

10 Famous Street Photographers to Follow

Long Exposure Phone Photography Tip! From Shoot to Post

Shooting with a Flat Picture Style for Better Exposure Information | Exposure Triangle, Pt. 4

5 Simple Recipes for Great Portraits Anywhere w/ Behind the Scenes!