When I’m shooting personal images, sometimes I go in without any kind of vision for the outcome. I just show up and start creating on-the-spot with whatever is going on around me. This is great practice, especially if you do any kind of documentary-style photography. Yes, it’s nice to have a plan and a vision for your shoots, but creating in-the-moment is an excellent way to exercise your creative muscles. Have you ever been in this situation and felt like the images you were making were not all that inspiring and you weren’t quite sure what you would do with them? Sometimes these images can be “saved” in the post-processing phase.
Such was the case with these images I shot at the beach on Lopez Island in the San Juans last summer. We had been camping (quite privately, I might add) so planning and executing amazing images wasn’t really on my radar. I just wanted to take some pictures of the kids playing on the beach. I didn’t have my flash with me so shooting with the sun behind the kids without any fill light on their faces blew out the sky. I just went with it. When I got home and uploaded them, I was kind of disappointed with the way they turned out and set them off to the side for later.
Looking at them today in Lightroom I thought, I wonder how these would look in Black & White? Boo-ya! Totally artsy. I love this grainy film look. Here’s how I shot and edited these in Lightroom in just a few clicks using the SLR Lounge Lightroom Preset System.
The Details

These were shot with a Canon 5D Mark III camera and Canon 24-70mm f/2.8L lens at ISO 100, 70mm, f/4.0, 1/125 sec. I use spot metering and meter for the face in this kind of situation. It was an overcast day, as you can see in the stitched panorama of the pebble beach we were playing on. This made for some perfectly diffused light, which I love.
Here’s the straight out of camera version of the first image I edited in the series.

Using the SLR Lounge Lightroom Preset System (or developing your own presets) saves so much time. Literally in one click, my image went from that to this just by selecting the 14b. Ilford HP5 Lifted Matte preset. Don’t worry, if you don’t have the presets, I’ll show you how to get this look below.

This is near perfect but there’s a little bit of detail still showing in the background, so I just used the Spot Removal Tool, set on “clone,” to clone out that little streak showing up back there.

If you click and drag with the Spot Removal tool, you can clone outlines and blemishes like this very easily without having to go into Photoshop. Lastly, I cropped the image and ta-da, it’s done!

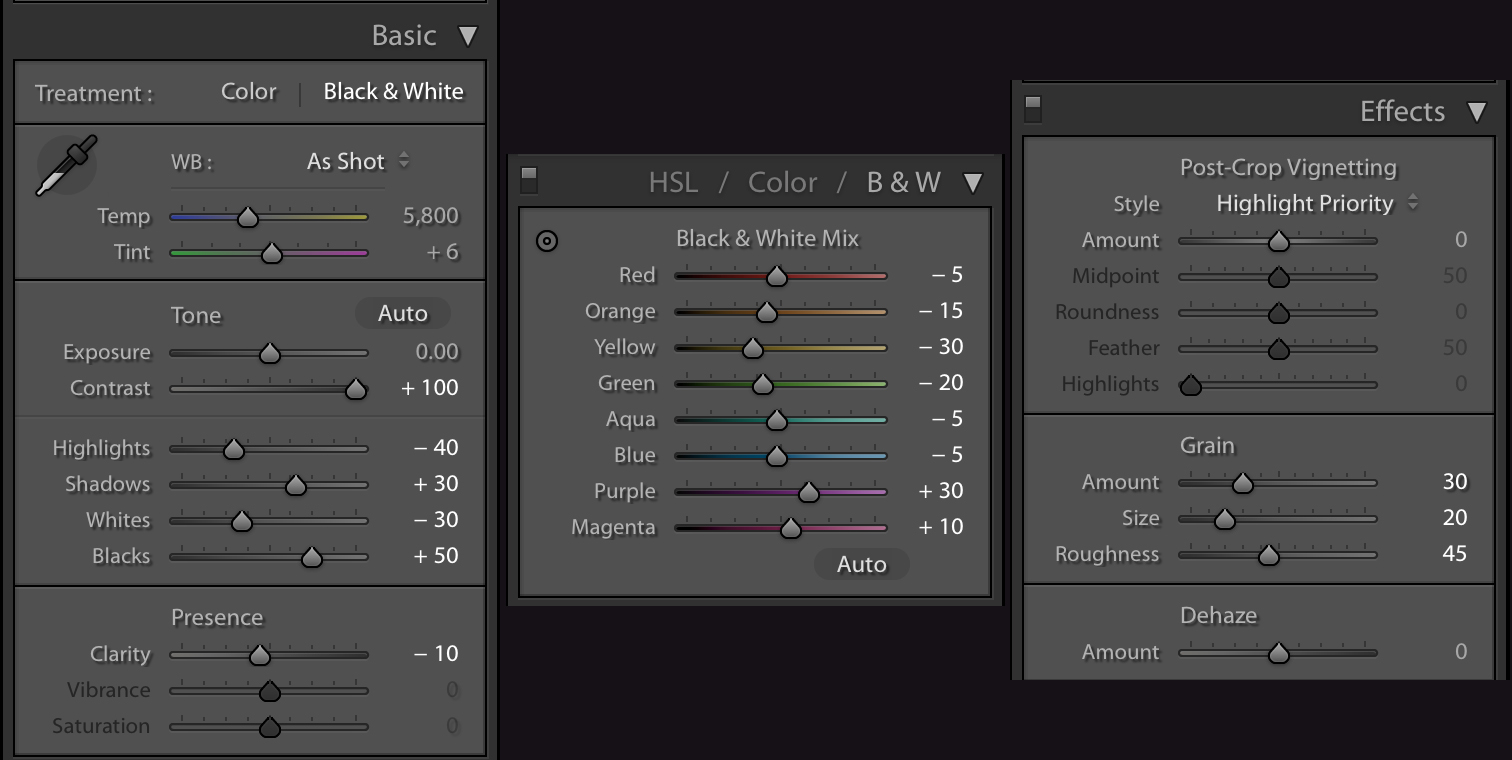
So, let me show you how to get this look if you don’t have the time-saving presets. The only sliders you need to worry about are your Basic, B&W, and Grain.
 When using your sliders for black and white images, make sure you click over to the black and white (instead of color) on the basic and HSL/Color/B&W menus.

Here is the final image and a few more from the series that I edited in just a few clicks as well.


More Easy Lightroom Edits
Check out more of my easy edit tutorials here:
-
EASY EDIT: HOW TO CREATE A FILMIC MATTE PHOTO USING LIGHTROOM IN JUST TWO CLICKS
-
HOW TO TAKE YOUR RAW FILES FROM DRAB TO FAB IN 5 CLICKS OR LESS
-
HOW TO ADD A VINTAGE LOOK TO PHOTOS IN FOUR CLICKS OR LESS


