As photographers and artists, we are usually on a tight budget since we are always buying (or wanting to buy) new gear. So when there are easy ways to cut some corners, giving us a few extra pennies to put toward the next lens on our wish list, we take it. Reflectors aren’t pricey photography accessories, and they certainly go a long way in helping us shape our light. If you’re looking for a DIY reflector, we’ve found 3 different methods that we’ll share with you below.
DIY Reflector From Slanted Lens
As some guy once said, “A penny saved is a penny earned,” (Yes, I know it was Benjamin Franklin) and this following tutorial from The Slanted Lens shows us a way to pinch some of those pennies by making your own reflector.

Using only a piece of bead foam from Home Depot, you can make a nice reflector with minimal effort. In the video, Jay P. has to actually cut his very large piece of insulation board, but he mentions that you can buy smaller pieces to suit your needs. Once he cuts it in half, he tears off the silver part on one side to reveal a plain white background and tapes the two parts together with gaffer tape.
DIY Reflector – Method 2 by Jim Berton
The tried and true triple reflector is a favorite of glamor and headshots, and this DIY tutorial will show you how to make one for less than $40.
This tip was sent in by Jim Berton, who is a product photographer for www.stormykromer.com, an apparel manufacturer. He uses this DIY triple reflector daily for products and corporate headshots for his company. Berton says he got the inspiration to make this reflector from the DIY posts that we feature from time to time.
Berton used a short piece of PCV pipe and put it on a cheap light stand so that different heights could be achieved easily. Using ripstop nylon in both white and mirrored (he has two sets of this unit – one set in white, and the other set is mirrored), PVC pipe, and fittings, he created this:

This DIY adjustable unit will save you a few bucks – white ripstop the project parts were $28 and with mirrored ripstop the total came to $36.
Here are the instructions with the measurements for the PVC and how long to cut them, including the materials needed.


Thanks for sharing your project with us, Jim.
Method 3 – Model Reflector Work by Kishore Sawh
Time, space, capability, usability, and, unless you’re a shooter along the vein of Mario Testino…money. These are all precious to photogs.
In a studio or on location, situations of compromise often arise; Maybe you’re running late to a shoot because you lost track of time down the rabbit hole of post processing, or you’re a one person team for the day since you’ve exhausted your friend-bank of ‘assistants’; or you just dropped rent on a piece of glass that’s the lens embodiment of a Victoria’s Secret model, and now can’t afford the new scrim you want…or food. This can help.
All photographs below are by Kishore Sawh are copyrighted and have been used with permission for SLR Lounge. Do not copy, modify or re-post this article or images without express permission. You can also follow him on twitter, and instagram.
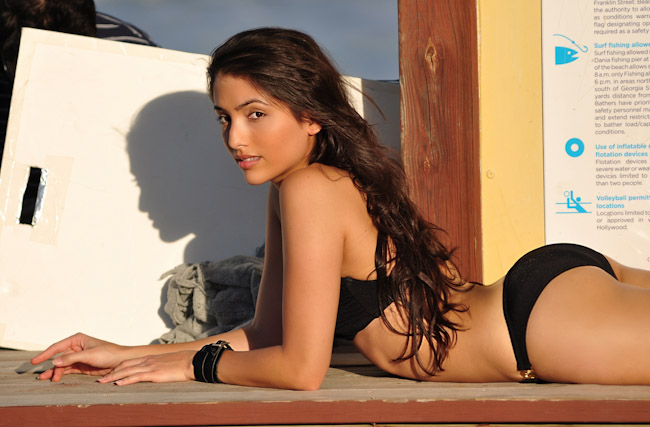
I had a friend in town (read: guilted assistant) and was shooting at the beach. Time was pressed for the model and myself, and in the haste of trying to catch the right light, I forgot my reflector. But the shoot had to happen. I’d like to share with you my improvised solution that yielded surprisingly slick results. I had mere moments to build so the materials used were crude, as was the build, yet effective. Given just 15 minutes however, it is possible to make foam board and foil into something that looks crisp, and presentable. The shiny side of the foil proved a large and bright reflective surface in the Miami sun while the white of the foam board was actually brilliant at softening that equatorial blaze into something soft and marshmallowy.
The examples below illustrate the model shot using each side of the reflector, and without. *See image at top for average relative distance from subject and size.



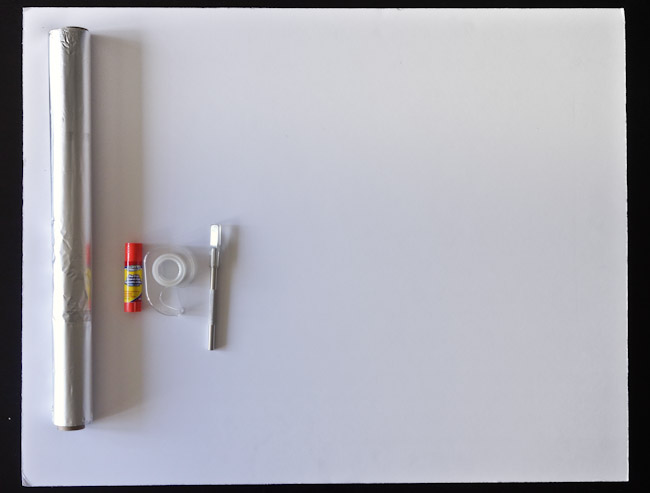
What You Need
- 1 foam board – carried in most pharmacies – typical poster board dimensions
- 1 roll aluminum foil
- 1 roll of tape
- 1 knife/scissors
- Glue Stick (optional)
What You Need…To Do
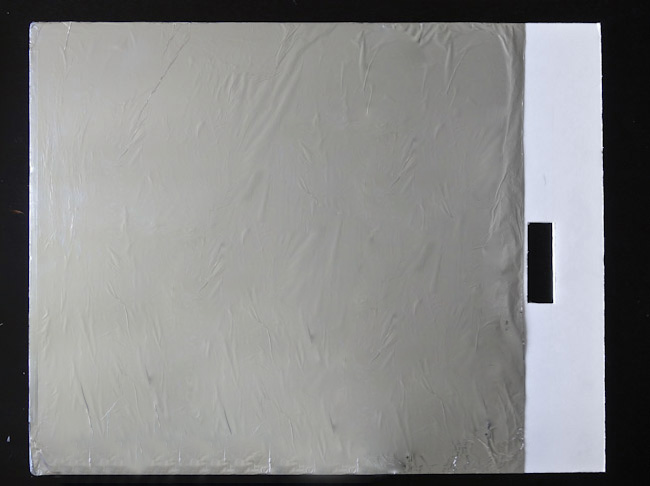
Step 1: Select one end of board to host the handle. From the center of that side cut a quadrilateral 3″ x 2″ section 3″ from the base.
Step 2: Layer your foil in sheets across the width of the board. Leave an inch on each side for overlap. Secure the foil with tape. Ensure the foil is as taut around the board as possible. *Using a glue stick here I have since found advantageous as it allows an even crinkling of foil, and is more secure leaving little to no air between the foil and the board.
Step 3: (optional) Wrap the handle area with tape a few times over. This aids in the structural integrity of the area and for easier handling. What you’ll have is something that resembles the following:
Now I am not suggesting this as a replacement for proper gear, I’m a fan of Lastolite TriGrips and Sunbounce reflectors, but for those who are just starting out and need practice, or you find yourself in a jam as I did, this may just be your ticket. Let me know how you find this, or if you have any suggested alterations or variants of your own, I’d love to hear.
Conclusion
If the most important tool for a photographer is light, then the most important accessory should be a light modifier. If you know how to harness light and make it work for you, you can create countless looks. One of our favorite light modifiers, which is versatile and inexpensive, is a reflector. Reflectors over the years have come in all shapes and sizes, and can be used in many different ways.
Do you have a DIY project you’ve created? Show us in the comments below or share them in the SLR Community Facebook page here.


