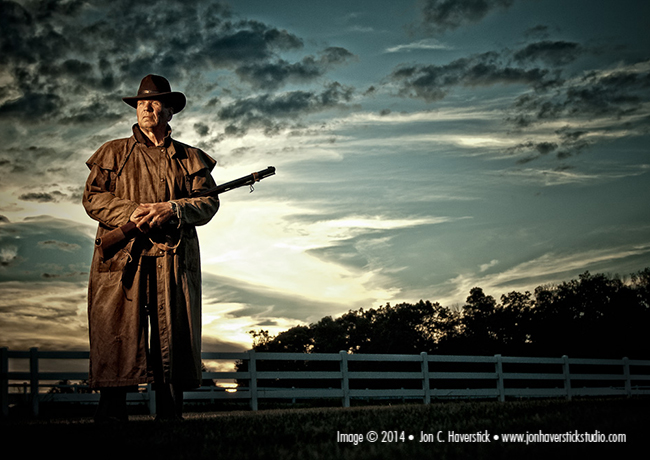
Often our favorite images are a compromise of exposure. Shooting into the sun in the picture above, my camera would likely have rendered this image rather differently, left to its own devices. To underexpose and retain the detail and color in the sky, Dad would have been a silhouette. To expose properly for his face, the sky would have been an overexposed gray wash with no cloud detail. The obvious solution was to underexpose to retain the detail in the sky, and light Dad with flash.
I wanted a shallow depth of field, so chose f/2.8 on my Nikkor 24-70mm lens. In hindsight, that probably wasn’t the best choice, but that’s what it was. However, at my ISO of 200, that meant in order to underexpose the sky, I needed a shutter speed of 1/1250s. And that’s typically a problem for flash since the maximum shutter speed for “normal” flash use tops out at around 1/250s. Enter “high-speed sync.”
How Does High-Speed Sync Work?
Let’s look at a bit of background on flash synchronization and shutter speed to put this in context. Our DSLR shutters consist of two “curtains” that when closed, prevent light from hitting the imaging sensor. When we make an exposure, the first curtain moves, and the second curtain follows – exposing the sensor to light for the duration of whatever shutter speed we’ve selected.
For most DSLR cameras, the maximum shutter speed at which the sensor is fully exposed to light when the flash fires is 1/200s to 1/250s. (For the sake of discussion, we’ll use 1/250s as our reference). Faster than that, and the second shutter curtain has already started to move across the sensor when the flash goes off. So effectively, at speeds above 1/250s, we have a “slit” that moves across the sensor. Flash exposure at speeds above 1/250s usually show a characteristic “shadow” of the shutter curtain on the sensor in the form of a darkened band covering part of the image.

So, when faced with the issue above–wanting to use a large aperture to control depth of field, resulting in a higher than 1/250s shutter speed — we resort to high-speed sync. Certainly there are other ways to deal with this; e.g., a smaller aperture, or a neutral density filter on the lens. Both have consequences that I don’t want to contend with, so I tend toward high-speed sync.
With high-speed sync enabled, the flash functions normally up to the typical maximum flash-sync shutter speed for your camera (i.e., 1/200s or 1/250s). However, once you exceed the normal maximum flash sync shutter speed, your flash functions a little differently. In essence, the flash “pulses” for the duration of the exposure, ensuring that the entire sensor is exposed evenly to the flash illumination.
There is a tradeoff – reduction of effective output. Simply, in high-speed sync operation, your flash doesn’t provide as much light on your subject as it does at normal sync speeds. Ganging together multiple flashes can help – up to a point. Alternatively, positioning your flash closer to your subject than you might otherwise can compensate for some of the loss of output.
To capture this portrait of a beautiful medieval bride on horseback, with the sun setting directly behind her, at ISO 200, f/2.8, I needed a shutter speed of 1/5000s. The image required three Nikon SB-800s on a stick; all working at 1/1 output, positioned just out of camera frame left.


In the following image, three Nikon SB-800s were positioned just out of frame camera left to light this pair of Indiana Air National Guard Warthog mechanics and offset the strong backlighting of the rising Hoosier sun. Slightly underexposed at ISO 200; 1/2500s; f/4.5., the high shutter speed enabled me to retain the detail and saturation in the morning sky.

Gear Requirements
High-speed sync mode requires TTL–capable flashes. Canon’s and Nikon’s infrared triggering systems will work in this situation, but are prone to interference–hence, misfiring–from bright sunlight. My preference is the PocketWizard FlexTT5 / MiniTT1 TTL-compatible radio triggers. It’s an expensive solution, but in my experience working in bright sunlight, RF is more reliable than IR triggering.
Mounting multiple flashes for this scenario takes a bit of engineering. I built several DIY brackets before I discovered this inexpensive “Flashpoint Triple Bracket” that is more compact and less expensive than any I’ve cobbled together on my own. I now carry two of them. It also helps to have good friends like Royce, Bob and Booker – each phenomenal photographers themselves – who are willing to stand in as VALs (voice-activated lightstands) when asked…


Stand Out from the Crowd
High-speed sync flash opens up entirely new realms of opportunity – shooting in conditions like mid-day sun in the image below (ISO 100; 1/1250s; f/5) that would have previously had me praying for clouds, or waiting until sunset or sunrise. It’s not inexpensive to do, but it’s an invaluable option in my photography toolkit that sets me apart from other photographers.
CREDITS: All photographs shared by Jon Haverstick are copyrighted and have been used with permission for SLR Lounge. Do not copy, modify or re-post this article or images without express permission from SLR Lounge and the artist


