
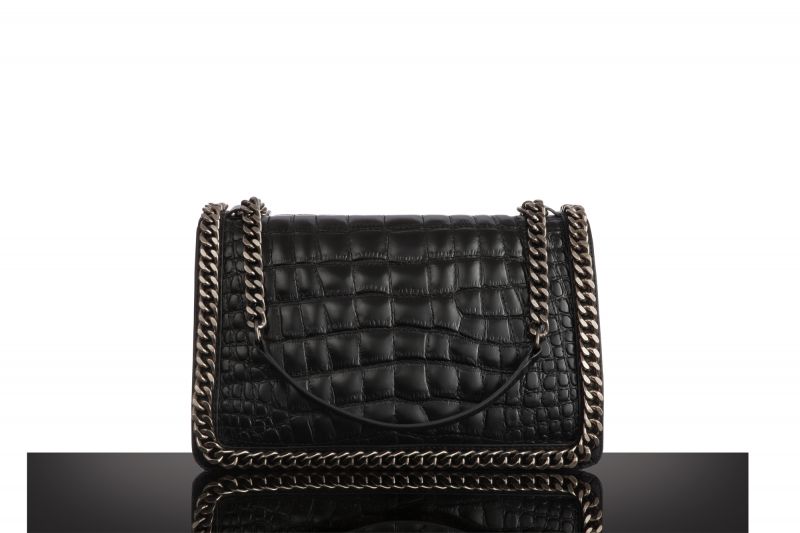
Product photography is a lot of fun. Of every photographic discipline I have tried, I find it the most creatively and technically challenging. The more you try it, the better your understanding of lighting will become. In addition, if you hold your work to high enough standards, you too will advance your editing skills. I cannot encourage you enough to give it a go.
As is often the case when I see certain objects, I immediately have a photo in mind. Similar to my last “How I Shot It” involving the Adidas shoe, I wanted a product photo which was artistic while displaying the product in a very flattering manner. I wanted something striking, yet subtle. I think it’s important to have some kind of vision when going into any shoot. With portraits, do recce’s and test shoots. For product photos, find reference images, sketch out an idea (even if you can’t draw, like me). Any pre-planning you do will aid the creative process.
Four Lights, Four Specific Reasons
Before I get going, these photos show each light being added to the scene. I took them while experimenting at the end of this shoot but thought it would be great for demonstration purposes. The only difference between these and the final photo is that in the final images, the background light is a little more intense and does not have a grid on it, as it does here.

Light 1 – The background light. Bowens 500 Watt with reflector.
This is an easy one, or so it seems. I wanted a white background, and so I needed an even distribution of light which was powerful enough to give me pure white (255, 255, 255). I had two problems to face here. Firstly, a lack of space which was easily overcome using a Manfrotto Super Clamp. Secondly, the bright background was ruining the dark reflection I wanted. The black plexiglass was reflecting it. Initially, I resolved this by turning off all the lights, placing a grid on the background, and deciding to blend the two images together; the one you see here and the SOOC image further down. In the edit, I decided otherwise.

Light 2 – Right side fill / main light. Bowens 500 Watt, reflector plus grid. Shooting through Westcott Fast Flag with diffusion gel.
When shooting an object with lots of texture, we want to show off that texture. As such, I placed my light at a sharp angle to the bag. If I had placed it more face on, it would have provided a flat light and reduced the visible texture. Picture the progression of the sun in the sky and the effect it has on the landscape, noon vs. sunrise/sunset.
With the light placed at an angle, I brought in what is fast becoming my favorite modifier, the Westcott Fast Flag, with some diffusion paper. By placing this in front of the light, I am able to add another level of control. The closer the light is to the flag, the harder the light. The sharper the angle to the flag, the more of a gradient is created. With this photo, I went for somewhere in between both. I wanted a gradient, but I didn’t want that gradient to have too hard of an edge.

Light 3 – Top light. Yongnuo YN 600 EX RT with 2ft strip light.
When you have an object like this (semi-glossy), much of what you are doing with lighting is controlling reflections. That’s why, as the bag curls around to form the top, we lose the light. The bag is at a different angle. Hence, we’ve lost that reflection on top. To resolve this I added a strip box directly overhead, parallel to the bag but pushed back quite a bit to get the reflection I wanted. Always think of a pool table when lighting anything like this. Light travels in straight lines, just like a ball on a pool table. Figure out the angle, and you know where your reflection will be.

Light 4 – Left side fill. Lencarta Super Fast 300 Watt, reflector plus grid. Shooting through Westcott Fast Flag with diffusion gel.
The set up for this light was almost a mirror to the right side. However, very small alterations to the placement of the light, Westcott Fast Flag and the intensity of the light, provided different results. I wanted this to add more highlights to the chain on the left side and to stop it falling too much into shadow. I wanted to retain a subtle direction to the light, but I didn’t want the left side to be too dark.

Post Processing, I Barely Did Anything…
As with all my photos, I’m such an amazing photographer that I barely do anything in post. Yeah, that’s a bit of a lie. It always makes me laugh when people proudly proclaim how little was done in post. I also used to think it was untrue, cheating or any other number of childish, whiny words, to heavily manipulate a photo. Then I realized it’s just another step in the process. A step which has always existed. So long as you don’t go crazy, I see nothing wrong with extensive editing, depending on the context. (i.e. I don’t like the idea of heavily photoshopping family photos).
[REWIND: USEFUL WILDLIFE PHOTOGRAPHY TIPS AND EDITING FOG TECHNIQUES {HOW I SHOT IT}]
This photo required lots of editing, partly because the bag was not new, and partly because I had a distinct vision which was not accomplished in camera. My vision remained the same; I just got there in a way I did not originally intend.

Here you can see the image SOOC. See what I meant by the table picking up the reflection from the background? The first part of any edit like this, for me, is what I call the Setup. Essentially, it’s compositing any elements necessary and building my base from which I then clean and apply creative edits to contrast, etc.
The most notable thing here is the table and the background. I had intended to replace the table with another version I had shot (I mentioned this earlier if you were paying attention). However, I quickly decided that I wasn’t too keen on that either. I cut out the bag and reflection using the pen tool, added a table using the existing surface as a reference, and added a highlight to that table. By doing it this way, I gained far more control over the highlight and final look. You can see the result below.
Clean, Clean, Clean, And Then, Clean Some More
This was my partner’s bag, which meant that despite it being not new (but not old) it was still very clean. She takes good care of her bags, as I think most women do. (Side note: never put their bags on the ground outside. Women don’t like that). Despite this, it still required lots of cleaning, and I used various methods to do so. I used Topaz DeNoise and surface blur to polish the metal and lots and lots of clone stamping to clean up the bag.
If you want to create a decent product photography image, attention to detail is key. That goes for every stage of the process, especially in post-production. Clean it until you can’t clean any more. It will take a long time!
[rewind: NOT YOUR TYPICAL PRODUCT PHOTOGRAPHY IMAGE | HOW I SHOT THIS FLOATING ADIDAS SHOE]
Having completed that oh-so-enjoyable process, we move on to standard editing which we are all familiar with; dodging and burning, sharpening, etc. I don’t tend to do much at this stage as I’ve spent a good deal of time perfecting things in camera, but I will always perform this step and refine further.
The last couple of steps were to extend the background. I knew this framing was what I wanted from the outset, but I shot the bag fairly tightly cropped to give me as much information to work with as possible. Why shoot a bunch of empty space when you can add it later? Finally, as I often do, I decided a couple more tweaks were needed which you can see in the last group of the layers.

What I Don’t Like
If you want your work to develop, you MUST become your own worse critic. Hold your work up against the best professionals, those whose work you admire. If yours does not stack up, then keep pushing until it does. It can be a little disheartening sometimes, but it’s the best way to progress. For that reason, I always critique my own work.
[REWIND: PHOTIGY MEMBERSHIP REVIEW PART 1 | THE BEST WAY TO LEARN PRODUCT PHOTOGRAPHY?]
With this photo, the chain in the centre is my least favorite element. Given the chance, I would do another shot with the bag on the floor and arrange the chain in some kind of creative way. Then I would composite the two images together and do something more creative. Then again, that would be a totally different photo! Either way, in my eyes it’s the chain that lets this image down.
For those that need to know:
Canon 5D Mark II
Tamron 24-70mm @ 70mm
f/16
ISO 100
If you’re interested in learning more about product photography, check out Photigy. It’s an excellent website with tons of high-quality education. Find it here.
For some of the very best photographic education, check out everything on offer in the SLR Lounge Store, click here.


Get Connected!