
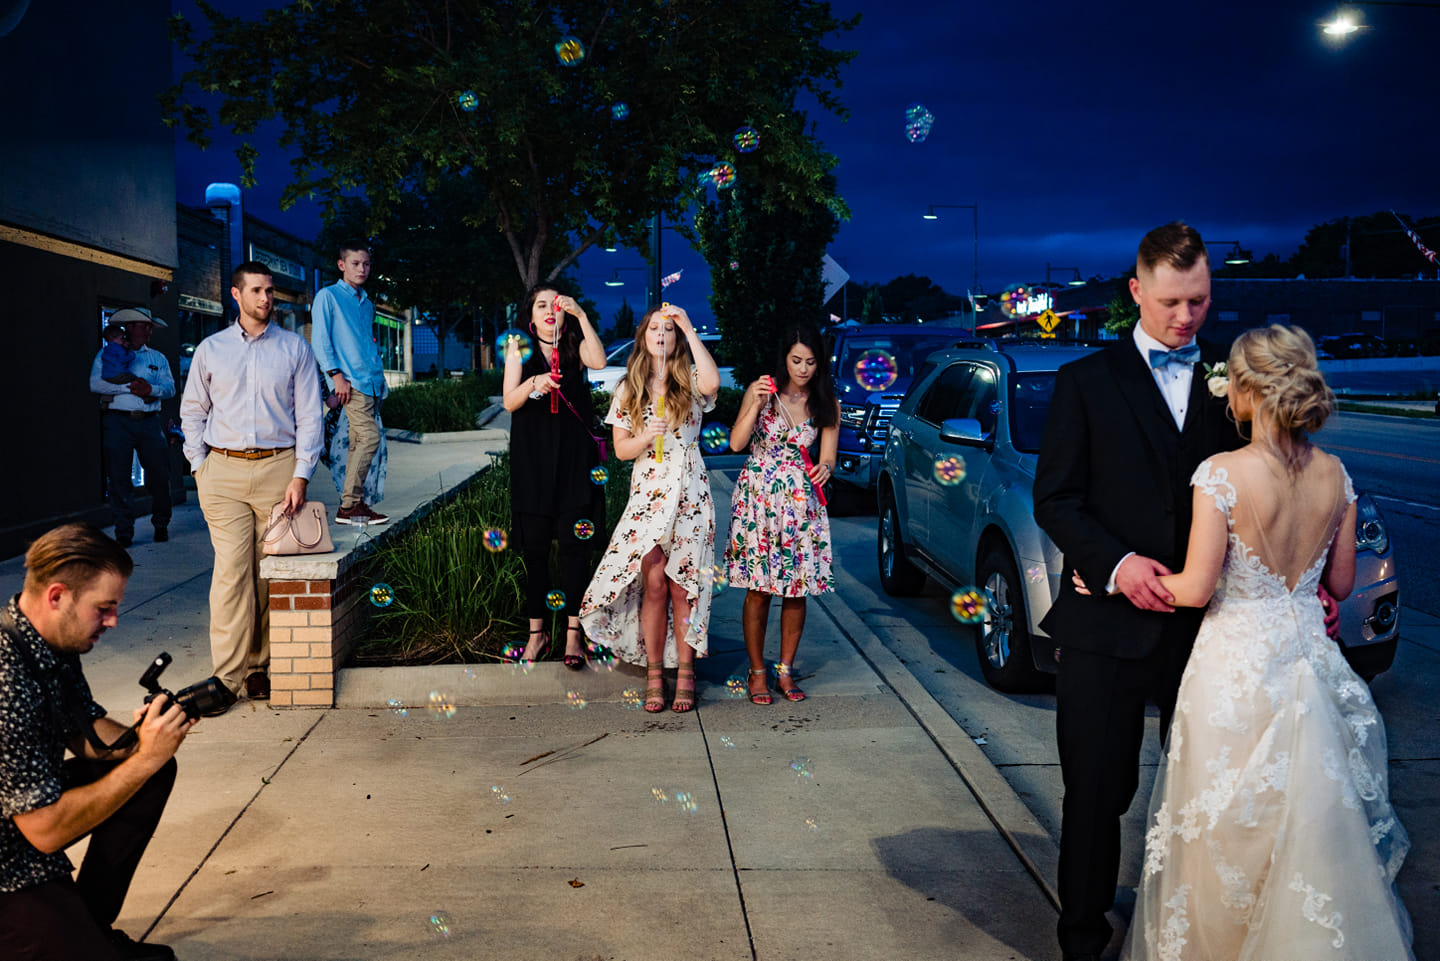
Backlight photography, a technique where the light source is behind the subject, creates a glowing and dramatic effect that can turn ordinary scenes into breathtaking images. When combined with flash, this technique opens up a world of creative possibilities. Whether you are struggling with the basics of lighting or yearning to master creative off-camera flash techniques, we’ve got a range of lighting education to guide you to success. This specific flash photography technique, backlight photography with flash, comes from our Flash Photography Training System and is simple to execute yet dynamic and jaw-dropping. Let’s review tips on executing this technique and discuss some case studies.

Lighting Gear For Backlight Photography with Flash
- Two Speedlights or Medium Strobes (your preferred brand of off-camera flashes)
- Two Light Stands (your preferred brand of light stands)
- Flash Diffuser such as a Magsphere
- Flash grid such as a MagGrid
- Flash gel such as a MagGel
While we have our preferences please note that any variant or brand of speedlight that you own can work for this shot. What we want to focus on is the lighting technique and not the gear associated with it.
Tips for Backlight Photography with Flash
Here’s how to accomplish this off-camera flash photography technique in three simple steps:
1. Place Key Light Behind Subject

Start with the main light behind our subjects to help bring attention to their faces. Consider aiming this light towards the groom’s face to bounce off of his face and chest and act as a reflector to light up the bride. You can choose to modify the light which will help control or soften it.
The magic happens when you balance the ambient backlight with your flash. Adjust the flash’s intensity to avoid overpowering the natural light. Experiment with the angle and distance of the flash to your subject – side and off-camera flash can yield particularly stunning results. Using diffusers softens the flash’s light and can help fill in shadows.

For this shot, we chose to place a MagSphere and MagGrid on the Profoto A1x to focus the stream of light towards Heath’s chest and then soften it just a bit so it wouldn’t be so harsh and would wrap the subjects more. With a MagGrid the light was hitting the leaves pictured on top of the couple and we wanted to really focus that light towards just them.
2. Place Secondary Light to Illuminate Environment

Now that our first light is placed, our next goal is to light up the scene/environment surrounding the couple. It’s important to note to feather or angle the light up just a bit to avoid light spill on the ground. A common mistake we see happening when people attempt this lighting technique is that they don’t place the secondary light far back enough. A typical flash at 50-75 w/s should be plenty of light at full power and should light up everything in your scene and make it look uniform in your scene. For this image, we used a Profoto B10 to light up the scene. To avoid having any bright flares make sure the light is fully hidden and can’t be seen by the camera. This is an easy way for your assistant to figure out where to place the light if they are far away and can’t quite hear your instructions. Here is the final image:
3. Dial-in Light Power Settings
Since both lights are being used for different purposes we have to adjust the power You’ll want less power on the light closest to the couple and a bit more power for the secondary light further away from them to really light up the whole background and environment.
Composition and Framing in Backlight Photography
Composition plays a crucial role in the impact of your backlight photos. When framing your subject, consider how the backlight creates silhouettes or highlights edges. Use natural elements like trees or buildings to create interesting shapes and patterns in the light. Remember, backlight can create a mood – use it to tell a story.
Advanced Strategies for Backlight Photography with Flash
For those ready to take their skills further, explore High-Speed Sync (HSS) flash to shoot at faster shutter speeds, freezing motion even in bright backlight conditions. In addition, mixing color temperatures between your flash and the backlight can also add a creative twist.
Examples of Backlight Photography with Flash
Let’s look at some real-world examples from our community of photographers. Analyzing these photos will help you understand flash placement and intensity in achieving a harmonious balance between subject and background.

This image was created using two off-camera flashes: one to highlight the couple and one placed further back in the scene to illuminate the bubbles. Our first feature comes from Jason Vinson, MagMod Ambassador, SLR Lounge Educational Ambassador, and an absolute visionary. Jason has the ability to make magic no matter what the scenario and this photo is no different.
“So after watching Lighting 301 and seeing how Pye does a “Stacked” light setup, I had to give it a try with a bit of a spin. For this shot I have a MagMod MagSphere and MagGrid behind the couple firing right into the groom’s face/shirt. Then I placed a light further back to illuminate the bubbles.”

The light closest to the couple is my key light for the scene, chiseling them out from the dark background and illuminating them, while the secondary light is lighting up the environment and bubbles to create interest. That’s it – two lights to create an absolutely stunning image. Here is another example of this creative flash photography technique by Jason:
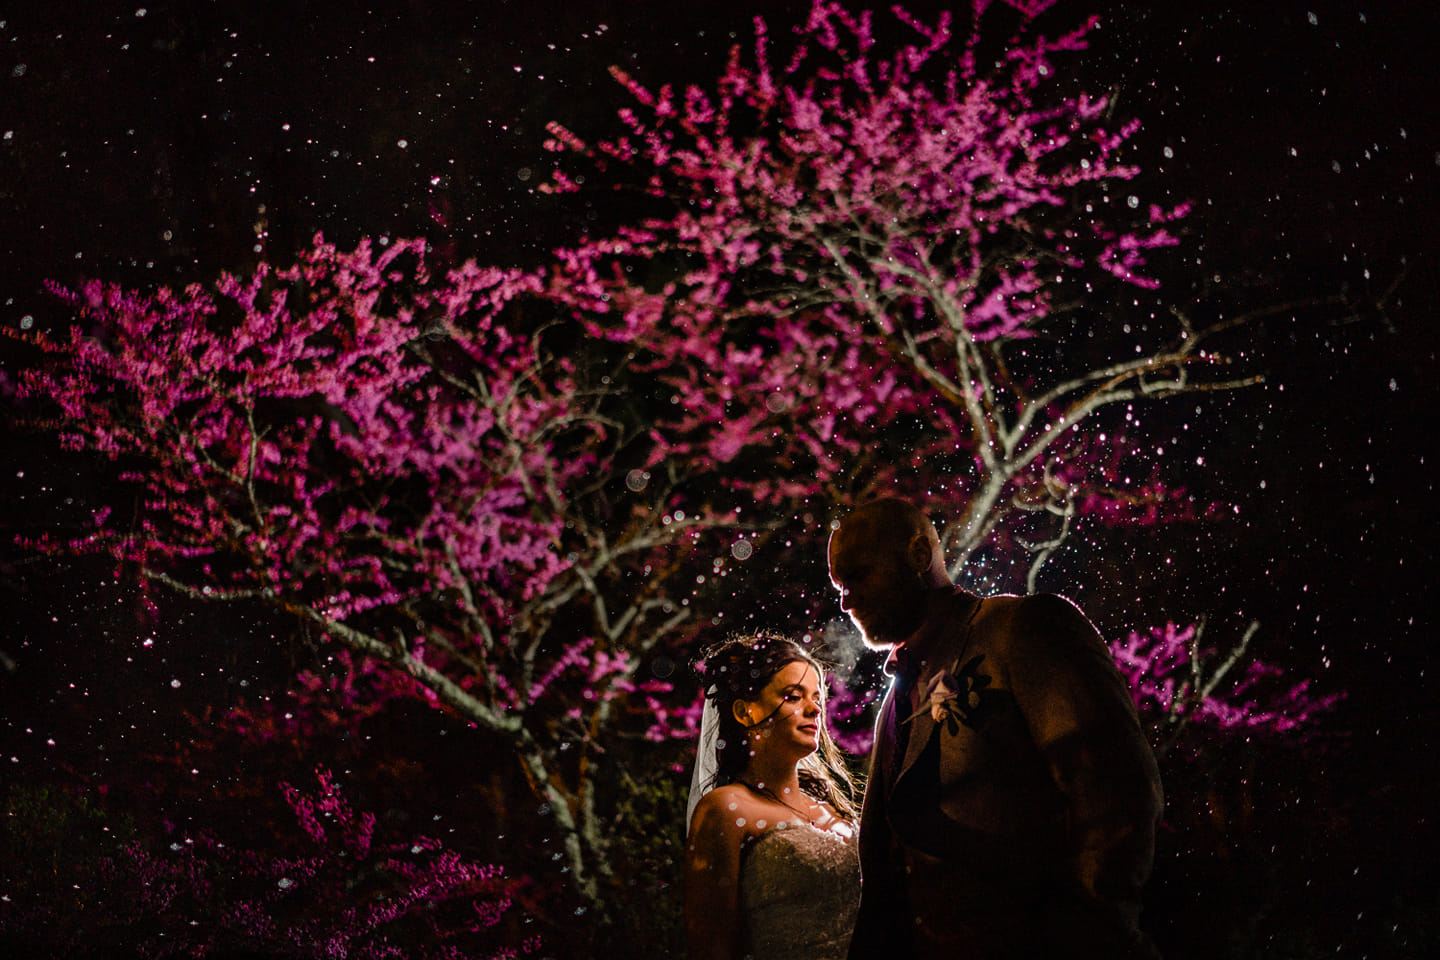
This image is lit with one Profoto A1 with a Grid firing from behind the couple toward the groom’s face, just like the last photo. The reason it’s important to note that this light hits the groom’s chest/face is that it’s acting as a reflector, throwing the light back onto the bride without directly lighting her. It gives the groom a rim light while simultaneously giving the bride a nice soft light. To light up the rosebud tree and rain, Vinson used a Stella Pro 5000 at full power from about 10 feet away.
Backlight with Flash Example 2
Our next feature comes from Jay Cassario who serves as an SLR Lounge Educational Ambassador for both our Wedding Photography and Business Facebook groups. Jay is a Leica Ambassador and has a distinct and irreplicable photography style. Let’s see how he interpreted this creative flash photography technique.
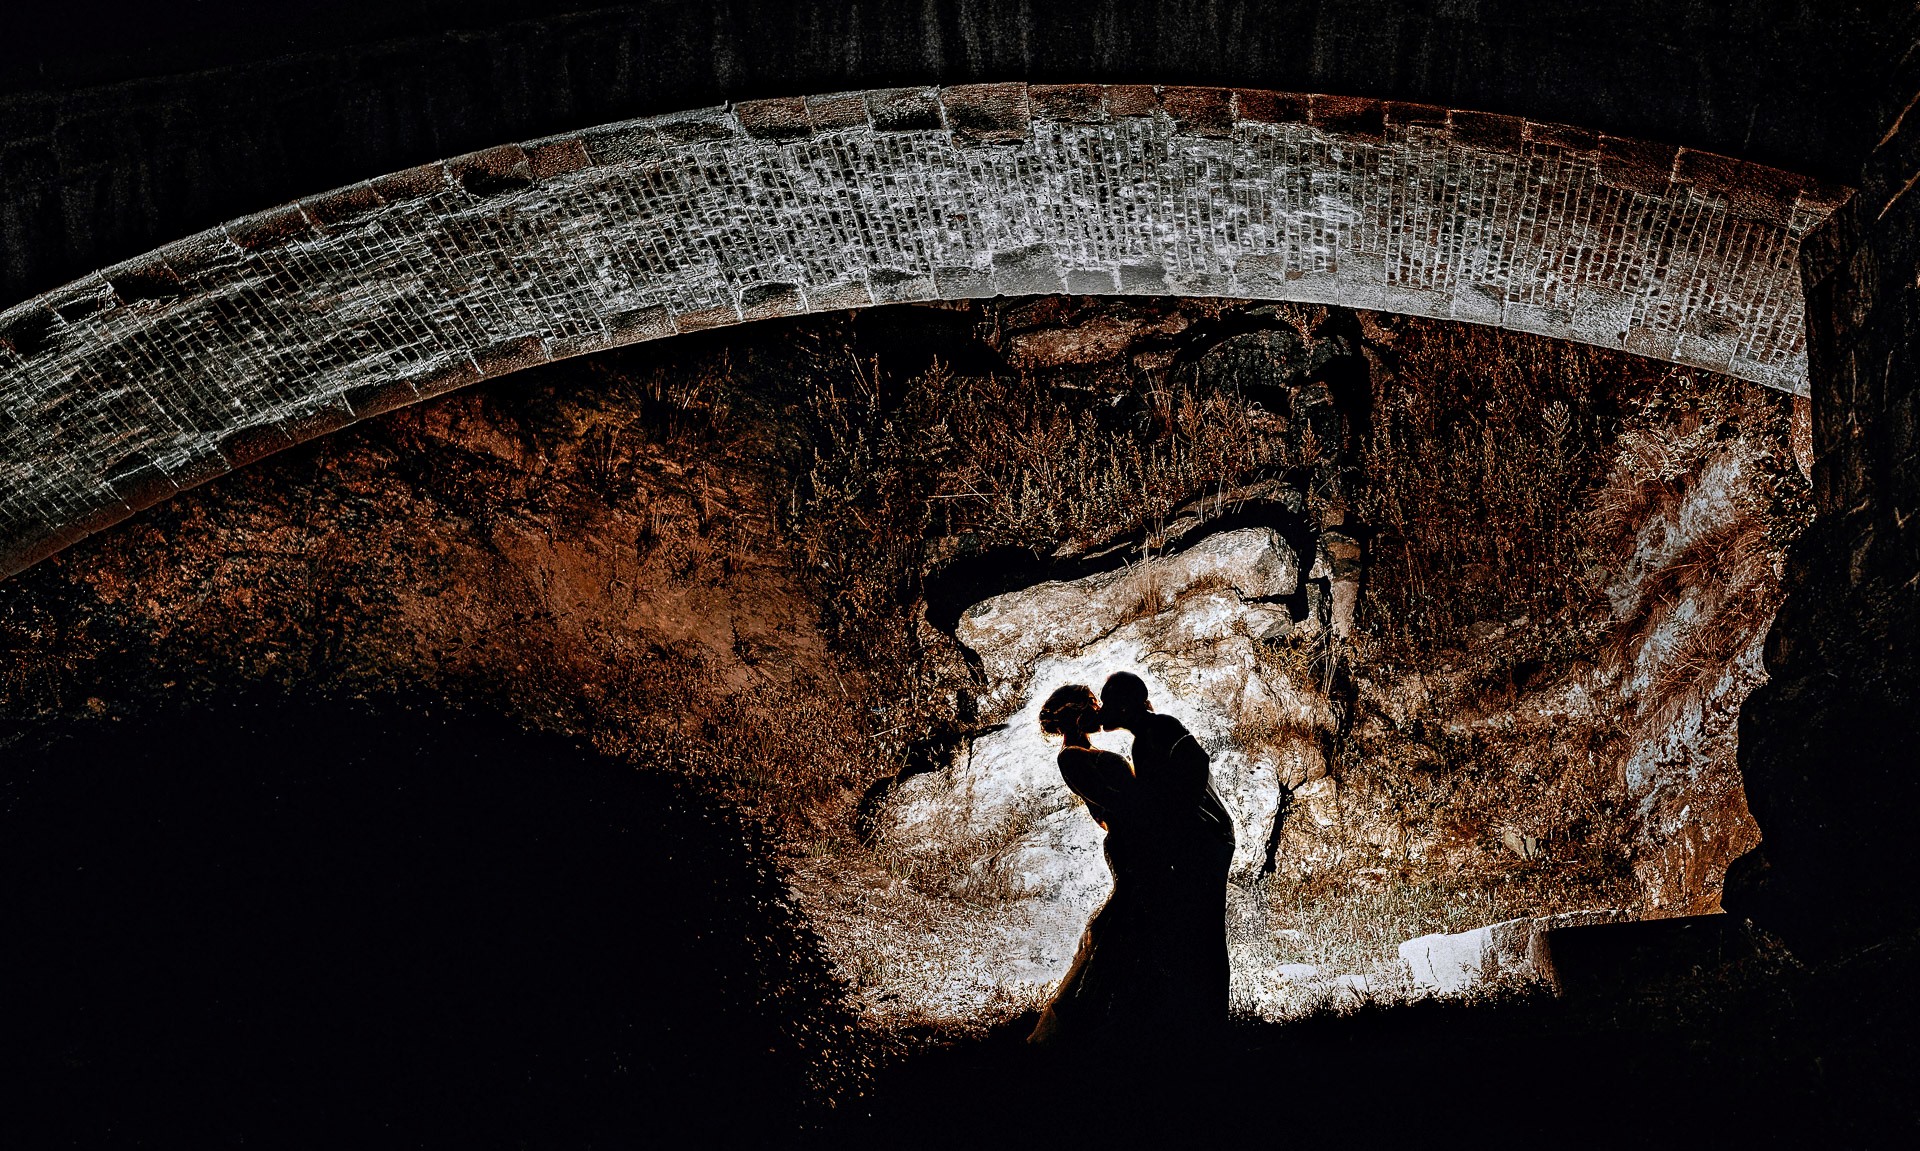

“It was almost 110-degrees with the humidity in Philly so we had to be careful with how much we shot during the day, which meant that we had to accomplish a good amount of shooting after the sun went down. This was an area that was like a cave in the side of the wall and there was some climbing involved to get up there, but the bride and groom were up for it. I took a test shot with one light (Godox AD600) pointed at the wall behind them. The problem was that the wall was actually a good 30 feet away from them so there really wasn’t much separation giving me a very clean silhouette.”
Jay added a second light. I put a light right up against the first light but aimed this one at the couple (with a MagMod MagGrid and CTO Gel) to provide a little bit of rim light and to help light a little more of the landscape off to each side from the overspill.
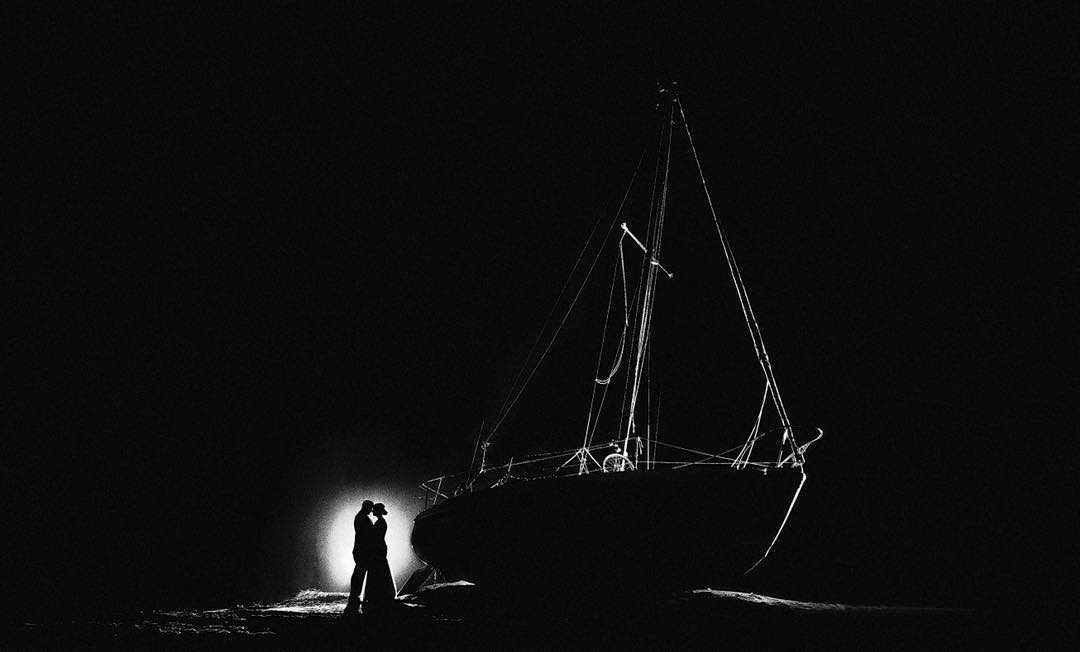
Here is another example of how lighting up the environment helps add context to the story and creates such a unique overall image. For this image, Jay placed a Godox AD200 about 30 yards and slightly to the camera right and aimed it at the side of the boat. He then placed a Godox AD600 about 30 yards on the other side of the boat, facing him, aimed up higher towards the top of the sails, no modifications, just bare bulb. Lastly, to help illuminate the couple, he placed a second Godox AD200 about 20 yards behind the couple aimed right at them with the Godox provided grid and barn doors.
Backlight with Flash Example 3

This image was created using 3 off-camera flashes each spaced out about ~30 ft. from each other.
Justin Lin is not only one of the founders of Lin and Jirsa Photography and SLR Lounge along with business partners Chris Lin and Pye Jirsa but also a Profoto Legend of Light. In order to light up this long row of trees, Justin placed three Canon 600EX II-RT flashes behind the couple: one about ~90ft back at the end of the row, one ~60ft back and ~30ft one right behind the couple. The key to placing flashes this far back is to make sure they are feathered up so that there is less light spill on the ground.
Try out this technique and show us your images for a chance to be featured on the SLR Lounge Instagram! This is just one of 25 advanced off-camera flash techniques from our Lighting 3 course available in SLR Lounge Premium. Our Premium membership also contains our best-selling Lighting workshops designed to help you master off-camera flash and truly create unforgettable images.


Get Connected!