Literally 98% of our editing occurs in Lightroom using RPG Keys. Lightroom is extremely powerful making Photoshop necessary only on a handful of images in each wedding. This article will help you understand basic post production/color correction in Lightroom, an essential skill for today’s photographer. Keep in mind that post production is a very stylistic subject, what looks right to some may not to others. This article shows you how to color correct based on our style and preferences.
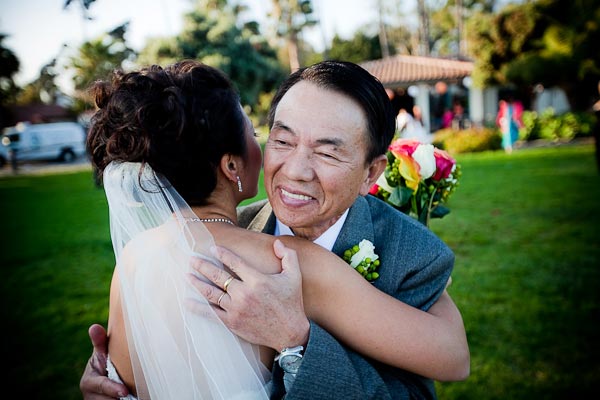
Below is an example of one of our RAW images taken directly from our Canon 5D Mark II. The image has been “zeroed out” meaning that all default Lightroom settings are set to 0 so you can see what it looks like in its pure RAW form. While it may look under exposed, this shot was actually nearly perfectly exposed, however in RAW form, everything will tend to look dark and murky until post produced.

Metadata – Canon 5D Mark II, EF 16-35mm f/2.8L II USM, 1/200 sec at f/2.8 at ISO 100
One quick note, if you are shooting in JPG mode, your camera will apply a default set of post production settings to your image file at the time of shooting. We shoot RAW simply because it is a more powerful file format, don’t let anyone tell you differently. A RAW file contains all of the tonal detail your camera has to offer, where as a JPG does not. This means that you can do much more in post production to a RAW image before affecting image quality than you can with JPG.
Also, regardless of whether you shoot RAW or JPG, your camera applies post production settings to each shot when you are previewing it on the camera LCD. So, don’t be surprised when images loaded onto your computer don’t look the same.
To get to the final image, I am going to perform a number of steps (using my workflow sequence), each described in detail below.
Step 1) Brightness +60 – I am going to start by raising Brightness to +60, this will give me a baseline to be able to add my other effects like Contrast, Blacks.

Step 2) Contrast +80 – Since the image exposure is close to correct, I am going to start by boosting Contrast to begin helping the image to pop. Now, I want to balance Contrast w/ Blacks to get the right pop. If I use too much contrast, skin tones can be too candied and contrasty, if I use too much blacks, I will kill detail in the shadows such as the hair. So I am going to start with +80 then fine tune if I need to after I add in my Blacks.

Step 3) Blacks +11 – Now I am going to bring up my Blacks a bit to make sure the black levels are truly black, and not a deep grey. You should see something like the image below now.

Step 4) Brightness +84 – Once I have adjusted my Contrast and Blacks, I can tune in the final brightness level. I am going to want to raise brightness a bit since Contrast and Blacks darkened the image.

Step 5) Temperature 5050 Tint -4 – Temperature and Tint often will affect the Brightness/Exposure of the image, so if you make a large change in Temperature you will need to adjust the Brightness/Exposure of the image. If the Temperature is way off to start with, I would recommend that be your Step 1 before adjusting Brightness. However, here we are just making a little adjustment to warm up the image slightly. Color temperature is a very subjective area, some people produce their images so skin tones are more yellow where as others border on the pink side. I prefer that my skin tones look very natural, with just a hint of warmth (yellow) to give them a nice sunglow.

Step 6) Clarity -25 & Recovery +50 – Now, since this is a close up shot of faces, I want to smooth out the lines and highlights on the fathers face. To do so, I am going to first bring my Recovery up to +50 which is going to tone down the highlights a bit, then I am going to reduce Clarity a bit which is going to smooth out the lighting as well as the lines on the father’s face, ultimately making him look younger. Be careful with Clarity, if it’s too low you will be killing too much detail, and if it’s too high you can end up showing too much detail and even outlining objects with black shadows.

Step 7) Lens Correction Amount -100 & Midpoint 50 – The final touch is to bring in a little artistic edge burning by applying a Pre-Crop Lens Correction vignette. This will bring focus from the outside of the frame into the subject, as well as provide a nice burn affect on the outside colors. Remember that Post-Crop and Pre-Crop (i.e. Lens Correction) Vignettes are different. Lens Corrections simply burn down or brighten the edges of the frame, where as Post-Crop Vignettes will add a black or white vignette to the frame.

Viola, you are done! Your image is now color corrected (in our books at least). While this may take you a bit of time the first few times, you should be able to get quite speedy at this process. With the aid of RPG Keys, we can produce over 500 image like this one per hour!
If you found this article helpful, we would ask that you let us know in the comments below. We are currently considering developing a full course and workshop for photographers on basic, advanced and artistic post production. So, let us know if you would be interested!


