New photographers — and even those with some experience — are often apprehensive about using manual mode on their digital cameras. Like using a smartphone to capture your memories, it’s convenient to simply point and shoot and let the camera work out the specifics regarding exposure. Is it really worth taking a chance to set the exposure manually only to potentially miss the moment? In a word, yes.
The creative potential that accompanies shooting in manual mode on your digital camera will push your skills (and the quality of your images) to the next level. The best part is that being in full control of your camera is really not so difficult. Like anything creative you want to learn, the more you practice, the better you become, the easier it gets, and the more you enjoy it.

Modern cameras come crammed with high-tech AI and tons of options. I was lucky to start with a camera that had none of this. I started out with my lovely old Nikkormat FTN, a Nikon that’s now 53 years old and still works fine. There is no auto anything on this camera. I had to learn to use ISO, aperture and shutter speed (also known as the exposure triangle) to obtain well-exposed photos. That’s all there is to it, just three settings.
Here are six tips to help you embrace using manual mode before your next shoot:
Tip 1: Commit to Mastering Manual Mode
I learned to touch type recently. I can now type without looking at my fingers (most of the time.) I started using a typewriter over thirty years ago, but I never bothered to commit to learning how to touch type. Using a computer, I’ve mainly used the mouse and a tablet. Once I committed to learning to not look down, it didn’t take me long at all. I took a few tutorials and practiced every day.
You can master manual mode on your camera the same way. Once you set your camera to manual and leave it there, you will be surprised at how naturally it comes to you.
Tip 2: Read Your Meter or Monitor

Well-exposed photos are made when the “right” amount of light is recorded by the electronic sensor or film. Your camera’s light meter or monitor will give you information about the exposure. All modern cameras have light meters. When you are in manual mode on many cameras you will see the influence of your exposure settings on the monitor as you make adjustments.

Essentially, all you need to do is make sure the meter is reading zero or the image is looking good on your camera monitor. You make this happen by adjusting the ISO, aperture and shutter speed controls.
Tip 3: Start With ISO
Putting a roll of film in my old Nikkormat, or any other film camera, determined the ISO. With digital cameras, this setting is far more flexible. ISO is the measurement of how sensitive the film or electronic sensor is to light.
ISO 400 is the setting I use most often. When the light is very bright I set it lower, to 100 or 200. When there’s not so much light, like inside or at night, I set my ISO to a higher number. At higher ISO settings, the quality of the image will deteriorate, so it’s best to keep it low.
Treat your ISO as the foundation of your exposure. Only adjust it when you need to based on your choice of aperture and shutter speed.
Tip 4: Adjust Shutter Speed To Control Movement
Your camera has a shutter in it. Like blinds or curtains, when it’s open it lets light in. The longer it is open, the more light comes in and affects the sensor or film. The shutter speed settings are measured in fractions of seconds or whole seconds.

When there is any movement in the scene you are photographing, your choice of shutter speed will also affect the outcome of the photo. When something in your composition moves during a long exposure, it will appear blurred in your photo. If your camera moves when you are using a slow shutter speed, the movement can also cause blurring.
Choosing a shutter speed of 1/250th of a second or faster is safe to avoid camera movement blur and subject blur unless your subject is moving quickly. Photographing subjects like birds flying, motor racing or boxing, for example, you will need to use a faster shutter speed to avoid motion blur.
Tip 5: Adjust Aperture To Control Depth of Field
Your camera’s lens has a diaphragm in it called the aperture. You can open or close this in varying degrees to let in more light or less light. The aperture settings are measured in f-stops.
The aperture you choose also affects how much of your photo is in focus. This is known as the ‘depth of field.’ When your aperture is open wider, letting in more light, there will be less in your photo in sharp focus. The amount in focus depends not only on the aperture setting, but on a number of other factors, including the following:
- The size of your camera’s sensor
- The lens you’re using
- The distance between the subject and your camera
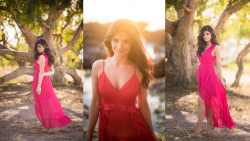
If you choose to use a very high f-stop, say f/22, less light will affect the sensor because the opening of the diaphragm is very narrow. At wider aperture settings, more light can enter the lens and affect the sensor. An aperture setting of f/2.8 on a 105mm lens will result in an out-of-focus background if you are close enough to your subject, as in the example below.

Tip 6: Balance The Exposure Using All Three Settings
Balancing the ISO, aperture and shutter speed settings is essential in creating well-exposed photos. This does not mean that you’re always going to balance the exposure to be neutral (as illustrated in tip #2 above). You might want to underexpose a scene to make it more dramatic, or your style might lean more towards the bright and airy look. Either way, you’re still going to have to balance the exposure to get the look you’re after. Learning to use the exposure meter to read the light well will enable you to make informed decisions and create the images you envision.
Camera exposure meters are calibrated to read from mid-gray. If you are photographing very light or dark subjects, the meter may not give you an accurate reading.
Dig Deeper
Once you get a taste of using manual mode, you may love it and want to dig deeper. You’ll feel more comfortable using your camera and you might just be amazed at the creative possibilities that present themselves when you have a better understanding of how ISO, aperture, and shutter speed affect the images you capture.
To learn more photography fundamentals like mastering manual mode, lighting, posing, and composition, check out our Photography 101 & Lighting 101 workshops.
Do you prefer using any of the other modes besides manual mode? If so, why? Let us know in the comments below.