As photographers, we’re not always able to schedule our shoots during golden hour in picturesque locations. Instead, we have to make the most of the conditions in which we are working. That’s just the way it goes. Luckily, we can learn to see and modify light with flash and modifiers and use our ability to pose subjects to create incredible portraits anywhere at any time.
In this article, we’re going to show you six of my favorite techniques for creating better images, regardless of the camera you’re using or the scene in which you’re working.
You can watch the video for these 6 tips below:
Okay, let’s dive in!
Technique #1: Place Subjects in the Brightest Part of Your Scene

Our focus is naturally drawn to the brightest part of the photograph. Therefore, when we place our subjects in the brightest part of the scene and let everything else create a natural vignette around our intended point of focus, our eyes are drawn right into the subject. Looking at the sample image above, you can see this technique in practice. To capture this scene, I lowered my stance a bit and place the subject (Dylan) right above the tree line and used the treetops to create leading lines right into Dylan. His head has been placed in the area of the sky that’s brightest. In post, we would just brighten the image slightly and use a radial burn to enhance the natural vignette that’s already present. See the image below for another example.

Bonus Tip: This technique also works for shooting close-ups.

Because I shot this close up using a wide-angle lens, I kept the subject (Shivani) in the center of the frame to minimize lens distortion, or at least use it to our advantage. When you shoot at a wide-open aperture on a prime (or other) lens (such as the Sigma 24mm lens I used in the image above), the lens automatically creates a natural vignette in the frame, which you can use to further direct the focus to your subject. When you use lens characteristics such as distortion and vignetting to your advantage, you can create a better image.
Technique #2: Narrow Your Crop

Sure, when you’re shooting in a beautiful location with perfect backdrops, you can shoot wide and let the environment play a key role in the portrait. What happens when you find yourself in the middle of a parking lot or street, however, in a less-than-ideal location? The best solution is to focus on the areas of the background that actually look good. Case in point: check out the image above. We captured this image on a sidewalk only a few feet over from a moving truck, which you can see in the behind-the-scenes image below:

Using lens choice and framing to selectively crop out what you don’t want to see in the image can go a long way toward creating a better photo. See the image below for another example:

The above image was created in a parking lot using a hedge that surrounded a power box. We simply chose an angle and focal length that allowed us to narrow our crop and reveal only the best parts of the scene. You can see the behind-the-scenes image of the parking lot photo below:

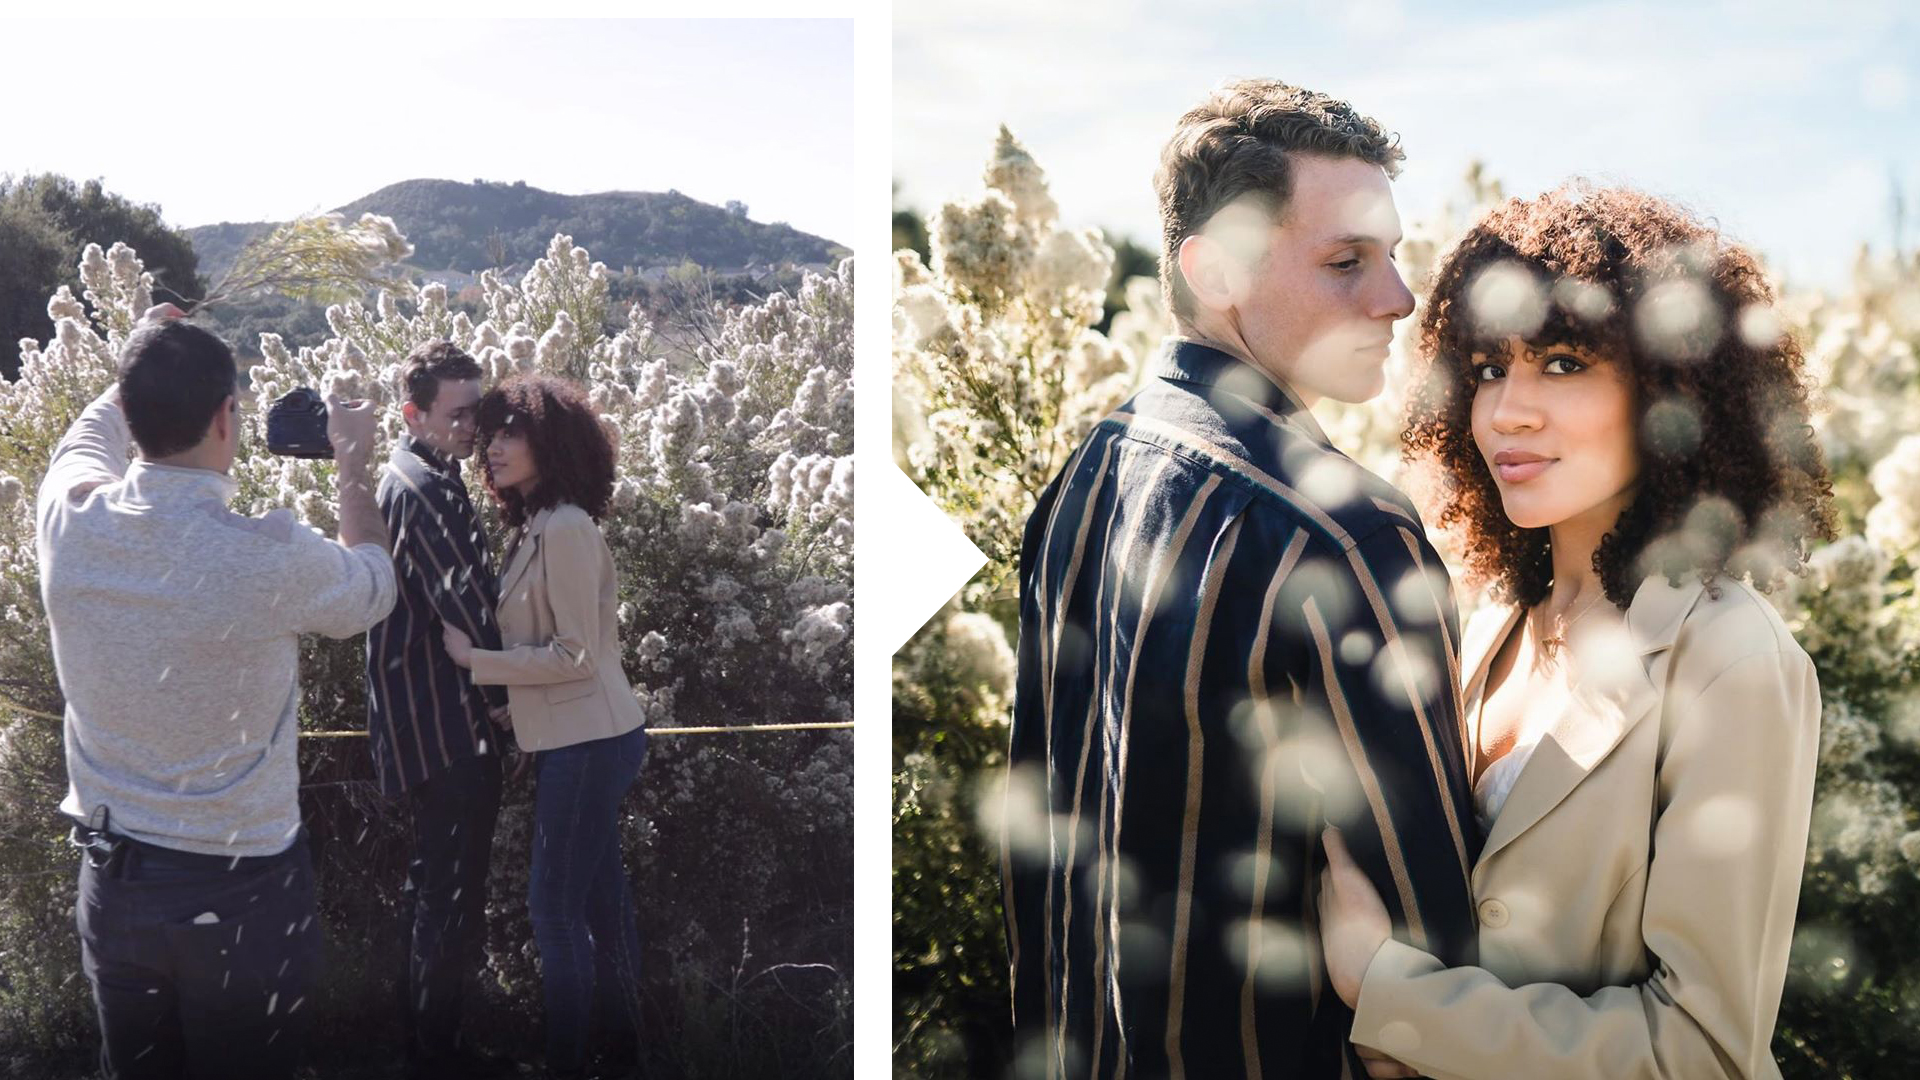
We used the same technique in the image below to crop out a rope and other elements of the scene that we wanted to conceal. We made sure to shoot tight and place them in a position so that they’d be backlit by the sun. For added effect, we shoot a tree branch to include falling particles in the foreground, which gave the image more depth.


Technique #3: Create Reflections to Conceal

Reflections can be used to enhance OR conceal elements in a frame to create a better photograph. Take the image above, which was also captured in our parking lot. We used a phone and an office window to create a reflection that in turn concealed the areas of the background that I felt weakened the frame. The model’s “second” reflection also creates a more compelling photo and makes creative use of the negative space in the frame. See the image below for a behind-the-scenes capture:

Here’s another example of this technique in practice, this time taken during a recent wedding I photographed. In this image, we photographed the bride while she was having henna applied. The background was pleasant enough, but I didn’t want to include too much of the ground and instead wanted to focus on the bride and the henna being applied to her arm, which can be seen in the frame. To add a creative flare to the photo, I used a mirror and placed it next to the lens and angled it to see the bride’s face in the reflection.

In the following example, I used this technique to simply enhance an already beautiful location. As you can see in the environmental shot below, the wedding ceremony site was beautiful on its own. Thanks to the incredible work put in by talented vendors, there was no real need to “conceal” anything.

However, we didn’t love the carpet in the room, so we wanted to capture the beauty of the room without having to feature the floor. To do this, I placed my camera lens just over my phone to take advantage of its reflective surface and highlight other elements in the room while also concealing the carpet. See the images below, which feature reflections I created using the phone.


Incorporating techniques like this into your professional shoots can make everyone look better, including all of the vendors you work alongside.
Technique #4: Show Motion
This is a technique that I feel photographers often forget to use. You don’t always need to freeze everything to get a tack-sharp or worthwhile image. Sometimes, showing motion can add a special quality to a photograph and make it better.

In order to create a shot like the one above, you’ll need to slow your shutter speed to somewhere between 1/5th and 1/20th of a second. For this image, I placed my camera on a tripod and directed the couple to walk into the center of the crosswalk and pose as soon as the light changed. Then, while standing in a safe spot away from the couple, I waited for the bus to go through the frame and I captured the photo. The couple had to stand very still and hold their pose in order to achieve this effect against the busy background.

The above photo uses a similar technique, but this time was created by blending together multiple photos. Because the crowd doesn’t always line up in just the right place at just the right time, I placed the camera on a tripod and took several long exposure photos as people passed by, which I later edited together as a composite using Photoshop.
[Related Reading: Create Amazing Composite Portraits in 7 Steps]
Technique #5: Cue the Action

Sometimes, it helps to cue the action. In addition to helping you capture great expressions, cueing the action can also allow you to freeze and incorporate other interesting elements into the moment. In the image above, for example, I asked dad to pull his daughters in tight, which elicited these beautiful, candid reactions and made for a special moment. The dynamic nature of the moment is more compelling than it would’ve been if the family was sitting still and simply smiling into the camera. There’s a place for those images as well, but this photo is more interesting to look at.

In the above image, I cued the action to capture a photo of my kids. Before I snapped the photo, I laid out some bread to get the birds grouped in a centralized location. Then, I asked the kids to run across the beach toward the birds, who quickly took off and created a frame around the kids while also adding more motion to the image. We did this a couple of times and the kids had a great time creating a collection of fun shots. Because of the circumstances of the shoot (we were kayaking along the beach and I only had my camera body and a 24-70mm lens), I wasn’t able to rely on bokeh or many of the tools & techniques I might normally use to create an interesting image. It goes to show that capturing compelling images is not about the gear, but more about the techniques you use to capture the moment.
Technique #6: Add Light and Color

I love adding light to a scene, and more specifically coloring the added light for creative effect. As you can see in the behind-the-scene image below, we were able to use a gel and two lights to add interest to an otherwise lackluster scene. We placed a red MagMod gel to the light that we used to light the background, which in this case happened to be a Profoto flash (you should be able to use whichever brand of flash and modifier you have to achieve a similar effect). We’re also using a second, un-gelled light in the front to illuminate our subject.

[Related Reading: Turn Any Boring Background into a Creative Portrait Using a Gel and Two Flashes]

We can also add light and color to enhance the existing color. For the photo above (which comes from our Lighting 101 workshop), we added a warm CTO gel to a standard on-camera flash and bounced the light off a reflector for more directional lighting. Then, when we cooled the white balance in post to adjust for the model’s skin tone, the blue hues in the scene took on an even deeper, richer shade of blue.
Conclusion
All six of these techniques can be incorporated immediately, regardless of the gear you’re using. In fact, the first five of these six techniques can be used with just your mobile phone. That’s what makes these techniques so fun and valuable.


