
I would consider myself to be a seasoned photographer. I’ve been seriously interested in photography since I was 12 years old and have been studying it since I was 14, working on the yearbook staff in high school. The silence and solitude of the darkroom was my sanctuary. Even though I never really considered a career in photography back then, basic photography classes in college were my favorite and I’ve continued to learn from workshops and online classes through the years.
When SLR Lounge released the Photography 101 Workshop DVD, I was excited to have a beginning class to recommend to my friends, but didn’t really think I had much to learn from a 101 level course. Surprisingly, the entire workshop was full of ‘Aha’ moments for me. Here are five surprising lessons I learned from Photography 101.
Native ISO and Image Quality

Of course, I already knew that the lower the ISO, the higher quality image you’ll get, as far as sharpness and noise are concerned. I did not, however, know the proper definition of Native ISO and how it can affect the quality of your digital image. Your camera has native ISO settings that are multiples of each other. On a Canon, like the Canon 5D Mark III that I use, the native ISO settings are 100, then 200, 400, 800 and 1600. On many older Nikon DSLRs, however, like the Nikon D700, the native ISO started at 200, not 100. Other cameras use ISO 160 as their base ISO, and others like the Nikon D810, use ISO 64.
Any ISO used on your digital camera that is not a native ISO, like 120 or 300 on the Canon, is being digitally enhanced by your camera and will decrease the overall image quality. So, it would actually be better to set your ISO at 400 instead of 300 on your Canon. You can read more about native ISO here: REASONS WHY YOU SHOULD SHOOT HDR IMAGES AT THE LOWEST NATIVE ISO SETTING
Focal Length Reciprocal Rule

I’m sure I had heard this rule before, but I have a hard time remembering technical mumbo jumbo, especially when numbers are involved. Luckily, Pye used a very good visual tool to help me remember the Focal Length Reciprocal Rule. What is the Focal Length Reciprocal Rule? Basically, to avoid camera shake (which can cause your images to end up looking blurry), if you’re hand holding the camera, your shutter speed should not be slower than the reciprocal of your effective focal length (but not lower than 1/50th of a second). What the heck does that mean????? In numerical terms, if you are using a 200mm lens, your shutter speed needs to be at least 1/200th of a second in order to avoid camera shake. If you’re using a 50mm lens, your shutter speed should be at least 1/50th of a second to avoid the blur. Make sense?
To fully understand why this rule works, a bunch of math and physics come into play, but when you see the visual used in Photography 101, you’ll just get it. Imagine you’re holding a 12 inch PVC pipe up to your eye. It’s not that difficult to hold it steady, right? Now try holding a 10 foot pole up to your eye. Can you hold it out there without any shaking? Well there you go. Longer lens equals faster shutter speed to avoid the shakes. You’ll never forget it now, will you?
Tips For Photographing Flowers

Everyone loves to photograph flowers, right? But they don’t always come out looking magazine worthy. I had a major ‘lightbulb’ moment when Pye brought out reflectors, scrims and a squirt bottle when photographing a bouquet of flowers outdoors.

No need for fancy flashes or off camera lighting, just controlling the available light for a proper exposure. What’s the squirt bottle for? To add that morning dew look to flowers that might not be so fresh. Awesome!
How to Hold the Camera While Panning

Pye demonstrates (quite hilariously, I might add), how to correctly hold the camera in various ways while panning and capturing motion. I never really had any formal training in this area. I guess we all kind of find a way to hold the camera that feels right, but I was surprised that I didn’t know any of these brilliant ways to use your body as a tripod. You’ll just have to buy the course and watch it to find out all these great tips and have a laugh at Pye’s expense. He even demonstrates proper sniper like breathing techniques. Oh, yeah.
The Hand Trick
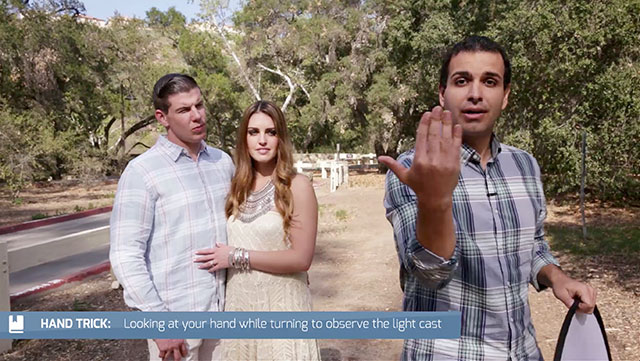
The hand trick is actually a technique we learn in the Natural Light Couples Photography DVD Workshop, but I always forget to use it. The hand trick basically helps you see the direction of light and how it affects the shadows on your subject. It can help you determine where to place your subject for the most flattering direction of light, or how you’ll need to modify the light if you place your subject in a specific location. This is an easy trick I’ll be using more often on my natural light, on-location shoots.
Have you downloaded Photography 101 yet? What’s your favorite tip you learned from the workshop?


Get Connected!