Learning something new can be difficult, especially if it’s Photoshop. I remember spending HOURS trying to figure out how to edit an image, googling YouTube videos and searching for tutorials to try and figure it out. I now have a rudimentary knowledge of the basics of Photoshop – enough to get me by and do some damage.
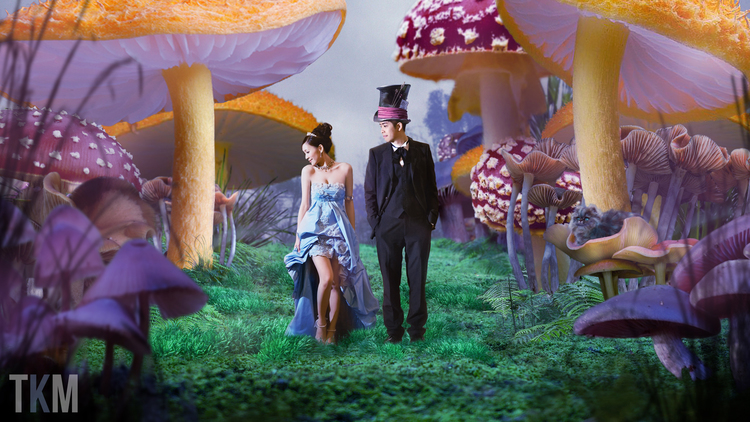
You might remember the work of Tanya Musgrave. The self-described Photoshop hobbyist created Planet Hoth for her newlywed couple which we featured in this article, along with her 3 minute time-lapse of the 12-hours it took to create the photo manipulation. When I spoke with Tanya about featuring her video, she mentioned that she was just commissioned by a groom in Hong Kong who had seen Tanya’s Hoth PS breakdown and wanted to surprise his wife with a photo manipulation with an Alice and Wonderland theme. I immediately called dibs on the project, and Tanya sent me the final images and video that you see below.
This second photo manipulation, Tanya reports, took about 12-hours (the same as the previous Hoth manipulation), but she learned quite a bit through trial and error and did save time in selection.


Tanya would be the first to admit that she is still learning the craft of photo manipulation and she welcomes any “kind and constructive criticism” as well as advanced tips. I asked her to provide a few photo manipulation tips/mistakes to avoid for the Photoshop Newbs like myself, and she gave me a few:
1. Use layer masks/adjustments when doing anything destructive (i.e. color, levels, “erasing” especially). Or just copy the layer beforehand so you have a backup. I made the mistake of doing a blur on one of the mushrooms and later wanting it sharper. I’m still researching on how to blur on an adjustment layer—suggestions welcome.
2. Refine edge after using the Quick Selection tool works well for selecting complicated edges; tutorials on Phlearn were invaluable. I’m still finessing my use of it because I often ran into the problem of the smart edge creeping into the middle of the image, so I’d end up having to paint it back in with the brush. Also used the pen tool for limited edges like the pins on [the groom’s hat – above], but it wouldn’t have worked very well to select the yellow mushroom, for example. It was a great learning experience for sure, but sometimes the trusty brush gets it done better (for me anyway).
3. Blending is probably the most common question I get. There are probably at least 5 steps I do for each layer to make it seem like they’re actually in their environment.
- Lighting – Making sure that the quality (soft or harsh) and the direction makes sense. For this particular one, I made the couple the focal point and chose to feature light emanating from the center. For some, it won’t sit well that the surroundings have a different light source than the couple, but that look seems to be quite common in high fashion, so I went with it. What wouldn’t have worked, though, is using a photo of the groom that had soft, subdued light.
- Color – I use Color Balance and Hue/Saturation (for more individual channels of color) to match the color to the surroundings.
- Edges – Sometimes the edges look way too stark against the background. For this, I might use refine edge, but using a brush at around 85% hardness helps to soften that.
- Environment – Getting your layer to interact with the environment is important, whether that’s adding a shadow, or putting grass in front. What I did for their feet and the bases of the mushrooms was to actually paint on their layer mask with a grass-shaped brush.
- Cohesive Atmosphere – As a whole, it matters that those layers blend with the rest of the piece, so usually I put a slight color tint over the whole shebang. On top of all your layers, fill a layer with a relevant color, set the blending mode to “Overlay” and turn the opacity down to say 50% depending on how stylized you want it. I also add some “mist” by painting a lighter color over bits of the entire piece, Gaussian blur it out at 100% and turn the opacity down to 30% or less.
Thanks for the tips, Tanya! You can see her Touch of Wonderland blog post here as well as see her work on her website.
Comment below if you have any advanced Photo Manipulation tips for Tanya Musgrave or me, the Photoshop newbie.


